I wanted to play along with this week's 52 Christmas Card Throwdown challenge and so I decided to make a tutorial as well. The challenge is to bring on the glitter glitz and use lots of glitter on our cards.
I have the directions posted below on how I made my background. My stocking was made and put together using the stocking builder punch. Along the top of the stocking panel I added some twine and a jingle bell attached to the stocking.
*card #22 out of 100 cards in 100 days goal
Stamps: Stitched Stockings, Curly Cute
Card Stock: Very Vanilla, Raspberry Ripple, Gumball Green
Ink: Raspberry Ripple, Gumball Green, VersaMark
Supplies: Ribbon, Twine, Jingle Bell, Rhinestone Gem, Dimensionals, Glue Dots, Heat Gun, Iridescent Ice Embossing Powder, Embossing Buddy, Big Shot, Snowburst Embossing folder
Technique: Dry Embossing, Heat Embossing, Punch Art
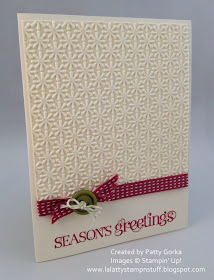
Here's another card I made using the same technique (shown below) and this time I decided to leave my embossed background untouched. I simply added a ribbon with a button for my embellishment.
*card #23 out of 100 cards in 100 days goal
Stamps: Curly Cute
Card Stock: Very Vanilla
Ink: Raspberry Ripple, VersaMark
Supplies: Ribbon, Button, Twine, Glue Dots, Heat Gun, Irridescent Ice Embossing Powder, Embossing Buddy, Big Shot, Snowburst Embossing folder
Technique: Dry Embossing, Heat Embossing
It's really important that you use your embossing buddy to remove any static that could be on your card stock. You do not want the glitter sticking in places where you didn't want it.
Next, I inked up my embossing folder using my VersaMark ink pad. Before you ink up your folder you will need to decide which side of the folder you would like to be your glittery back ground. When you are finished to clean your embossing folder simply run it under some warm water, pat it dry and leave it out to dry completely.
And then I placed my card stock inside my inked embossing folder. Here I decided to only emboss the upper portion of my card.
Then run it through your big shot machine like you normally would.
As soon as your card stock is embossed you will want to sprinkle your iridescent embossing powder all over your card stock. Be sure to tap off the extra powder.Then all you need to do is to heat emboss you card stocking using your heat gun. You will see the powder melting and as your heating your gun
I tried to post a photo of how glittery my background turned out. You might be a me to see it here a little bit.
In this photo below you can really see the glitter on my background.
Contact me today if you would like to place an order or to be added onto my mailing list!
My Stampin' Up! Website- http://www.stampinup.net/esuite/home/lalatty/
To place your Stampin' Up! order- http://www.stampinup.com/ECWeb/default.aspx
My email address- pebbles4@ptd.net


Thanks for the tutorial Patty, I'm going to give this a go!
ReplyDeleteLouisex
Hi Patty - thanks so much for sharing this glittering technique - what a great idea. Your cards are stunning - thanks for joining in at 52CCT this week - Jacqueline xx
ReplyDeleteJust gorgeous Patty! What a wonderful technique for adding lots of seasonal sparkle to a festive card - thanks so much for the clear instructions of your tutorial!
ReplyDeleteThanks so much for sharing your lovely card with us at 52 CCT! Ruth x
Thanks Patty for the tutorial. I tried it - but it wasn't too sparkly with just the VersaMark on the folder, so I added more VM and "ice" and heated it again and it turned out great! :-)
ReplyDeleteOh my word, Patty!!!! This is amazing!!! Love this technique and will be using it soon! Thanks for joining us at 52CCT! ;-)
ReplyDeleteHmmm...great idea!! I love it!
ReplyDeleteHow would you clean your embossing folder to get the versamark off?
ReplyDeleteKrista- That's a great question! I've edited my post to include this- When you are finished to clean your embossing folder simply run it under some warm water, pat it dry and leave it out to dry completely.
ReplyDeleteYou always make the best cards Patty!
ReplyDeletegreat tut...and fabu cards...i MUST get that embossing folder!
ReplyDeleteOMG Patty!!!. For how long have I been gone???. Beautiful cards, specially this one. Love your Christmas cards. I can't wait to made the one for our challenge and add another one to my pile.
ReplyDeleteWhat a neat idea. I'm going to have to try this. Thanks for sharing!
ReplyDeleteWhat a fun technique. Can't wait to try it. I pinned it for future reference,
ReplyDelete