May 20, 2011

Hi everyone!  Thank you for being so patient with me.  I've been really busy these past few weeks, but slowly I am catching up on the things I need to get finished, but I wanted to stop in to let you all know that I'm still here and I'll be back on Monday.  Have a great weekend!


Contact me today if you would like to place an order or to be added onto my mailing list!
To place your Stampin' Up! order- http://www.stampinup.com/ECWeb/default.aspx
My email address- pebbles4@ptd.net
Pin It

May 4, 2011


Hi everyone!  I just wanted to remind you all if you would like to receive my newsletters please send me an email with your name and email address and I will add you to my list.  My email addreess is posted at the bottom of this post.

Remember our Stampin' Up! Summer Mini catalog is now posted and the items are available for ordering from now until August 31st.  Feel free to contact me for more details or to view the catalog click here.

Today I'm sharing with you another card I made for my class this past Saturday.  This is a Mother's Day card we made.  My background is embossed using clear embossing powder and the flower part of the hydrangea stamp.

The rest of my card was really quick and easy to make.  I inked up the flower portion of my stamp using my poppy parade ink pad and the stem portion of my stamp I inked up using my pear pizzazz ink pad and then all I did was stamp the image onto my card stock.  It's not always easy to ink up an image this way, but with this particular image it's pretty easy.

The decorative paper I used has the top 1/4" folded over- I often times do this.  My sentiment was stamped and punched out using my wide oval punch and I placed it onto my card using dimensionals.

I hope you like my card!  Thanks for stopping by!  Have a great rest of the day.

Stamps:  Because I Care, Well Scripted
Card Stock:  White, Poppy Parade, Pear Pizzazz
Ink:  Poppy Parade, Pear Pizzazz, VersaMark
Supplies:  Ribbon, Wide Oval Punch, Clear Embossing Powder, Heat Gun, Embossing Buddy, Dimensionals
Technique:  Heat Embossing

Contact me today if you would like to place an order or to be added onto my mailing list!

To place your Stampin' Up! order- http://www.stampinup.com/ECWeb/default.aspx
My email address- pebbles4@ptd.net
Pin It

May 3, 2011


Good Evening!  I want to thank you all for being patient with me these past two weeks.  I have been really sick and as a result I have not been posting much.  I'm feeling better today, but I still have my cold.

I wanted to share with you one of the cards I made for my class this past Saturday.  We made Father's Day and Mother's Day cards.  I used the Stampin' Up! set called Uncharted Territory, what a great set for all sorts of masculine cards.

I began making my card by first making a mask of the lighthouse.  To make a mask you first need to stampin your image onto a scrap piece of card stock and then cut it out.  Then I placed my cut out lighthouse over top of the stamped lighthouse image on my card.

Next, I began sponging by background.  I first started with the pacific point ink - sponging heavier along the top of the sky and then sponging lighter but not all the way down to the ground and sea area- you'll want to leave that part untouched.

Using daffodil delight ink I very lightly sponged just below my blue area towards the bottom of the ground and sea area.  And then I sponged just above the ground area using pumpkin pie ink.  I was very careful when sponging with the daffodil delight and pumpkin pie ink because it's hard to fix it when the ink is too dark, but if it's too light you can always sponge a little bit more.

The sea, part of the lighthouse, and ground part of my stamped image were water colored using my Stampin' Up! water color crayons and a blender pen. 

And finally to finish off my card I added three brads on the left hand side and stamped my sentiment in the upper right hand side.  My image panel is adhered to my card using dimensionals. 

I know it sounds like a lot to make this card, but really it's not.  Just some simple sponging and a little bit of coloring and you can have yourself a great Father's day card too!

Thanks again for stopping by and I'll be back again tomorrow with another card from my class.  Have a great evening!

Stamps: Uncharted Territory, Well Scripted
Card Stock: White, Confetti Cream
Ink: Black Stazon, Pacific Point, Daffodil Delight, Pumpkin Pie
Supplies: Brads, SU Mat Pack, Paper Piercing Tool, Stampin' Up! Water Color Crayons, Blender Pen, Scissors, Stamp-a-ma-jig, Dimensionals
Technique: Sponging, Masking, Water Coloring

Contact me today if you would like to place an order or to be added onto my mailing list!

To place your Stampin' Up! order- http://www.stampinup.com/ECWeb/default.aspx
My email address- pebbles4@ptd.net
Pin It

April 26, 2011


Hi everyone! Today I decided to try out Stampin' Up's new Doily triple layer punch. I used this punch for punching out my flower images and to layer behind them. I also used this punch to create my punched border along the bottom of my card. I have posted a few photos to show you how I created my card.

I made this card for this week's splitcoast clean & simple challenge in which we were to create a card using the 'rule of 3' meaning that we needed to have 3 of something on our cards. I'm also submitting this card for the Stampin' Up! only challenge blog found here. For this challenge we were to create Mother's day cards.

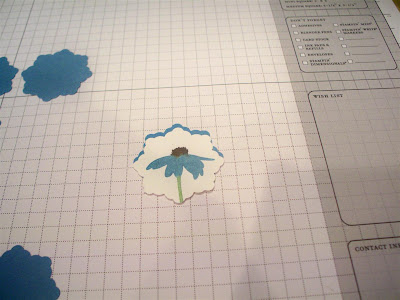
I began by punching my card stock for my border.  Here I needed 5 punch outs and I used the 3rd position of my Doily Triple Layer Punch.  I used a scrap piece of card stock so that's why my top part is cut off- not to worry you won't see that part anyway.

Here I simply placed the punch outs together.  I didn't even worry about trying to glue them together.  The adhesive in the next step will be enough.  I used my grid paper to help me line up the punch outs.

I placed my adhesive along the bottom portion of my white card stock and then all I needed to do was to neatly lay it on top of my punch out pieces.

Next, all you need to do is to trim off the excess card stock along the ends.  I used my paper snips for this and that's all there is to creating a border using your triple layer punch!

Now for my flower images.  I used the smallest flower image on my Inspired by Nature flower stamp.  I simply colored that part of the stamp using my SU markers and then I stamped it onto my card stock. 

Next, I punched out the flower using my Doily Triple Layer Punch (in the first position).  I did this for a total of three times.  Then to create my background layer I needed to punch out 6 peices of Marina Mist card stock.

Once I had all my pieces punched out it was time to start putting them together.  I positioned my flower image layer on my Marina Mist background so that just a little bit of the border was showing along the top portion.

Then I took another Marina Mist punch out and I placed that piece just along the bottom part of my stamped image so that just a bit of the border would be showing.  Both pieces of Marina Mist card stock will overlap each other on the back side, but you won't see that part once your card is completed.


And here is my finished card.  My three flowers are raised up using SU dimensionals.  The upper portion of my background was embossed using my Big Shot and my Polka Dots embossing folder.  My Mother's Day sentiment is from the hostess stamp set called Something to Celebrate.

Thank you so much for stopping by.  I hope you liked my card!  Have a great rest of the day.  It's getting warm here today and I'm just about to turn on the air conditioner.

Stamps: Inspired By Nature, Something to Celebrate
Card Stock:  White, Marina Mist, Wild Wasabi
Ink: Early Espresso
Supplies: Ribbon, SU Markers, Doily Triple Layer Punch, Big Shot, Polka Dots Embossing Folder, Dimensionals, Stamp-a-ma-jig
Technique: Dry Embossing

Contact me today if you would like to place an order or to be added onto my mailing list!

To place your Stampin' Up! order- http://www.stampinup.com/ECWeb/default.aspx
My email address- pebbles4@ptd.net
Pin It

April 22, 2011


Hi everyone!  Today I made this card for the Stampin' Up! only blog challenge found here.  For this challenge we were to create a Mother's Day card.  I decided to use my new Blossom Bouquet Triple Layer Punch and so I have a turtorial to share with you on how I made my flower.  It's really easy, but I have a lot of photos to show you step by step how I made my flower.

The rest of my card was simple to make.  I added two rows of paper piercing along the top and bottom of my card and I stamped and cut out a butterfly and placed it to the left and just above my sentiment.  My decorative paper is folded over along the top and that's about it!

I won't be around for the next few days because of the Easter holiday, but I'll be back early next week.  I'd like to wish all of you a Happy Easter!  Thanks so much for stopping by and I hope you like my turtorial.


This is a picture of the three punched out pieces I made my flower with. Here I used 2 punch outs that are decorative paper and one is so saffron card stock. I added a few dots on my punch outs. I placed my white punch out on top of my so saffron card stock so that you could see it better.


I began forming and folding my flowers in the direction I wanted them to be. This punch out is my bottom layer so I am folding it so that my saffron side will be the raised part.


I am doing the same thing in this photo except this punch out is my top layer and I am working the card stock so that this part of my flower will become cupped. You will want to work the card stock to sort of break up the fibers. 


My next step was to actually use the end of a brand new pencil to help me cup my punch outs. Don't worry you won't ruin your flowers, this just helps to break up the card stock fibers and form the card stock into the shape you want it. You will not see the center so don't worry about any marks left by the eraser or metal part of the pencil.


Here's another photo of me doing the same thing with my top flower layer. I placed the pencil eraser in the center of my punch out and then I sort of wrapped it around my eraser.


This is what your punch outs will look like once you have finished forming them in the direction you would like them. They can be formed so that your flower appears cupped outward or inward.


My next step was to place my three layers together using my SU glue dots. I only used one glue dot in the center of my layers. With the flower I am making I have my bottom layer cupped downward and my two top layers cupped upward.


Next, I tied some linen thread through the button holes of my button and then using another glue dot I placed my button in the center of my flower.


At this point your flower is all but finished. All you need to do is to use some SU dimensionals to adhere your flower onto your stamped image layer or your card. I took this photo to show you how I use my SU dimensionals to give more of a 3-D appearance. In this photo I placed one dimensional in the center of the back side of my flower.


And here I placed another SU dimensional on top of my first one. I layered my dimensionals to help raise up the center of my punched flower. I ended up using a total of 3 dinemsionals on my punched flower.


Then all you need to do is to place your flower wherever you would like it. Here I have it towards the top of my stamped flower stem.


And this is a photo of my finished card.

Stamps:  Bold Blossom
Card Stock: White, So Saffron, SU DP
Ink: Black Stazon, Pear Pizzazz
Supplies: Ribbon, Blossom Bouquet Triple Layer Punch, Scissors - for cutting out the butterfly, SU Mat Pack, Paper Piercing Tool, Stamp-a-ma-jig, SU Marker- for making the dots on my designer paper & my card stock, Glue Dots, Dimensionals, Button, Linen Thread
Technique: Paper Piercing

Contact me today if you would like to place an order or to be added onto my mailing list!

To place your Stampin' Up! order- http://www.stampinup.com/ECWeb/default.aspx
My email address- pebbles4@ptd.net
Pin It

April 21, 2011


Hi everyone! Today I have another Easter card to share with you. I apologize again for my photo not being as nice as I would like it. I do not have the card to retake the photo because my son gave this card to his speech therapist for Easter, I hope she liked it!

I stamped the chick image for a total of three times. The first one is my main image that I stamped onto my white card stock and then I colored the chick and I made some grass along the feet using my SU markers. My next two images were stamped onto my decorative paper so that I could paper piece the egg part. I simply stamped the image onto my decorative paper and then I cut out the egg shell portion of my image and one I placed over top of the chick and the other one I placed next to the chick along the grassy ground area.

The borders of my pretty in pink card stock were punched using my scallop trim border punch and my scallop trim corner punch. Here is a wonderful tutorial from Gretchen's blog showing how you can do this too.

Thank you for taking the time each day to stop by and for leaving a comment for me. I truly appreciate it! Have a great rest of the day! See you tomorrow!

Stamps: A Good Egg
Card Stock:  White, Pretty in Pink, Certainly Celery, SU DP
Ink: Black Stazon
Supplies:  Ribbon, SU Markers, Stamp-a-ma-jig, Scallop Trim Border Punch, Scallop Trim Corner Punch
Technique: Paper Piercing

Contact me today if you would like to place an order or to be added onto my mailing list!

To place your Stampin' Up! order- http://www.stampinup.com/ECWeb/default.aspx
My email address- pebbles4@ptd.net
Pin It

April 20, 2011


Hi everyone!  First, I must say thank you for bearing with me while I wasn't feeling well these past few days.  I have a few more cards to share with you this week and then I will be taking a few days off from blogging during the Easter holiday.  My husband and children will both be home and it's hard to find stamping time with everyone here.

This is an Easter card that I made for my Easter card class.  I'm sorry the photo of my card isn't the best, but I do not have this card anymore to retake the picture.  My son gave it to his teacher today for Easter.

This is the stamp set I used to make my card, it's called 'So Cute'.

I stamped the bunny image three times and then punched it out using my large oval punch.  Each image is layered onto pretty in pink card stock that I punched using my scallop oval punch.  I colored the images using my Stampin' Up! markers.  The bunny ears are pink and each bow is colored using a different color.

My Happy Easter sentiment is from the 'A Good Egg' stamp set and I punched that out using my word window punch.  And that's about it, quick and easy!

I have one more Easter card to post tomorrow so be sure to stop by!  Have a great rest of the day!
Stamps:  So Cute, A Good Egg
Card Stock:  White, Pretty in Pink, SU DP
Ink: Black Stazon
Supplies: Ribbon, Markers, Large Oval Punch, Scallop Oval Punch, Word Window Punch

Contact me today if you would like to place an order or to be added onto my mailing list!

To place your Stampin' Up! order- http://www.stampinup.com/ECWeb/default.aspx
My email address- pebbles4@ptd.net
Pin It

April 19, 2011

Hello everyone!  I haven't been feeling well these past few days and so I've been absent from my blogging.  I'm a bit better today and trying to catch up with some of my posts. 

The card I am posting today I made for the index gallery on splitcoast stampers so this card will not show up in my splitcoast gallery, but I can post it here on my blog for you all to see.

Since this card was for the gallery index I kept it more plain and simple.  I colored the stamp using my SU markers.  I used rose red, wild wasabi, and soft suede.

My decorative paper isn't really decorative paper.  It's rose red card stock that I just added a few dots onto using my white gel pen.  And my ribbon is actually white grosgrain ribbon that I colored using my wild wasabi maker. 

I hope you like my card and thanks so much for stopping by.  I have a few Easter cards that I will be sharing with you this week so be sure to check back!  Have a great rest of the day!

Stamps: Hello Blossoms
Card Stock: White, Rose Red
Ink: None
Supplies: Ribbon, White Gel Pen, SU Markers

Contact me today if you would like to place an order or to be added onto my mailing list!

To place your Stampin' Up! order- http://www.stampinup.com/ECWeb/default.aspx
My email address- pebbles4@ptd.net
Pin It

April 13, 2011


Good morning!  It's a rainy day here today in PA and my little one is down for her nap already so I had some time to try out the new triple layer punch from Stampin' Up!  There are 2 triple layer punches in the new summer mini catalog and I couldn't resist so I had to buy both of them and I'm so glad I did.

I decided to make an Easter card with my flower punch today.  The triple layer punches are so easy to use.  All you need to do is to slide the button over to which ever punch out you would like. I decided to use the solid and the flower punch outs to make my flowers.  So basically I punched out the flower pieces and then I layered them together.  I added some dots using my white gel pen and my chocolate chip SU marker.  The center part of my flower is one of the small punches from the SU itty bitty punch pack.

My flower stems were stamped using my stamp-a-ma-jig to help me line them up nicely.  The stamp set I used for the flower stems is called Bold Blossom and it is available right now in our current mini catalog.  My sentiment is from a retired set called well scripted.

To finish my card all I needed to do was to add my pretty in pink ribbon.  I hope you like my card today!  Thanks so much for stopping by, I'd love to have you follow me on my blog.  Have a great rest of the day!

Stamps:  Bold Blossom, Well Scripted
Card Stock: White, Pretty in Pink, Certainly Celery, Bashful Blue, SU DP
Ink: Chocolate Chip, Certainly Celery
Supplies: Ribbon, Blossom Bouquet Triple Layer Punch, Itty Bitty Shapes Punch Pack, White Gel Pen, Stamp-a-ma-jig, Glue Pen, SU Chocolate Chip Marker

Contact me today if you would like to place an order or to be added onto my mailing list!

To place your Stampin' Up! order- http://www.stampinup.com/ECWeb/default.aspx
My email address- pebbles4@ptd.net
Pin It

April 12, 2011


Hello everyone I'm sorry my post is later today, it's been a busy couple of days. I received my preorder yesterday and I couldn't wait to share this card with you that I made using one of our new stamps. This stamp is called Hello Blossoms and it is from the new summer mini catalog which will be available to order on May 1st.

I didn't use any ink pads to create my card, instead I used my Stampin' Up! markers to color the stamp. It took a little bit to color the flowers, stems, and letters, but all you need to do once you have colored you stamp is to 'huff' to remoisten the ink on your stamp and then stamp it onto your card stock.

I was trying to come up with a little bit different layout and I like the way my card turned out. Just along the bottom portion of my card I added three rows of paper piercing using my SU mat pack and paper piercing too. I almost always add ribbon on my cards and so on this card I decided to add my ribbon just along the side of my stamped image.

Well, that's about it for today!  Be sure to stop by tomorrow because I just got my triple layer punches and I'm going to post a card I made using them.  Have a great evening!

Stamps: Hello Blossoms
Card Stock: White, Pretty in Pink, Certainly Celery, SU DP
Ink: None
Supplies: Ribbon, SU Markers, White Gel Pen, Scalloped Border Punch, SU Mat Pack, Paper Piercing Tool
Technique: Paper Piercing

Contact me today if you would like to place an order or to be added onto my mailing list!

To place your Stampin' Up! order- http://www.stampinup.com/ECWeb/default.aspx
My email address- pebbles4@ptd.net
Pin It

April 8, 2011


Hi everyone!  This is the second card I made for my CAS clean & simple birthday card swap.  I wanted this card to be simple, simpler than the cards I usually make.

For my stamped flower image, I inked up the flower part of the stamp using my brocade blue ink pad and then I carefully inked up the stem part of the stamp using my pear pizzazz ink pad and then all I needed to do was to stamp it onto my card stock, so quick and easy.

I chose to use a spiral clip with a small piece of ribbon tied on it for my embellishment as well as some dazzling diamonds glitter.  My flower image is really glittery in person and that little bit of glitter makes all the difference, what a great way to dress up a card without a lot of work. 

The because of you is a current level I hostess set and the sentiment I used is from a current level II hostess set in the mini catalog called something to celebrate.

I would love to have you follow my blog!  I will be offering some Stampin' Up! blog candy once I reach my goal of 200 followers.  I haven't quite decided yet what it will be; I want to wait to see which catalog will be current at the time and pick something from there.

Have a great weekend and thanks for stopping by!

Stamps:  Because I Care, Something to Celebrate
Card Stock: White, SU DP
Ink: Borcade Blue, Pear Pizzazz, Black Stazon
Supplies:  Spiral Clip, Ribbon, Dimensionals, 2 Way Glue Pen, Dazzling Diamonds Glitter, Stamp-a-ma-jig

Contact me today if you would like to place an order or to be added onto my mailing list!

To place your Stampin' Up! order- http://www.stampinup.com/ECWeb/default.aspx
My email address- pebbles4@ptd.net
Pin It

April 7, 2011


Hi everyone! Here is another swap card I made, but this time this swap card was made for my swap. I am currently hosting a CAS clean & simple birthday card swap.  The cards were due to me yesterday so I'm almost finished hosting that swap and I've since started a Christmas in July CAS clean & simple card swap.  If anyone might be interested in joining that swap feel free to send me an eamil and I will give you the details on how to sign up.

I decided to keep my CAS birthday card a bit more CAS then I usually do.  This card literally only took me a few minutes to create and I love the results.  I used a retired Stampin' Up! stamp set call Dream a Little.  This is the first time that I used this stamp set so I wanted to give it a try.

I stamped the flower images onto my white card stock and then I colored them using my Stampin' Up! markers.  Next, I stamped my birthday sentiment in the upper left corner, I added one rhinestone jewel for the dot of the letter i in the word birthday, and then I punched my corners using my ticket corner punch.

I almost always add ribbon on my cards and so this card was no exception.  For my ribbon treatment, I decided to add two small tabs on the right side. 

I hope you like my card and thank you for taking the time to stop by.  Remember, I'm offering Stampin' Up! blog candy once I reach my goal of 200 followers, so please spread the word!

Stamps: Dream a Little, Well Scripted
Card Stock: White, SU DP
Ink: Black Stazon
Supplies: Ribbon, Rhinestones Jewel, SU Markers, Ticket Corner Punch

Contact me today if you would like to place an order or to be added onto my mailing list!

To place your Stampin' Up! order- http://www.stampinup.com/ECWeb/default.aspx
My email address- pebbles4@ptd.net


Before I sign off for today, I have some not so good news to share with all my blog friends.  My family and I lost our cocker spaniel, Pebbles last night.  She was just two months shy of her 15th birthday.  I took this picture of her about two weeks ago. 

She was such a wonderful dog and we miss her already, *sniff sniff* but my family and I know she is at peace now and no longer suffering since she was diagnosed with kidney disease just two months ago.  I have already received several messages from some of you and I wanted to say thank you for your thoughts and prayers for my family and me.

Pebbles  6/6/1996 - 4/6/2011
Pin It