Medallion Wreath


I bought this medallion stamp awhile ago just because I wanted to try and make a wreath card with it.  This was really easy to make and it would make great Christmas cards because they can be reproduced so quickly.

I used my 1 3/4" circle punch to create a mask and mask off the center of this medallion stamp.  I placed the punched out circle over my stamp, then inked up my stamp, removed the mask and then I stamped my image onto my card stock base.  The image doesn't quite fit onto a card front, but I think it still works.

I used my raspberry ripple marker to color in some of the white dots on my 'wreath' and then all I did was add a bow.  I used some glue dots to hold the ribbon in place and to finish my card I just stamped my sentiment in the center of the wreath.  Easy peasy!

I've had a busy week, but I promise I will be posting more cards within the next few days and I'll be making a glitter video too!  Have a great rest of the day!

*card #78 out of 100 cards in 100 days goal

Stamps: Medallion, Occasional Quotes
Card Stock: White, Raspberry Ripple
Ink: Gumball Green, Raspberry Ripple
Supplies: Ribbon, Glue Dots, 1 3/4" Circle Punch, SU Raspberry Ripple Marker
Technique: Masking
Contact me today if you would like to place an order or to be added onto my mailing list!
To place your Stampin' Up! order- http://www.stampinup.com/ECWeb/default.aspx
My email address- pebbles4@ptd.net
Pin It

Clean & Simple Sketch


I made this card for the Clean & Simple stamping blog sketch challenge found here.  I posted a picture of the sketch below.  This was a really easy card to make.  I used the leafy tree stamp from the Stampin' Up! stamp set 'Thoughts & Prayers' and I just stamped the image along the side of my card.  An easy way to do this without getting the lower portion of the tree is to ink up your stamp and then cover the part of the image you do not want on your card (I taped on a small piece of card stock over the lower part of the tree).

I decided to punch out a few small pretty in pink flowers and I added some pearl centers and then I placed them onto my card and that's about it!  Quick and easy!

*card #77 out of 100 cards in 100 days goal

Stamps:  Thoughts & Prayers
Card Stock:  Pretty in Pink, Chocolate Chip, White
Ink:  Chocolate Chip, Lucky Limeade
Supplies:  Trio Flower Punch, Basic Pearls, Stamp-a-ma-jig, Glue Dots

Contact me today if you would like to place an order or to be added onto my mailing list!
To place your Stampin' Up! order- http://www.stampinup.com/ECWeb/default.aspx
My email address- pebbles4@ptd.net
Pin It

Twisted Tuesday ~ Cooler Theme


Good morning!  It's time for another Twisted Tuesday challenge and this week's challenge is to create something cool.  With autumn around the corner, cooler temps are on my mind you can interpret this theme anyway you like and the twist this week is to sponge some edges.

I decided to use my Cold & Cuddly stamp set and my inked edges are the ink around the ice and around the edges of my card base.  My card was really easy to make, I simply stamped and cut out the images. The coffee mug was a little tricky so for that I inked up the wavy steam part of the image and stamped it onto my card base and then I was able to stamp and cut out the mug image and place it just under the steam.  I did it this way because it was too hard to try and cut around the steam- I guess you could just draw it on your card too.

The bottom of my dsp was punched using my scallop border punch and then I added my ribbon.  I decided to stamp and punch out my sentiment and then I tied the twine over top of my ribbon knot.  I did use one dimensional to help hold my sentiment in place.

It's hard to see in my photo so I wanted to mention that I put some dazzling diamonds glitter on the ice.

Be sure to take a minute and check out the other DT member's cards!  By the way Melina is having a design team call for her Twisted Tuesday's Blog.  If you would like to apply you can find more information about that here.  Have a great day!

*card #76 out of 100 cards in 100 days goal

Stamps:  Cold & Cuddly
Card Stock:  White, Marina Mist, Subtles Designer Series Paper Stack
Ink:  Marina Mist, Crumb Cake
Supplies:  Ribbon, Twine, Small Oval Punch, Scissors, Sponge, Scallop Border Punch, Dimensional, Tombow Multi Glue, 2 Way Glue Pen,  Dazzling Diamonds Glitter
Technique:  Sponging

Contact me today if you would like to place an order or to be added onto my mailing list!
To place your Stampin' Up! order- http://www.stampinup.com/ECWeb/default.aspx
My email address- pebbles4@ptd.net
Pin It

Clean & Simple Sketch

Hi everyone!  I've had a busy weekend, but I wanted to take a few minutes to make a card for this week's Clean & Simple Stamping blog.  This week's sketch is a great one; in fact I guess you could say I cheated.  I loved the sample card so much that I decided to case it.  Her card reminded me of my Array of Sunshine stamp set that has yet to see any ink and so today I inked it up!

I stamped and cut out the flowers and I ended up only cutting out one of the leaves.  The other two leaves I was able to simply stamp, so that saved me some cutting.

The upper portion was stamped using the French Script background stamp.  To create this portion I used a scrap piece of very vanilla card stock and I cut (by hand) the three large scallops that follow the sketch.  Then I placed my stamped, French script card stock onto my very vanilla image panel.  Cutting out the scallop outline also helped me to know exactly where I should place my cut out flowers.

The middle flower has a small center flower cut out and placed on top using a dimensional.  I added one basic pearl in the center of the middle flower and then I stamped my embellishment.  Below is a picture of the sketch for this challenge.  Thanks so much for stopping by, enjoy the rest of your weekend!


*card #75 out of 100 cards in 100 days goal

Stamps:  Array of Sunshine, Well Scripted, French Script
Card Stock:  Very Vanilla, Primrose Petals, Gumball Green
Ink:  Primrose Petals, Gumball Green, Crumb Cake
Supplies:  Scissors, Basic Pearls, Stamp-a-ma-jig, Dimensional
Contact me today if you would like to place an order or to be added onto my mailing list!
To place your Stampin' Up! order- http://www.stampinup.com/ECWeb/default.aspx
My email address- pebbles4@ptd.net
Pin It

52 Christmas Card Throwdown ~ Chipboard


Good Morning!  This week's 52 Count Christmas Card Throwdown blog challenge is an embellishment challenge and the embellishment we are using is chipboard.  I didn't have any chipboard, so I had to think outside the box a little bit.

No chipboard, no problem!  I simply saved an empty cereal box and cut it apart and I ran the cardboard through my big shot machine using my snowflake die.  Then using the same snowflake die I cut some silver glimmer card stock and I placed that on top of my cereal cardboard cut out.  Worked like a charm!  I now had a chipboard snowflake to create a card with.  And just to show you that I really did cut a die out of a cereal box I took a photo and I posted below.

I began making the background of my card by first cutting a piece of white card stock 4" x 5 1/4".  Then I took a labels collection die and placing it towards the top of my card stock and I ran it through my big shot machine.  Then I took a scrap piece of real red card stock and using my petals-a-plenty embossing folder I ran it through my big shot machine.  Once I was finished with that I placed the dry embossed real red panel behind my white card base.

Next, I began to glue my large snowflake layers starting with the largest glittery, chipboard layer followed by the chocolate chip punched snowflake, real red ribbon bow, and button with the twine tied in the center.

Along the bottom of my white card base I used my scallop embossing folder from the adorning accents embossing folder set for the dry embossed scallops and then I used my paper piercing pack for the paper piercing just below the scallops.  I decided to add a few red dots above the scallops using my real red marker.

Sorry for the long post today.  My card was a little more involved today and I wanted to be sure to explain everything for you.  Have a great weekend and be sure to visit the other design team member's cards on the 52 Christmas Card Throwdown blog

*card #74 out of 100 cards in 100 days goal

Stamps:  Christmas Greetings
Card Stock:  White, Real Red, Chocolate Chip, Silver Glimmer Paper
Ink:  Chocolate Chip
Supplies:  Big Shot, Ribbon, Twine, Button, Snowflake Punch, SU Essentials Paper Piercing Pack, Piercing Tool, Adorning Accents Embossing Folder, Petals-a-Plenty Embossing Folder, Labels Collection Framelits, Snowflake Die, SU Real Red Marker, Stamp-a-ma-jig, Tombow Mulit Glue, Glue Dots, Glue Gun
Technique: Dry Embossing, Die Cutting, Paper Piercing

Contact me today if you would like to place an order or to be added onto my mailing list!
To place your Stampin' Up! order- http://www.stampinup.com/ECWeb/default.aspx
My email address- pebbles4@ptd.net
Pin It

Deployment Card

Good evening!  First I have to say thank you to all of my new followers!  I'm half way to my 300 followers goal and you are the ones who make blogging so much fun!  Special thank you for all your lovely comments too, it means so much to me!  When I reach 300 followers I will be giving away a Stampin' Up! gift certificate so be sure to tell your friends!

A friend of mine asked me to make her a deployment card.  At first I thought this was going to be a real challenge, but the more I thought about it I had a few idea running through my head and little by little I was able to come up with something I really liked.  I wanted to use red, white, and blue, but at the same time I didn't want it to look like it was for a patriotic holiday.

I forgot I even had this stamp set, but I'm sure glad I kept it.  I love the images in this set!  I colored the image using my SU markers and then I stamped it onto my card stock.  Then I cut out the image using my labels collection dies.  My image is layered onto another labels collection cut out that I dry embossed using my snow burst embossing folder.  I sort of thought this embossing folder might pass for small stars, I think it worked.

I decided to make a small medallion for an embellishment.  I cut 2 strips of 1"x6" designer series paper, scored them every 1/4" and folded them back and forth and then gluing them together to form a circle/medallion.  I used my glue gun to hold it together.  Then I used my large and small star punches to punch out some stars and I put a small silver brad through the center and then placed that on top of my medallion.  My medallion is placed onto my card using my glue gun.

The script background part of my card is computer generated.  I wanted to use the words from 'God Bless America' so I decided to print out the words using script writing and medium brown ink and then I printed it out on my computer.  I added some sponging all along the edges and it is darker at the edges and lighter towards the center.  I wanted to give it a distressed look.

The other embellishments on my card are a few more punched out stars, scallop border using real red card stock, and a ribbon knot with a button tied with twine.  There are dimensionals under the crumb cake designer series paper and underneath the left side of my main image panel- I did this to help keep my image level since the dsp has dimensionals under it.  Below is a close up side view of my card.  I hope you liked my card!  Thanks for stopping by!  Have a great weekend!


*card #73 out of 100 cards in 100 days goal

Stamps:  Liberty for All
Card Stock:  Crumb Cake, Not Quite Navy, Real Red, White, DSP- 6"x6" Patterns Pack (Retired)
Ink:  None
Supplies:  Ribbon, Twine, Button, Simply Score Tool, Glue Gun, Large Star Punch, Small Star Punch, Silver Mini Brads, SU Mat Pack & Paper Piercing Tool- for holes for brads, Scallop Border Punch, Sponges, Snow Burst Embossing Folder, Label Collections Framelits, SU Markers- Real Red, Not Quite Navy, Crumb Cake, Dimensionals
Technique: Sponging, Distressing, Dry Embossing, Paper Folding (paper medallion)

Contact me today if you would like to place an order or to be added onto my mailing list!
To place your Stampin' Up! order- http://www.stampinup.com/ECWeb/default.aspx
My email address- pebbles4@ptd.net
Pin It

Twisted Tuesday ~ Sketch


Good Morning! Today's Twisted Tuesday Challenge is a sketch!  I have the sketch posted below and this week's twist is that we were not allowed to use any ribbons or trim.  This is such a fun easy sketch so I hope you'll play along with us this week.  I decided to make a fall card and try my hand at making a pumpkin out of punch art.  I'll post a quick video on how I made my pumpkin.

I began by punching out three scallop ovals and sponged all along the edges.  Then using the 2 step bird punch I created the leaf curls and the leaves.  My pumpkin is placed onto my card using dimensionals.  I wanted to place my sentiment so that it looked like it was hanging from the top of my pumpkin.

My background designer paper strips measure 1 1/4" x 5" and along the bottom I punched them using my scallop border punch.  (I punched the border first and then cut apart the strips).


Here's my video showing how I made my pumpkin.  Hope you like it!  Thanks for looking!


*card #72 out of 100 cards in 100 days goal

Stamps:  Teeny Tiny Wishes
Card Stock:  Very Vanilla, Pumpkin Pie, Old Olive, DSP- Spice Cake
Ink:  More Mustard, Chocolate Chip
Supplies:  Scallop Border Punch, Oval Scallop Punch, 2 Step Bird Punch, Stylus Tool, Word Window Punch, Dimensionals, Large Circle Punch, Coluzzle for 2" Circle
Technique:  Sponging, Punch Art

Contact me today if you would like to place an order or to be added onto my mailing list!
To place your Stampin' Up! order- http://www.stampinup.com/ECWeb/default.aspx
My email address- pebbles4@ptd.net
Pin It

Thanksgiving Circles

Hi everyone!  Tonight I saw this week's sketch on the Clean & Simple Stamping blog and I wanted to make it a point to play along.  This is such a fun sketch and a great way to use up some of those paper scraps!  Below is a photo of the sketch.

To create my card I simply punched out a few circles and arranged them on my card following the sketch.  I felt that it was easier when punching some of the circles to not punch out the complete circle and only place the punch part way through the paper.  This gave the circles a nice straight edge.  My main image panel measures 3 1/4" x 4 1/2".

My sentiment is from a retired stamp set called Holiday Wishes.  Thanks for looking!

*card #71 out of 100 cards in 100 days goal

Stamps
:  Holiday Wishes
Card Stock:  Very Vanilla, Chocolate Chip, DSP- Spice Cake
Ink:  Chocolate Chip
Supplies:  Circle Punches- 1 3/4", 1 1/4", 1", Stamp-a-ma-jig

Contact me today if you would like to place an order or to be added onto my mailing list!
To place your Stampin' Up! order- http://www.stampinup.com/ECWeb/default.aspx
My email address- pebbles4@ptd.net
Pin It

52 Christmas Card Throwdown ~ Theme Carol or Hymn

Good Morning!  Today's 52 Christmas Card Throwdown is a theme challenge and this week's theme is a Christmas carol or hymn.  I ended up making three cards for the challenge, what a fun challenge! 

I decided to use this cute 'let it snow' image and my song inspiration is 'Let it Snow' which is one of my favorite Christmas songs.  Sleigh Bells is my very favorite song so I decided to go ahead and make a second card (posted below).

To make my 'let it snow' card I stamped my image and colored it using my SU markers.  My background was dry embossed and then I lightly rubbed my versamark ink pad over the raised areas and I sprinkled some iridescent ice embossing powder and heat embossed it.  It's hard to see in my photos, but it's really sparkly in person.  I also added some more glitter under my let it snow image.  I love glitter, can ya tell?!!

*card #68 out of 100 cards in 100 days goal

Stamps:  Big on Christmas
Card Stock:  White, Bashful Blue, Basic Gray, Retired SU DSP
Ink:  Black Stazon, VersaMark
Supplies:  SU Markers, Big Shot, Northern Flurry Embossing Folder, Ribbon, Twine, Button, Dimensionals, Heat Gun, Iridescent Ice Embossing Powder, Dotted Scallop Ribbon Border Punch
Technique:  Dry Embossing, Heat Embossing


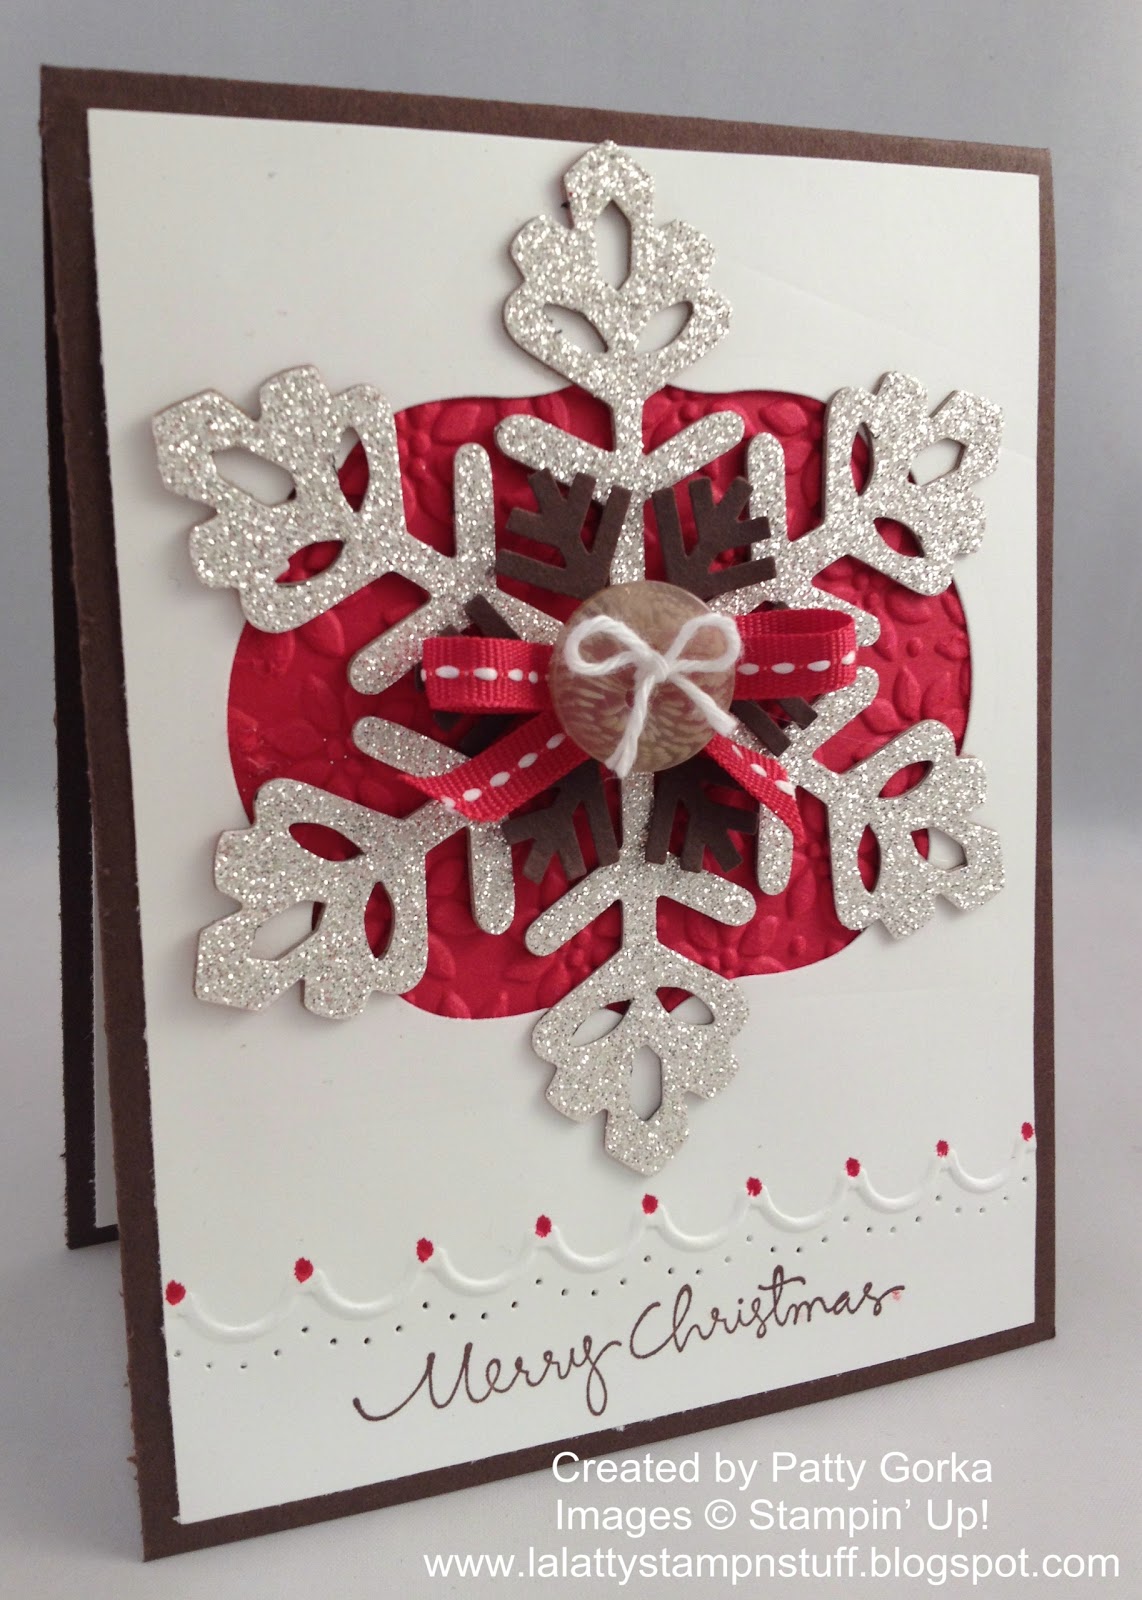
For this card I used the song 'Sleigh Ride' for my inspiration.  I simply colored the image using my SU markers and added lots of glitter.  My red border was punched using a combination of my scallop trim border and corner punches.  I started out with a 4x4 square, punched the corners first and then using the border punch I punched the scallops along the straight edges.

I added some white dots along my real red layer using my white gel pen and just above my sentiment I added two dry embossed lines just to sort of break up the area of my stamped image and my sentiment.

*card #69 out of 100 cards in 100 days goal

Stamps: Sleigh Ride, Curly Cute
Card Stock: White, Crumb Cake, Real Red, Black
Ink: Black Stazon
Supplies: SU Markers, Scallop Trim Corner Punch, Scallop Trim Border Punch, White Gel Pen, 2 Way Glue Pen, Dazzling Diamonds Glitter, Simply Score Tool
Technique:  Dry Embossing


And here's my last card for today.  Can you guess the song that inspired this card?  'I'm Dreaming of a White Christmas'- now you'll be singing that song all day long like I've been.....LOL

Basically my card is a mixture of white layers and dry embossed white layers. I love all white cards so this went together pretty quickly for me.  I used the petals-a-plenty and perfect polka dots embossing folders.  Just below my sentiment I added two rows of dry embossing. 

For my embellishments I used some retired SU organdy ribbon and silver cording.  I also decided to add some dazzling diamonds in the center of the flowers on my embossed background.  It's hard to see in my photo, but it's there.  I think I've convinced myself that I will be covered with glitter all day long tomorrow...LOL

*card #70 out of 100 cards in 100 days goal

Stamps: Snow Swirled
Card Stock: White
Ink: Basic Gray
Supplies: Big Shot, Petals-a-plenty Embossing Folder, Perfect Polka Dots Embossing Folder, Organdy Ribbon, Silver Cording, 2 Way Glue Pen, Dazzling Diamonds Glitter, Scallop Border Punch, Dimensionals
Technique:  Dry Embossing

Be sure to stop by the 52 Christmas Card Throwdown blog and check out the other DT member's cards!

Contact me today if you would like to place an order or to be added onto my mailing list!
To place your Stampin' Up! order- http://www.stampinup.com/ECWeb/default.aspx
My email address- pebbles4@ptd.net
Pin It

Twisted Tuesday ~ The Color Blue

Good Morning!  Here's my card for today's Twisted Tuesday challenge.  This week's challenge is a color challenge and our cards/ projects needed to be mostly blue in color. The Twist ~ Try to only use one other color besides blue.

I always wanted to try and make some paper roses and today's challenge I thought was the perfect opportunity.  I made blue roses for my blue card.  The other color I used was certainly celery green for my leaves.  Hubby saw my card and said I should post a video on how I made these roses and so I did.  I hope you like my video; I'm getting better at them (I think). 

Here is a close up photo of my card; I put some glitter along the edges of the roses.


And here is my video!


Be sure to stop by and see the other cards made by the Twisted Tuesday Design team members!

*card #66 out of 100 cards in 100 days goal

Stamps:  Teeny Tiny Wishes
Card Stock:  White, Bashful Blue, Certainly Celery, Subtles DSP Paper Stack
Ink:  Marina Mist
Supplies:  Fancy Flower Punch, Sponge, Big Shot, Little Leaves Sizzlit, Glue Gun, 2 Way Glue Pen, Dazzling Diamonds Glitter, Decorative Label Punch, Scallop Oval Punch, Large Oval Punch, Dimensionals, Bone Folder
Technique: Paper Roses, Sponging


Another Flower Card~ Blossom Flower Punch


I wanted to try making a flower using the blossom punch so this card above is another card with a paper flower.  I think this flower looks more like a carnation than a rose because of the scallop edges.  This flower is made the same way that I made the roses.  Be sure to check out my video above to see how I made them.

I added some faux stitching along the top part of my black card stock and I added a row of scallop paper piercing onto my white background (just above my black card stock).

I hope you liked my cards today!  Thanks for stoping by, make it a great day!

*card #67 out of 100 cards in 100 days goal

Stamps: Curly Cute
Card Stock: White, Rose Red, Black, Certainly Celery, Subtles DSP Paper Stack
Ink:  Black Stazon, Rose Red
Supplies:  Blossom Punch, Sponge, Big Shot, Little Leaves Sizzlit, Glue Gun, 2 Way Glue Pen, Dazzling Diamonds Glitter, Bone Folder, SU Mat Pack, Paper Piercing Tool, White Gel Pen
Technique:  Paper Flower, Sponging, Paper Piercing, Faux Stitching

Contact me today if you would like to place an order or to be added onto my mailing list!
To place your Stampin' Up! order- http://www.stampinup.com/ECWeb/default.aspx
My email address- pebbles4@ptd.net
Pin It

Splitcoast Featured Stamper Card

Good  Morning!  This is one of those types of cards that are my favorite to make, you know....the kind with lots of stamping.  I love the way this turned out and I will certainly be making a few more of these. I made this card for yesterday's featured stamper challenge on splitcoast stampers.  The featured stamp this week is naturecoastcrafter and this is her card that I decided to case.  Congrats to you Jean for being this week's featured stamper!

I loved the card that Jean made so I wanted to try and keep the same basic layout and stamp arrangement.  I ended up using different, but similar stamps and I loved the colors she used, but I decided to add riding hood red for my flowers and card base.

I began making my card by first cutting out my mask.  In other words I cut out a label die and I used the reverse part of that cut out for my template for my masking/sponging.  I placed that over top of my card base and I began my sponging.  I sponged darker around the edges and lighter towards the center.

Once my sponging was finished I began stamping my images- this is the fun part!  Simply stamp away! 
For my embellishment I decided to add a basic pearl in the center of the two flowers.

I decided to go ahead and make a video of my card  using the reverse masking technique.  I hope you like it!  Thanks for stopping by and have a great rest of the day!


*card #65 out of 100 cards in 100 days goal

Stamps:  For All You Do, Best Blossoms, Best Yet
Card Stock:  White, Riding Hood Red
Ink:  So Saffron, More Mustard, Old Olive, Riding Hood Red, Chocolate Chip
Supplies:  Big Shot, Lables Collection Framelits, Sponge, Basic Pearls
Technique:  Reverse Masking, Sponging, 2 Step Stampin'

Contact me today if you would like to place an order or to be added onto my mailing list!
To place your Stampin' Up! order- http://www.stampinup.com/ECWeb/default.aspx
My email address- pebbles4@ptd.net
Pin It

Dynamic Duo~ Color Challenge

Good evening!  Tonight I came across a new challenge blog and I wanted to play along.  The Dynamic Duos challenge this week is a color challenge and the colors we were to use are certainly celery and pretty in pink.  We were also allowed to use a neutral color which I used for my sentiment and butterflies.

I decided to use a retired background stamp and I've never used this stamp before so it was fun to play around with a 'new to me' stamp.  I simply colored my stamp using my SU markers and then stamped it onto my card stock.  I placed my stamped layer onto a pretty in pink layer which I punched along the bottom using my scallop trim border punch.  Then I added my ribbon, added a few basic pearls and then stamped my birthday sentiment.

I hope you like my card!  I'll be back tomorrow with another card!

*card #64 out of 100 cards in 100 days goal

Stamps:  Pretty Petals, It's Your Birthday
Card Stock:  White, Certainly Celery, Pretty in Pink
Ink:  Chocolate Chip
Supplies:  Ribbon, Basic Pearls, Scallop Trim Border Punch, Stamp-a-ma-jig, SU Markers- Chocolate Chip, Crumb Cake, Pretty ink Pink, and Certainly Celery

Contact me today if you would like to place an order or to be added onto my mailing list!
To place your Stampin' Up! order- http://www.stampinup.com/ECWeb/default.aspx
My email address- pebbles4@ptd.net
Pin It