Showing posts with label Baby Cards. Show all posts

Two By Two Baby Cards


Good Morning!  I needed to make some baby cards.  I have to catch up on my stash of birthday and baby cards.  When I bought this stamp I thought it would make really cute baby cards and since I spent so much time coloring I tried to keep the rest of my card simple.

I stamped the image using black stazon ink and then I colored it using SU markers.  I added some twine and a clip with a piece of ribbon tied on it for my embellishments.

Stamps:  Two By Two
Card Stock:  So Saffron, White, Subtles- designer series paper stack for the baja breeze dsp
Ink:  Black Stazon
Supplies:  Ribbon, Twine, Swirl Clip, SU Markers, Dimensionals, Coluzzle- for cutting out circle of image


Here's another baby card I made using the same image.  Actually I almost always stamp 2 images when I am coloring them in case I make a mistake with one and it just so happens that my coloring went pretty well this time so I ended up with an extra image and I didn't want it to go to waste and so I decided to make another card.

This one is pretty simple as well.  I colored in the image using my SU markers and I colored this image a little differently.  The background on this card is dry embossed using the perfect polka dots embossing folder. 

Thanks so much for taking the time to stop on by.  I am feeling better and hopefully I'll be back to my normal stamping and blogging routine next week.  Have a great weekend!

Stamps:  Two By Two
Card Stock:  White, Cherry Cobbler, Subtles- designer series paper stack- for the so saffron dsp
Ink:  Black Stazon
Supplies:  Ribbon, SU Markers, Big Shot, Perfect Polka Dots Embossing Folder
Technique:  Dry Embossing

Contact me today if you would like to place an order or to be added onto my mailing list!
My email address- pebbles4@ptd.net
Pin It

Fox & Friends Baby Card ~ July 15, 2012


After making the time consuming card I made yesterday I opted to make a simpler card today so I looked on the Clean & Simple stamping blog and I found this cute sketch. 

I decided to make a baby card and stamp three animals in a row.  I used a retired stamp set called 'Fox & Friends'.  I think this stamp set always makes such cute baby cards.

I used my stamp-a-ma-jig to help me line up my images neatly and just on both sides of my stamped image area I added two rows of dry embossed lines using my simply score tool.  For my embellishment I decided to put a piece of twine tied in a bow on the giraffe's neck. 

Once my card was finished I still felt that it needed a little something else and so I used my spritzer tool and chocolate chip marker to spritz a little bit of color along both left and right edges of my card.

I don't make one layer cards very often so I hope you like the way my card turned out.  This card would make cute baby thank you cards (simply change the sentiment) or even baby announcements and since it's flatter it would be perfect for sending through the mail.

Well, thanks so much for taking the time to stop by!  Have a wonderful day!

*card #39 out of 100 cards in 100 days goal

Stamps:  Fox & Friends, Short & Sweet
Card Stock:  White
Ink:  Chocolate Chip, Summer Starfruit, Gumball Green
Supplies:  Twine, Tombow Multi Glue, SU Chocolate Chip Marker, Spritzer Tool, Simply Scoring Tool, Stamp-a-ma-jig
Technique: Dry Embossing

Contact me today if you would like to place an order or to be added onto my mailing list!
To place your Stampin' Up! order- http://www.stampinup.com/ECWeb/default.aspx
My email address- pebbles4@ptd.net
Pin It

March 10, 2012

Hi there! Hubby is outside playing football with our son and while dinner is in the oven I thought I would take a few minutes to post the baby card I made last week. I found some designer paper scraps large enough to use to make a card and that was the inspiration for the colors I chose.

I began by stamping my images and punching them out. The card stock layers behind my images were not punched out; I just cut them using my paper trimmer.

The designer series paper I used on my card is double sided paper so I used the front and back of the same piece of paper. My hello baby sentiment is from the stamp set Teeny Tiny Wishes and it was stamped and punched out using my word window punch and it's layered onto chocolate chip card stock using the modern label punch. Then I punched a small hole along the upper end and I tied it onto my pink ribbon treatment using some twine.

To make my ruffled ribbon I placed a piece of sticky strip tape from the top of my card to the bottom and then I began scrunching my ribbon and placing it on top of the sticky tape (I use my paper piercing tool to help me ruffle up the ribbon and it works great). Sticky tape is the perfect adhesive for making your ribbon look ruffled and it's a great alternative if you do not have any pleated ribbon.

Thanks so much for stopping on by! Have a great rest of the weekend!

Stamps: Fox & Friends, Teeny Tiny Wishes
Card Stock:  White, Chocolate Chip, Pretty in Pink, Tempting Turquoise
Ink: Chocolate Chip, Pretty in Pink, Tempting Turquoise
Supplies: Ribbon, Twine, 1 3/8" Square Punch, Window Punch, Modern Label Punch, Hole Punch- for twine, Dimensionals, Sticky Tape

Contact me today if you would like to place an order or to be added onto my mailing list!
To place your Stampin' Up! order- http://www.stampinup.com/ECWeb/default.aspx
My email address- pebbles4@ptd.net
Pin It

February 26,2012

Hi everyone!  I was in the process of making a card for Friday's free for all challenge on splitcoast stampers and then I had to stop and pick up my son from school.  The free for all challenge was to create a card with some sort of critter on it.  I had my images stamped and punched out and then today I saw the sketch challenge on the Paper Players blog and it was the perfect sketch that I needed to complete my card.  Below is the sketch from the challenge.

We were able to change it up a little.  As long as we had 3 elements down a center panel with our sentiment across the bottom we were okay.  The elements could be any shape and we could use any shape for our sentiment.

When I started my card I was looking through my scrap bin to see what scraps I could use up and I found this designer series paper (it's retired dsp).  I also found enough card stock scraps in my bin for my smaller layers.  This is a great sketch for using up those scraps!

My images were stamped and punched out and then I layered them onto colored card stock.  My image panel was placed on my card using dimensionals.  My turtle was also placed on my card using dimensionals.  I ran my certainly celery layer through my paper crimper to give a little more texture to my card.

My background paper is retired designer series paper from Stampin' Up! and lastly I added a few embellishments.  I used up some of my hodge podge hard ware and some so saffron ribbon- both of which I purchased from Stamin' Up's! clearance rack.  I also have a small knotted ribbon placed on the giraffe's neck.

For my sentiment I used the 'hello baby' stamp from the Teeny Tiny Wishes stamp set.  I stamped it and punched it out using my word window punch and then it's layered onto a so saffron layer punched using the modern label punch.  I have a dimensional under my sentiment to pop it up a bit.

Well, that's about it for today.  I have one other baby card that I made and I'll be posting it sometime this week. Have a great rest of the weekend.  I need to get dinner started.  We are having baked chicken and I have to get it in the oven soon.  See you tomorrow.

Stamps:  Fox & Friends, Teeny Tiny Wishes
Card Stock:  White, Certainly Celery, Bashful Blue, So Saffron, Retired SU Designer Series Paper
Ink: Certainly Celery, Bashful Blue, So Saffron, Basic Gray
Supplies: Ribbon, SU Hodge Podge Hardware, Twine, Dimensionals, Glue Dots, Paper Crimper, Word Window Punch, Modern Label Punch, 1 3/8" Square Punch, Crop-a-dial for the hole for my brad
Technique: Crimped Paper

Contact me today if you would like to place an order or to be added onto my mailing list!
To place your Stampin' Up! order- http://www.stampinup.com/ECWeb/default.aspx
My email address- pebbles4@ptd.net
Pin It

March 22, 2011


I made this card baby card using the Sale-a-bration Punch Bunch stamp set.  I find myself never having enough baby cards on hand and so I thought this cute tag stamp would be perfect, plus I love that the large and small Stampin' Up! tag punches are made for stamps like these.

The background of my card was first stamped using the small star stamp from the So Happy for You stamp set and then I added some white dots using my white gel pen, just to brighten it up a bit. The rest of my background is just a piece of SU dp folded over along the top.

The tag stamp was colored using my SU markers and then I stamped it onto my card stock.  Next, I punched it and layerd it using the tag punches.  Then I added a small piece of white ribbon behind the tag and the brad helps to hold it in place.  The tag was then placed onto my card using dimensionals.

I used the baby sentiment from the SU set, Curvy Verses- that's such a great sentiment set because you really don't have to worry about stamping the sentiment straight since the words are curvy.

I hope you liked my baby card, thanks for stopping by!

Stamps: Punch Bunch, So Happy for You, Curvy Verses
Card Stock: So Saffron, Certainly Celery, White, SU DP
Ink: So Saffron, Black Stazon
Supplies: Ribbon, Hole Punch- for the brad, Brad, White Gel Pen, Large & Small Tag Punch, SU Markers

Contact me today if you would like to place an order or to be added onto my mailing list!

My Stampin' Up! Website- http://www.stampinup.net/esuite/home/
To place your Stampin' Up! order- http://www.stampinup.com/ECWeb/default.aspx
My email address- pebbles4@ptd.net
Pin It

My First Blog Giveaway!

This week's Splitcoast's clean & simple challenge is a real easy one.  If you have time be sure to check it out.  The challenge can be found here.  The challenge this week is to create a CAS card using dry embossing.

I use embossing on a lot of my cards.  It's such an easy way to add that 'wow' factor or to add just a little something extra without over doing it.  My cuttlebug is one of my most used tools and I just love it!

I originally made one card of these cards and I then I really liked the way it turned out. 

These literally took only minutes to make, so I decided to keep going and I make an entire set of cards (in different colors).  I was planning on doing 3 birthday, 3 thinking of you, and 3 thank you cards, but I ended up using a few different sentiments from SU's Warmest Regards stamp set.


I ran the upper portion of my card stock through my cuttlebug machine and then I tied on the ribbon.  Next I colored just the centers of the embossed flowers using my SU markers, and then I added my sentiment- so quick and easy!

And what am I going to do with all of these cards you ask?  Well, I've decided that it's time to have my very first blog give away and the prize will be this set of cards, with envelopes of course. 

All you need to do to win is to leave a comment for me here in this post (I'd love to have you as a follower as well, but it's not required). 

I will be drawing a winner one week from today on Monday morning, July 19th.  I will contact the winner (and I'll post it on my blog as well) and then I'll get these cards in the mail. Everyone is welcome to play along, I will ship outside of the US.  Good Luck and thanks for stopping by!

Below is a close up photo of one of my cards.  And I have individual photos of all of these cards posted here in my Splitcoast gallery.


Stamps: Warmest Regards
Card Stock: White
Ink: Black Stazon
Supplies: Cuttlebug, SU's Petals-A-Plenty Embossing Folder, SU Markers, Ribbon, Stamp-a-ma-jig
Technique: Dry Embossing Pin It

April 29, 2010


My card for today is for Bugaboo's Oldie, But Goodie Thursday.  Thursday's are my favorite Bugaboo challenges, what a great idea to go through the images you have and find one to play with. 

As soon as I saw this image I thought it would make really cute baby and birthday cards.  I was going to put a sentiment on my card, but then I decided not to- I can always add one later.

I printed the image and colored it using my SU markers.  Although the black part of the puppy looks black, I actually used my grey marker to color it.  I do this a lot because sometimes I feel that the black marker can be a bit harsh. 

Once I was finished coloring my image I added some white dots on the balloon using my white gel pen (I love my white gel pen, can you tell...LOL?)  And just along the outside of my oval image I did a added a line/dot border using my creamy caramel marker.  I also have two rows of paper piercing along the very bottom of my card, but it's hard to see in my photo.

My background is embossed using my Cuttlebug and Swiss Dots embossing folder.  I cut out my scalloped oval using this technique that I posted last week.  I wanted to mention this because I did say that this technique works with ovals too and I wanted to show a scalloped oval that I made.

I have a neat little trick that I used with the ribbon on my card.  I knew I wanted to tie some smaller pieces of ribbon on my card, but I didn't have any caramel or blue ribbon, so I used white ribbon that I already had and then I colored it using my SU markers.  After doing this several times, I have learned that you need to color both sides of the ribbon and then it helps if you dry it with your heat gun, otherwise you will have to let the ribbon dry for awhile.  This works great and I do it all the time, bet you never would have guessed that I colored my ribbon to match my card?!

Thanks for stopping by and be sure to stop back tomorrow because I will be posting my card for Bugaboo's Freebie Friday and my card turned out really cute ;)

Stamps: Bugaboo Digi Image Critter Balloon- CB Dog
Card Stock: White, Bashful Blue, Creamy Caramel, SU DP
Ink: None
Supplies: Ribbon, Coluzzle, Corner Rounder Punch, Scallop Trim Border Punch, SU Markers, White Gel Pen, Brads, SU Mat Pack- to help me align my brads, Cuttlebug, Swiss Dots Embossing folder
Technique: Dry Embossing, Paper Piercing Pin It

April 23, 2010


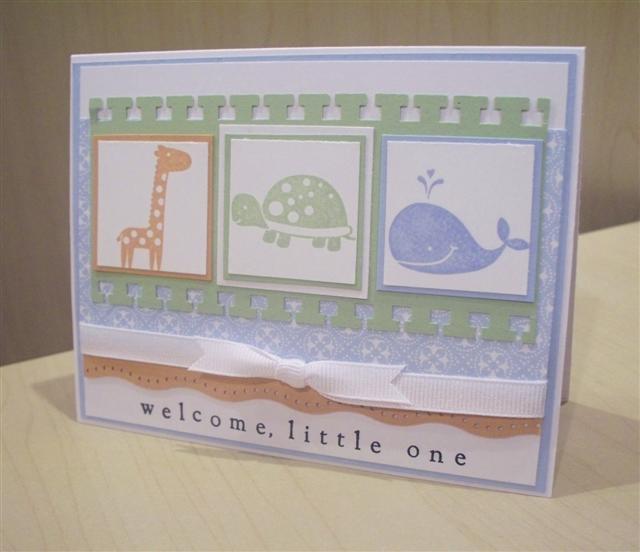
Here's the baby boy card that I made for one of the mother's at my son's preschool.  She's expecting a baby boy within the next couple of months. 

This card is similar to the baby girl card I posted two days ago.  I wanted to use the same stamp set and the same film strip technique.

This was a pretty quick and easy card to make.  Basically, I stamped the images and punched them out using my square punch.  Then I punched my certainly celery layer using my spiral punch along both sides. 

The wavy border along the bottom of my really rust layer was punched using an EK Success punch.

Have a great weekend!  I'll be back tomorrow to post a card I made for a Bugaboo Sketch Challenge.

Stamps: Fox & Friends, Fun Phrases
Card Stock: White, Really Rust, Bashful Blue, Certainly Celery, SU DP
Ink: Black Stazon
Supplies: Ribbon, Wavy Border Punch, 1 1/4" & 1 3/8" Square Punches, Spiral Punch, Stamp-a-ma-jig
Technique: Film Strip Pin It

April 21, 2010


Last week I said that I would share some baby cards that I made. I know two ladies that are both expecting within the next few months and one is having a girl, so this is my baby girl card for her and the other is expecting a boy. I'll post the baby boy card that I made for her on Friday.

It's been a while since I've made a film strip card and I figured this super cute monkey would be just perfect. I stamped the monkey three times and punched him out so that he looks like he's moving along so to speak.

The monkey images are layered onto pink and then a chocolate chip layer which I have punched on both sides using my spiral punch. My ribbon treatment is just a piece of pink ribbon with piece of brown and white tied onto it- this is a great way to use up some of those ribbon scraps. Can you tell I save everything?

Stamps: Fox & Friends, Hugs & Wishes
Card Stock: White, Pretty in Pink, Chocolate Chip, SU DP
Ink: Chocolate Chip
Supplies: Ribbon, Word Window Punch, Modern Label Punch, 1 1/4" & 1 3/8" Square Punches, Spiral Punch, Scallop Border Punch
Technique: Film Strip Pin It