Showing posts with label Video Tutorials. Show all posts

Flower Wreath


Hi everyone!  This is the flower wreath that I've been working on the past few days.  My upline posted a home decor challenge and I wanted to make a new wreath for my front door so her challenge was the perfect motivation I needed.  My wreath is 16" round so it's a nice size wreath.

I guess you could say this was a labor of love.....LOL  I made the flowers as I was watching TV and it actually went pretty quickly.  The more you make them the faster it goes.  There are 80 flowers on my wreath and I only used three punches to make them so you don't need a lot of supplies to make these flowers.  I used the Fancy Flower Punch, Blossom Punch, and 1 3/4" Scallop Circle Punches.  I have a short video posted below showing how I made the flowers.  The photos below show you how I made my wreath.

This photo above is how I made my wreath base.  You could buy one in the store, but I consider myself thrifty and I decided to make one out of card board.  All you need is a large card board box and look around to find two things that are circle shape and trace them onto the card board.  I used a large circle toy tub my kids have their toys in and for the inside I used a large tupperware container.  Once your circles are traced simply cut them out.  Here I cut out 2 circle card board pieces and I glued them together to make the card board sturdier.  At this point you will want to add some twine or something that you can tie around your wreath base that you will use to hang your wreath with.

I forgot to mention the size of my cardboard base and I wanted to come back and upate my post.  My wreath base measuers 16" across from the outside edges.  The inside circle measures 11" across and my wreath is 2 1/2" wide. 

This photo (above) I took 2 sheets of card stock and and cut them it into 3 strips (longways) and I crumpled it up and glued it onto my wreath base.  I didn't want my flowers to lay flat on my wreath base so I decided to create a raised area using card stock.  Then I could glue my flowers on the card stock and they wouldn't lay flat. It worked like a charm!
 
And above is a photo of the crumpled up card stock glued all around my wreath base.  You don't have to do this and you could skip this step if you wanted.  You could probably buy a rounded shape wreath, but I was working with what I had in the house and honestly, it turned out great. 

Here is a picture of my flowers.  I ended up having to make a few more though.  I have 80 total flowers on my wreath.  Be sure to check out my video below to see how I made them. 

Here's a picture of my wreath when I was almost finished gluing the flowers on.  I used my hot glue gun to glue on all of the flowers.  I found it easiest to first figure out about where I wanted to flowers placed and then I filled in with the smaller flowers.

Here is the video I made showing how I made the flowers.  Hope you like it!


And below are a few close up photos of my wreath. 


Stamps:  None
Card Stock:  White, Pretty in Pink, Pink Pirouette, Certainly Celery, Bashful Blue, So Saffron
Ink:  Pretty in Pink, Pink Pirouette, Ceratinly Celery, Bashful Blue, Rose Red, So Saffron, Perfect Plum, Pumpkin Pie
Supplies:  Wreath Base, Fancy Flower Punch, Blossom Punch, 1 3/4" Scallop Circle Punch, Brads, Paper Piercing Tool, Tombow Multi Glue, Hot Glue Gun, Sponges
Technique:  Sponging,  Punch Art

Contact me today if you would like to place an order or to be added onto my mailing list!
My email address- pebbles4@ptd.net
Pin It

Twisted Tuesday ~ The Color Blue

Good Morning!  Here's my card for today's Twisted Tuesday challenge.  This week's challenge is a color challenge and our cards/ projects needed to be mostly blue in color. The Twist ~ Try to only use one other color besides blue.

I always wanted to try and make some paper roses and today's challenge I thought was the perfect opportunity.  I made blue roses for my blue card.  The other color I used was certainly celery green for my leaves.  Hubby saw my card and said I should post a video on how I made these roses and so I did.  I hope you like my video; I'm getting better at them (I think). 

Here is a close up photo of my card; I put some glitter along the edges of the roses.


And here is my video!


Be sure to stop by and see the other cards made by the Twisted Tuesday Design team members!

*card #66 out of 100 cards in 100 days goal

Stamps:  Teeny Tiny Wishes
Card Stock:  White, Bashful Blue, Certainly Celery, Subtles DSP Paper Stack
Ink:  Marina Mist
Supplies:  Fancy Flower Punch, Sponge, Big Shot, Little Leaves Sizzlit, Glue Gun, 2 Way Glue Pen, Dazzling Diamonds Glitter, Decorative Label Punch, Scallop Oval Punch, Large Oval Punch, Dimensionals, Bone Folder
Technique: Paper Roses, Sponging


Another Flower Card~ Blossom Flower Punch


I wanted to try making a flower using the blossom punch so this card above is another card with a paper flower.  I think this flower looks more like a carnation than a rose because of the scallop edges.  This flower is made the same way that I made the roses.  Be sure to check out my video above to see how I made them.

I added some faux stitching along the top part of my black card stock and I added a row of scallop paper piercing onto my white background (just above my black card stock).

I hope you liked my cards today!  Thanks for stoping by, make it a great day!

*card #67 out of 100 cards in 100 days goal

Stamps: Curly Cute
Card Stock: White, Rose Red, Black, Certainly Celery, Subtles DSP Paper Stack
Ink:  Black Stazon, Rose Red
Supplies:  Blossom Punch, Sponge, Big Shot, Little Leaves Sizzlit, Glue Gun, 2 Way Glue Pen, Dazzling Diamonds Glitter, Bone Folder, SU Mat Pack, Paper Piercing Tool, White Gel Pen
Technique:  Paper Flower, Sponging, Paper Piercing, Faux Stitching

Contact me today if you would like to place an order or to be added onto my mailing list!
To place your Stampin' Up! order- http://www.stampinup.com/ECWeb/default.aspx
My email address- pebbles4@ptd.net
Pin It

Splitcoast Featured Stamper Card

Good  Morning!  This is one of those types of cards that are my favorite to make, you know....the kind with lots of stamping.  I love the way this turned out and I will certainly be making a few more of these. I made this card for yesterday's featured stamper challenge on splitcoast stampers.  The featured stamp this week is naturecoastcrafter and this is her card that I decided to case.  Congrats to you Jean for being this week's featured stamper!

I loved the card that Jean made so I wanted to try and keep the same basic layout and stamp arrangement.  I ended up using different, but similar stamps and I loved the colors she used, but I decided to add riding hood red for my flowers and card base.

I began making my card by first cutting out my mask.  In other words I cut out a label die and I used the reverse part of that cut out for my template for my masking/sponging.  I placed that over top of my card base and I began my sponging.  I sponged darker around the edges and lighter towards the center.

Once my sponging was finished I began stamping my images- this is the fun part!  Simply stamp away! 
For my embellishment I decided to add a basic pearl in the center of the two flowers.

I decided to go ahead and make a video of my card  using the reverse masking technique.  I hope you like it!  Thanks for stopping by and have a great rest of the day!


*card #65 out of 100 cards in 100 days goal

Stamps:  For All You Do, Best Blossoms, Best Yet
Card Stock:  White, Riding Hood Red
Ink:  So Saffron, More Mustard, Old Olive, Riding Hood Red, Chocolate Chip
Supplies:  Big Shot, Lables Collection Framelits, Sponge, Basic Pearls
Technique:  Reverse Masking, Sponging, 2 Step Stampin'

Contact me today if you would like to place an order or to be added onto my mailing list!
To place your Stampin' Up! order- http://www.stampinup.com/ECWeb/default.aspx
My email address- pebbles4@ptd.net
Pin It

Twisted Tuesday ~ Anything Goes


Good Morning!  Here's my card for today's Twisted Tuesday Challenge which is a free for all challenge so I hope you'll play along with us this week and be sure to stop by and check out the other DT member's cards!  I also made these cards for Monday's technique lover challenge on splitcoast stampers.

I wanted to try this technique that I've been seeing lately.  It's called seamless tiers or some people are calling it triple stamping. Basically all you are doing is taking three sheets of white card stock and placing them on top of each other and then begin your stamping.  You will want to pick a stamp that is big enough to cover at least 2 of the three layers.  I'm going to make a video showing this technique so that you can better understand how to do this.  I'll post the video below. 

Below is a close up photo of my card.  I wanted to try and show you the glitter on my card; it's really sparkly in person.  I also wanted to list the measurements of the wisteria wonder (purple) and the black layers on my cards. There is 1/8" difference in each layer. 

My finished card size is- 5 1/2" x 4 1/4" the next white layer is 5 3/8" x 4 1/8"
The next layer (black/purple card stock) is: 4 1/2" x 3 1/4" and the white card stock is: 4 3/8" x 3 1/8"
My smallest layer (black/purple card stock) is- 3 1/2" x 2 1/4" and the white card stock is 3 3/8" x 2 1/8"

*card #55 out of 100 cards in 100 days goal

Stamps:  Reason To Smile, Tiny Tags
Card Stock:  White, Wisteria Wonder
Ink:  Wisteria Wonder, Black Stazon
Supplies:  Ribbon, Jewelry Tag Punch, Twine, 2 Way Glue Pen, Dazzling Diamonds Glitter
Technique:  Seamless Tiers

And here's my video. I made another card using this same technique. I hope you like it. After having so much positive feedback from my first video (thank you so much) I think I'm going to try and post one video a week :) Thanks so much for stopping by! Feel free to pass along the link to my blog so that others can see my video too.


This is the card I made in my video.  I decided to add a small tag using my jewelry punch and tiny tags stamp set.  I also ended up adding some glitter using my 2 way glue pen and dazzling diamonds glitter.


*card #56 out of 100 cards in 100 days goal

Stamps:  Reason To Smile, Tiny Tags
Card Stock:  White, Black
Ink:  Black Stazon
Supplies:  Ribbon, Jewelry Tag Punch, Twine, 2 Way Glue Pen, Dazzling Diamonds Glitter
Technique:  Seamless Tiers

Contact me today if you would like to place an order or to be added onto my mailing list!
To place your Stampin' Up! order- http://www.stampinup.com/ECWeb/default.aspx
My email address- pebbles4@ptd.net
Pin It

52 Christmas Card Throwdown Theme ~ Wreaths!

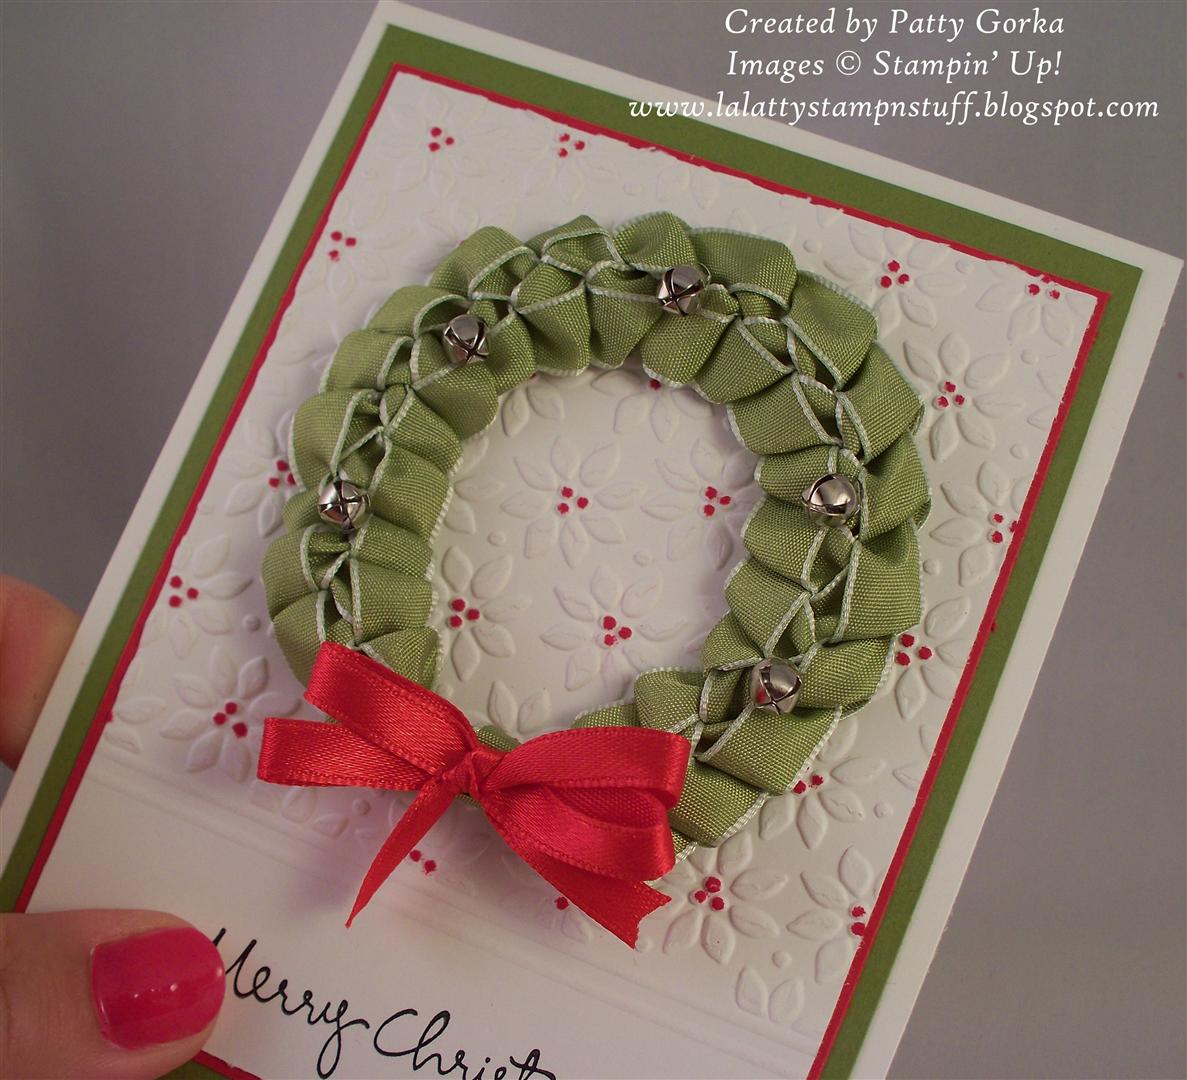
Good Morning!  Here's my card for this week's 52 Christmas Card Throwdown blog challenge.  This week is a theme challenge and the theme is wreaths.  I had a few ideas in mind for my card this week and I ended up making a ribbon wreath card.  I figured it might be easier to post a video on how I made my wreath so if you have a moment check out my very first video posted below.

I ended up making three of these wreath cards and they are all basically the same, but the colors are different.  I embossed my background using the petals a plenty embossing folder and my sentiment is from a retired SU stamp set called Christmas Greetings.  Below is a close up photo of my wreath.

And here is my very first video.  I was a bit nervous so I hope you like it!  In my video I showed how to make the wreath (which I learned from this video), and I showed you how I embossed my background, and how to use a stamp-a-ma-jig.

*card #45 out of 100 cards in 100 days goal

Stamps: Christmas Greetings
Card Stock: White, Old Olive, Real Red
Ink:  Black Stazon
Supplies:  Ribbon, Big Shot, Petals A Plenty Embossing Folder, SU Real Red Marker, Dimensionals, Bells, Glue Dots, Stamp-a-ma-jig, Simply Scoring Tool
Technique:  Dry Embossing, Ribbon Wreath


Below are the other two cards I ended up making. I have the supplies listed below each card.


*card #46 out of 100 cards in 100 days goal

Stamps
:  Christmas Greetings
Card Stock:  White, Riding Hood Red, Lucky Limeade
Ink:  Black Stazon
Supplies:  Ribbon, Big Shot, Petals A Plenty Embossing Folder, SU Lucky Limeade Marker, Dimensionals, Stamp-a-ma-jig, Simply Scoring Tool
Technique:  Dry Embossing, Ribbon Wreath


*card #47 out of 100 cards in 100 days goal

Stamps:  Christmas Greetings
Card Stock:  White, Real Red, Old Olive
Ink:  Black Stazon
Supplies:  Ribbon, Big Shot, Petals A Plenty Embossing Folder, SU Old Olive Marker, Dimensinoals, Stamp-a-ma-jig, Simply Scoring Tool, Brads
Technique:  Dry Embossing, Ribbon Wreath

Contact me today if you would like to place an order or to be added onto my mailing list!
To place your Stampin' Up! order- http://www.stampinup.com/ECWeb/default.aspx
My email address- pebbles4@ptd.net
Pin It