February 23, 2012

Hi there!  I made this card today for a few challenges.  I'm not one to usually combine challenges (it just never works out that way for me), but today it did.  Here are the challenges I made my card for:

WT363- Splitcoast Ways to use it challenge- found here.  This week's challenge was to use buttons.
Clean & Simple FTL sketch challenge- found here.
Stampin' Up! Only Blog challenge- found here.  We were to create birthday cards.

At first I wasn't quite sure if I liked my card, but then my 3 year old girl came over to me and said, "What pretty cupcakes, Mommy.  Are they for me?" I guess that's all I needed to hear so now I like it....LOL.

I used a combination of the Create a Cupcake stamp set and my Cupcake builder punch to make the cupcakes.  The tops of all the cupcakes are punched using dsp (spice cake- it's retired now, but I love this paper).  The chocolate bottoms of my cupcakes are stamped and punched out and the middle (vanilla) cupcake was punched using very vanilla card stock and then I ran it through my crimper.  My middle vanilla, cupcake is adhered onto my card using dimensionals.  And my entire cupcake panel was also adhered using dimensionals.

My background was embossed using the perfect polka dots embossing folder and my big shot.  My sentiment is from the create a cupcake stamp set and for my embellishment I decided to use a chocolate chip button with a small piece of white twine tied through it.

Well, that's about it for today!  Thanks for stopping by!  Have a great day!

Stamps:  Create a Cupcake
Card Stock: White, Chocolate Chip, Very Vanilla, Spice Cake DSP
Ink: Chocolate Chip
Supplies: Big Shot, Perfect Polka Dots Embossing Folder, Cupcake Builder Punch, Glue Dots, Dimensionals, Paper Crimper, Button, Twine, SU Chocolate Chip Marker- for the dots along my sentiment
Technique:  Dry Embossing

Contact me today if you would like to place an order or to be added onto my mailing list!
To place your Stampin' Up! order- http://www.stampinup.com/ECWeb/default.aspx
My email address- pebbles4@ptd.net
Pin It

February 22, 2012

Hi everyone!  Today I'm sharing with you another card I made using my new Apothecary Art stamp set.  I love how versatile this set is since you can stamp several different sentiments inside these images.  And just in case you weren't sure, yes the sentiments from the Loving Thoughts stamp set do fit inside the Apothecary images.  Both of these sets are available in the current occasions mini catalog.  (I posted photos below so you can see the full stamp sets).

I stamped the image and colored it using my SU markers.  I used so saffron and certainly celery.  My so saffron and certainly celery layers are embossed using my big shot and the Perfect Polka Dots Embossing Folder- then I decided to punch a scalloped border along the bottom of my certainly celery layer.

My image panel was applied using dimensionals and along the bottom of my card I decided to add two rows of paper piercing.  It's hard to see in my photo, but I did add a few small pearls in the center of the flowers. 

The dsp that I used is from Twitterpated Designer Series Paper- it is one of the SAB choices this year.

I'm not in the need of a sympathy card at the moment, but I'm just making some cards to have on hand.  It seems as though I never have a sympathy card when someone asks me for one.

Here are the photos of the sets and framelits that I used to make my card-


Apothecary Art Clear Mount Item # 125527 $27.95
Apothecary Art Wood Mount Item # 125525 $34.95

Loving Thoughts Clear Mount Item # 125845 $23.95 
Loving Thoughts Wood Mount Item # 125843 $29.95 

Labels Collection Framelits Dies Item # 125598 $26.95

Have a great rest of the day!  Thanks for stopping by!

Stamps: Apothecary Art, Loving Thoughts
Card Stock:  White, So Saffron, Certainly Celery, Twitterpated Designer Series Paper- one of this year's SAB choice
Ink: Black Stazon
Supplies: Labels Collection Framelits, Big Shot, Perfect Polka Dots Embossing Folder, Basic Pearls, SU Markers, Scallop Border Punch, SU Mat Pack, Paper Piercing Tool, Dimensionals
Technique: Dry Embossing, Paper Piercing


Contact me today if you would like to place an order or to be added onto my mailing list!
To place your Stampin' Up! order- http://www.stampinup.com/ECWeb/default.aspx
My email address- pebbles4@ptd.net
Pin It

February 20, 2012


Happy Monday!  Today I am trying to catch up on some of the blog challenges for the blog group that I belong to.  I also wanted to make a card for this week's clean & simple challenge on splitcoast stampers.

So this is a first for me, or I guess you could say this is unusual for me.  I rarely combine so many challenges into one card.  I don't know why, I guess I'm really not that great at finding several challenges that work together for me.  I'm always amazed when I see bloggers with like 10 challenges that fit into one card.  LOL

But anyway, the three challenge that my card is for are:  My blog group challenge was to make a card using green and purple and this week's blog group challenge was to make a card with some sort of bling- silver paper, glitter, glimmer mist, etc.  The third challenge I made this card for was for this week's CAS challenge to create a card using stitching.

I decided to use my SU Mixed Bunch stamp set and create a one sheet wonder card.  I'm sure you've read about me making one sheet wonder cards before, but just in case you didn't I'll briefly explain how to make them.  Basically, all you do is to take a sheet of neutral card stock and using your stamps you stamp all over.  The trick to this is to try and keep your images close together.  To make the card I am showing you today, I just took a piece of scrap card stock and I stamped all over it.  You really don't need to stamp an entire sheet of card stock, unless of course you would want to make several cards.

Once my card stock was stamped I layered my card onto my purple layer, I did my faux stitching, and then I added a punched border along the bottom.  My image panel was placed on my card using dimensionals.  I added the dimensionals because the backs of the brads are pretty big and I didn't want my card to have the bumps in it from the brads.  The dimensionals raised my panel up just enough that the brads really aren't an issue now. 

Lastly, I added my birthday sentiment (I decided to make this a birthday card because it seems as though I'm always in need of birthday cards around this time of year).  The sentiment is from the Stampin' Up! stamp set Curly Cute.  I love this sentiment stamp set because it's has really nice sentiments in it that I would definitely use on a regular basis. 

I'm posting a photo of the two stamp sets I used (in case you wanted to see them).

Mixed Bunch Clear Mount Item # 125537 - $21.95     Mixed Bunch Wood Mount item # 125535 - $27.95

Curly Cute Clear Mount Item # 120510 $14.95   Curly Cute Wood Mount Item # 117014 $19.95

Well, that's about it for today!  Thanks so much for stopping by!  Have a great day!

Stamps: Mixed Bunch, Curly Cute
Card Stock: White, Perfect Plum, Wild Wasabi
Ink: Perfect Plum, Wild Wasabi
Supplies: SU Mat Pack, Paper Piercing Tool, White Gel Pen, Large Brads, Scallop Trim Border Punch, Stamp-a-ma-jig, Dimensionals
Technique: One Sheet Wonder, Faux Stitching

Contact me today if you would like to place an order or to be added onto my mailing list!
To place your Stampin' Up! order- http://www.stampinup.com/ECWeb/default.aspx
My email address- pebbles4@ptd.net
Pin It

Medallion Wreath Tutorial

Hi everyone!  I know it's been awhile, since I've updated my blog, I'm sorry about that.  I'm hoping to get back on track now.  I was looking at my front door yesterday and I realized that I needed to make another wreath and so I thought it would be a great idea to use the designer series paper from this year's sale-a-bration catalog. 

The brads and designer series papers are both sale-a-bration choices this time around.  I have the SAB catalog posted on the right side of my blog if you would like to look through it.  Remember from now until March 31st you can earn free merchandise for every $50 you spend.  Plus if you place a $150 show you will earn $25 in free merchandise and a free Stampin' Up! tote bag. 

I have made these wreaths before, but this time I used my new Designer Rosette Bigz XL Die that's available in the current occasions mini catalog (item # 125594 $42.95) .  I found it quicker and much easier to make my rosettes using this die plus the die has two designer edges and it can cut rosettes up to 10".  The spacing between each fold is 1/2".  The few steps I have posted below for you are how I made my wreath.  If you have any questions about this project feel free to send me an email at pebbles4@ptd.net

The first thing I did was to cut my 12x12 designer series paper in half.  You have to use 12x12 paper for this die.  I ended up using an entire pack of dsp to make my wreath- I wanted my wreath to be large.

This is a close up picture of the Designer Rosette Bigz XL Die.  I wanted to try and show you the two designer edges and the score marks.

This is the stack/sandwich I used when cutting with this die.  You'll need the extra large cutting pads for this die.  The sandwich is- extra large cutting pad, die cutting side up, designer series paper, extended cutting pad.

For my big shot machine I needed to use a shim.  I saved the long thin cardboard that came with my die and it was just perfect for the shim I needed.  If your big shot machine is new you probably won't need a shim.  Don't use a shim if you do not need it- you should not force anything to go through your big shot.  If you use a shim and you really don't need it, the scoring part of the die may end up cutting your paper instead of scoring it. 

On the other hand if you are running this die through your big shot and the score lines are not scored enough you might want to try using a shim- you can also use a piece of card stock for a shim.

In this photo above I tried to show you what your paper should look like after you cut it using this die.  Each end will have a different edge and every 1/2" there is a score line.


Since this die cuts 2 decorative edges you will need to run this die through your big shot twice to get 2 strips with the same edge, but this works out perfectly since you will now have made 2 rosettes.  The designer series paper I used is double sided and so when I'm cutting my rosettes I try to use 2 sheets of the same paper and this is perfect because it takes the guess work out of finding papers that match. 

In my photo above I cut the designer paper in half (after I ran it through my big shot).  If you want to make smaller rosettes then you will need to cut a little bit off of your straight edge.  I did this just using my scissors since the straight edge will be in the middle and you really won't be able to tell if it was cut straight.  You can use your paper cutter if you wanted as well.

Once you have 2 strips of designer series paper with the same edge all you need to do is to glue them together.  I used my snail adhesive for this part.  If you would like to see more information on how I assembled my rosettes please see my blog post found here.

To create the rosettes simply flatten them out keeping the straight edge in the center.  I used a large 1 3/4" circle punch to punch out some circles and then using my glue gun I glued the rosettes to the punched out circle.  For my larger rosettes my paper strips measured 2 1/2" and my smaller rosettes the paper strips measured 1 1/2". 

Here is a photo of my finished wreath.  This is a large wreath and it's approximately  20" round.  I ended up making 12 large and 12 small rosettes.  If you wanted to make a smaller wreath all you need to do is to make less rosettes or cut the strips smaller.

Here is a close up photo of some of the rosettes on my wreath.

And here is one more close up photo.  I used brads for the centers of my rosettes.  I simply glued them in the centers using my glue gun.


Thanks to all of you for takign the time to stop on by.  I hope you liked the wreath I made.  Have a great rest of the day!  See you tomorrow!

Stamps: None
Card Stock: Everyday Enchantment Designer Series Paper- 2012 Sale-a-bration
Ink: None
Supplies: Designer Rosette Bigz XL Die, Big Shot, Extended Cutting Pads, Everyday Enchantment Ribbon & Brad Pack- 2012 Sale-a-bration, Glue Gun, 1 3/4" Circle Punch, Cardboard- for wreath back & twine for the hanger
Technique: Paper Folding

Contact me today if you would like to place an order or to be added onto my mailing list!
To place your Stampin' Up! order- http://www.stampinup.com/ECWeb/default.aspx
My email address- pebbles4@ptd.net
Pin It

February 5, 2012

Hi everyone!  Today I'm posting the card that I made for the monthly challenge of the blog group that I belong to.  This month's challenge was to create a Valentine card using hearts.  Our blog group recently started weekly challenges and this week's challenge was to use polka dots so I decided to combine both challenges and the polka dots I used are on my designer series paper.

I used a current Sale-a-bration stamp set called sprinkled expressions and I just stamped the heart and punched it out using my circle punch.  The black layer behind my heart is actually the blossom flower punch that I punched twice and then I placed them on top of each other so that they looked like a larger scallop circle.

My dry embossed heart layer I made using the new Adorning Accents Textured Impressions Embossing Folders- heart folder found in the current Stampin' Up! mini catalog.  These strip embossing folders are great for embossing a smaller portion for your projects. 

Other than that finishing my card was just a matter of assembling it.  I decided to use a mini clothespin with a small piece of red and white twine tied around it and then I added a ribbon tied with a knot.

I hope you liked my card and be sure to check out the other challenge cards from our Crafty Gals blog group.  The link to their blogs can be found on the right side of my blog in the side bar.

Thanks for visiting & have a great rest of the day.  Enjoy the super bowl too!

Stamps: Sprinkled Expressions- 2012 Sale-a-bration stamp set
Card Stock: White, Black, Real Red, SU Love Designer Series Paper
Ink: Real Red, Black Stazon
Supplies: Ribbon, Big Shot, Adorning Accents Textured Impressions Embossing Folders- heart, Mini Clothespin, Glue Dots, Dimensionals, Scallop Border Punch, Blossom Punch, 1 3/4" Circle Punch
Technique: Dry Embossing

Contact me today if you would like to place an order or to be added onto my mailing list!
To place your Stampin' Up! order- http://www.stampinup.com/ECWeb/default.aspx
My email address- pebbles4@ptd.net
Pin It

February 4, 2012

Good Morning!  I wanted to take a moment to let you all know about the free trial offer Stampin' Up! is having.  I'll be back next week with some blog posts of projects I have finished.  January has been a really busy month for me so I'll be back on track now that it's over.  Have a great weekend!

My Digital Studio Express Free Trial Now Available
Stampin’ Up! is offering a FREE 30-day trial of My Digital Studio Express and it is now available. Have you been wanting to try out My Digital Studio? Well now you can! Make sure let your friends know and feel free to pass along my email!

How do you get it?  Just go to my online store (I posted the link below for you) and click the MDS free trial button on the right hand side. You can order the free trial by itself. If the My Digital Studio Express Trial is the only item you order, you will not be asked for any credit card or payment information. If you are a new customer, you will need to first create an account.

http://www.stampinup.com/ECWeb/default.aspx?email=PEBBLES4%40PTD.NET&phone=5704036144

My Digital Studio Express Trial - Digital Download 129600
Price: $0.00

With the FREE 30-day trial, you’ll get:
* Full access to the software at NO COST for 30 days.
* Full design functionality.
* Exclusive artwork that comes with My Digital Studio Express—that’s $50 worth of content!
* Opportunity to purchase additional downloads from designer templates to stamp brush sets--and everything in between.
* Access to our professional print services

What do you do once you try it and like it?

Once the 30-day free trial period is over, you can purchase the downloadable or disc version of the software to continue using it. You'll simply open up the trial version you already have on your computer, and will be prompted to enter the product registration key you received after purchasing the software. (You'll receive this key via e-mail if you purchase the downloadable version, and you'll find it along with your shipped software if you purchase the disc version.)

*Your 30 day trial period starts as soon as you launch the program. It does not matter when you download the program, your 30 days will start as soon as you actually launch (open) the program.Feel free to email me with any questions!

Patricia Gorka
Independent Stampin’ Up Demonstrator
My email- pebbles4@ptd.net
My Stampin’ Up Website: www.stampinup.net/esuite/home/lalatty
My Stampin’ Up! Blog: http://www.lalattystampnstuff.blogspot.com/

I now have gift certificates! A great gift for the stamper who has everything!

Contact me today if you would like to place an order or to be added onto my mailing list!
To place your Stampin' Up! order- http://www.stampinup.com/ECWeb/default.aspx
My email address- pebbles4@ptd.net
Pin It

January 30, 2012


Hi everyone!  I wanted to make sure to post the sale-a-bration catalog for you.  This is Stampin' Up's! biggest sale of the year!  From now until March 31, 2012  you can earn FREE product with every $50 you purchase. If you are on my mailing list then you probably already saw this, but for those of you who didn't get a chance to see this year's sale-a-bration catalog and you would like to be added to my mailing list please send me an email at pebbles4@ptd.net   Below is the link to the new sale-a-bration catalog:


Also, there are some changes with Stampin' Up's! catalogs and I wanted to tell you about them.  Starting June 1, 2012, Stampin' Up! will release one annual catalog, comparable to (but smaller than) the current Idea Book & Catalog, and two seasonal catalogs, comparable to (but larger than) the current mini catalogs.  Here are the details:

Annual Catalog-
- The annual catalog will run from June 1, 2012 through May 31, 2013.
- The annual catalog will be reduced from over 240 pages in the current Idea Book & Catalog to 208 pages.
- The annual catalog will be printed on lighter-weight paper.
- Celebrando Creatividad will remain unchanged.

Seasonal Catalogs-
- The Occasions, Summer, and Holiday Mini Catalogs will be replaced by two seasonal catalogs called the Holiday Catalog and the Spring Catalog.
- The first Holiday Catalog will run from August 1, 2012 through the beginning of January, 2013
- The first Spring Catalog will run from the beginning of January, 2013 through May 31, 2013.
- The seasonal catalogs will be larger in both size (8 1/2" x 11") and page count (about 40 pages) than the current mini catalogs.


Contact me today if you would like to place an order or to be added onto my mailing list!
To place your Stampin' Up! order- http://www.stampinup.com/ECWeb/default.aspx
My email address- pebbles4@ptd.net
Pin It

January 18, 2012

Hi everyone!  Last night I finally got some time to try out my new clear mount stamp sets and  I ended up making this birthday card.  I need to rebuild my stash of birthday cards.  It seems as though I send out a lot of birthday cards in the beginning of the year.

I haven't been doing much coloring lately on my cards and so I decided to pick an image to use that needed some coloring.  I love coloring with my SU markers and this is one of my very favorite color combinations.

I started making my card by first stamping and coloring my image.  Then I cut my image out along the dotted line (using my scissors) and this way I was able to layer it on the pretty in pink card stock that I cut out using the same size framelit.  I used the next size up framelit to cut out the bashful blue layer then I ran my bashful blue layer through my big shot using the perfect polka dots embossing folder.

Then I just needed to assemble my card.  My designer series papers are from the Designer Series Paper Patterns Stack - Subtles Collection.  I added some pretty in pink ribbon that I ruffled/scrunched by placing some sticky tape along my card and then folding the ribbon back and forth until I got the ruffled look I wanted.  This is a really neat way to use ribbon differently on any card.  I found that making ruffled ribbon workds best with a satin/silky ribbon. 

And the last few items I decided to add onto my card was a mini clothespin with a small piece of twine tied around it and then three basic pearls towards the bottom of my image panel.  I used one medium pearl and two smaller pearls on both sides of it.

On my photo below I wanted to show you a close up photo so that you could see my coloring a little better.  I hope you liked today's card!  Have a great rest of the day and I'll see you tomorrow!

Stamps: Apothecary Art
Card Stock:  White, Pretty in Pink, Bashful Blue, Designer Series Paper Patterns Stack - Subtles Collection
Ink: Black Stazon
Supplies: Ribbon, Labels Collection Framelits, Big Shot, Perfect Polka Dots Embossing Folder, Basic Pearls, Twine, Mini Clothespin, SU Markers, Sticky Strip Tape, Scissors
Technique: Dry Embossing

Contact me today if you would like to place an order or to be added onto my mailing list!
To place your Stampin' Up! order- http://www.stampinup.com/ECWeb/default.aspx
My email address- pebbles4@ptd.net
Pin It

January 15, 2012

Hi everyone!  Today I have a bit of a different sort of post for you.  I didn't have chance to create a project for you this weekend since 2 of my 3 kiddos were sick and hubby as well (they are all better now), but anyway I wanted to take a day to post some pictures of Stampin' Up's! clear block system.

As many of you know I only use wood mounted stamps (I swore I would only use wood mount stamps), but with my last Stampin' Up! order I decided to give clear mount stamps a try and so I purchased the clear mount block bundle (item # 118491 $69.95).  The bundle includes all of the clear block sizes.  *Note* you'll save $9.25 if you order the bundle rather than ordering them all separately.  I also ordered the clear block storage caddy item # 120279 $16.95 and I'm going to show you some photos of that as well.

This is a photo of the clear block bundle.  In this photo I've already removed the blocks from the packaging, but here I wanted to show you that they will arrive packaged separately.  These are blocks A-I.

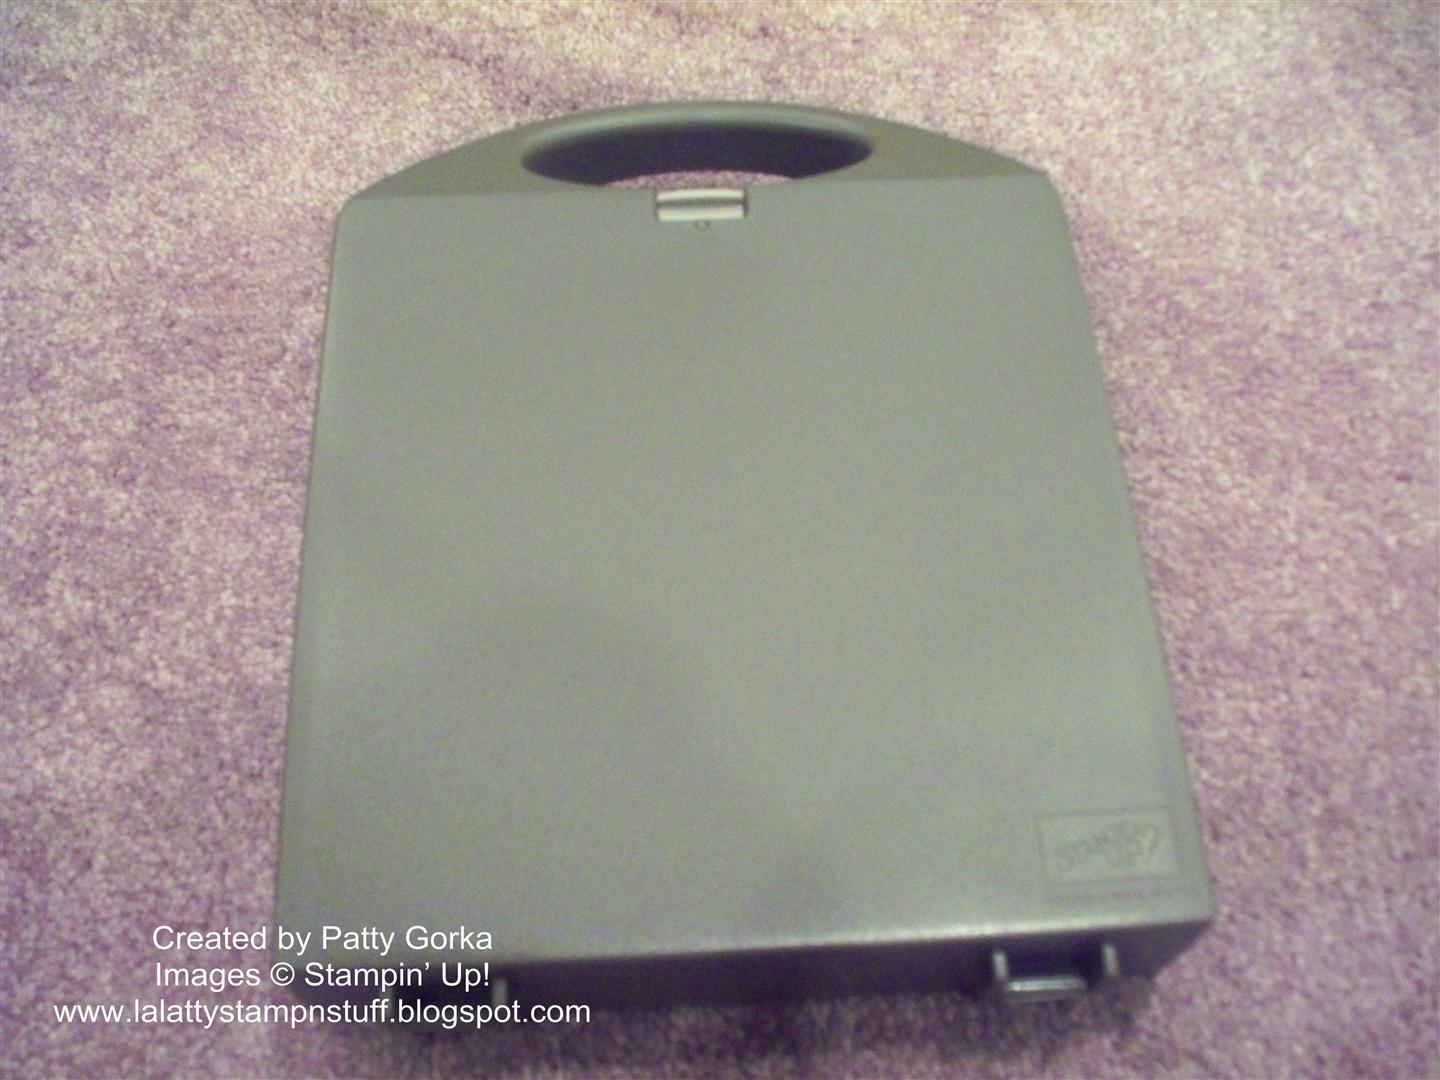
This is a photo of the clear block storage caddy (closed).  The case opens flat for easy access and when you're finished it closes and locks to hold your blocks in place.

This is a photo of the clear block storage caddy opened.  You will notice that Stampin' Up! gives you an additional foam insert to sit between the blocks and protect them when the caddy is closed.

If you look closely at my photo you will see foam inserts that you will need to remove before you can place your blocks inside.  The foam blocks simply pop out.  I've already popped one out in this photo below to show you what I am talking about.

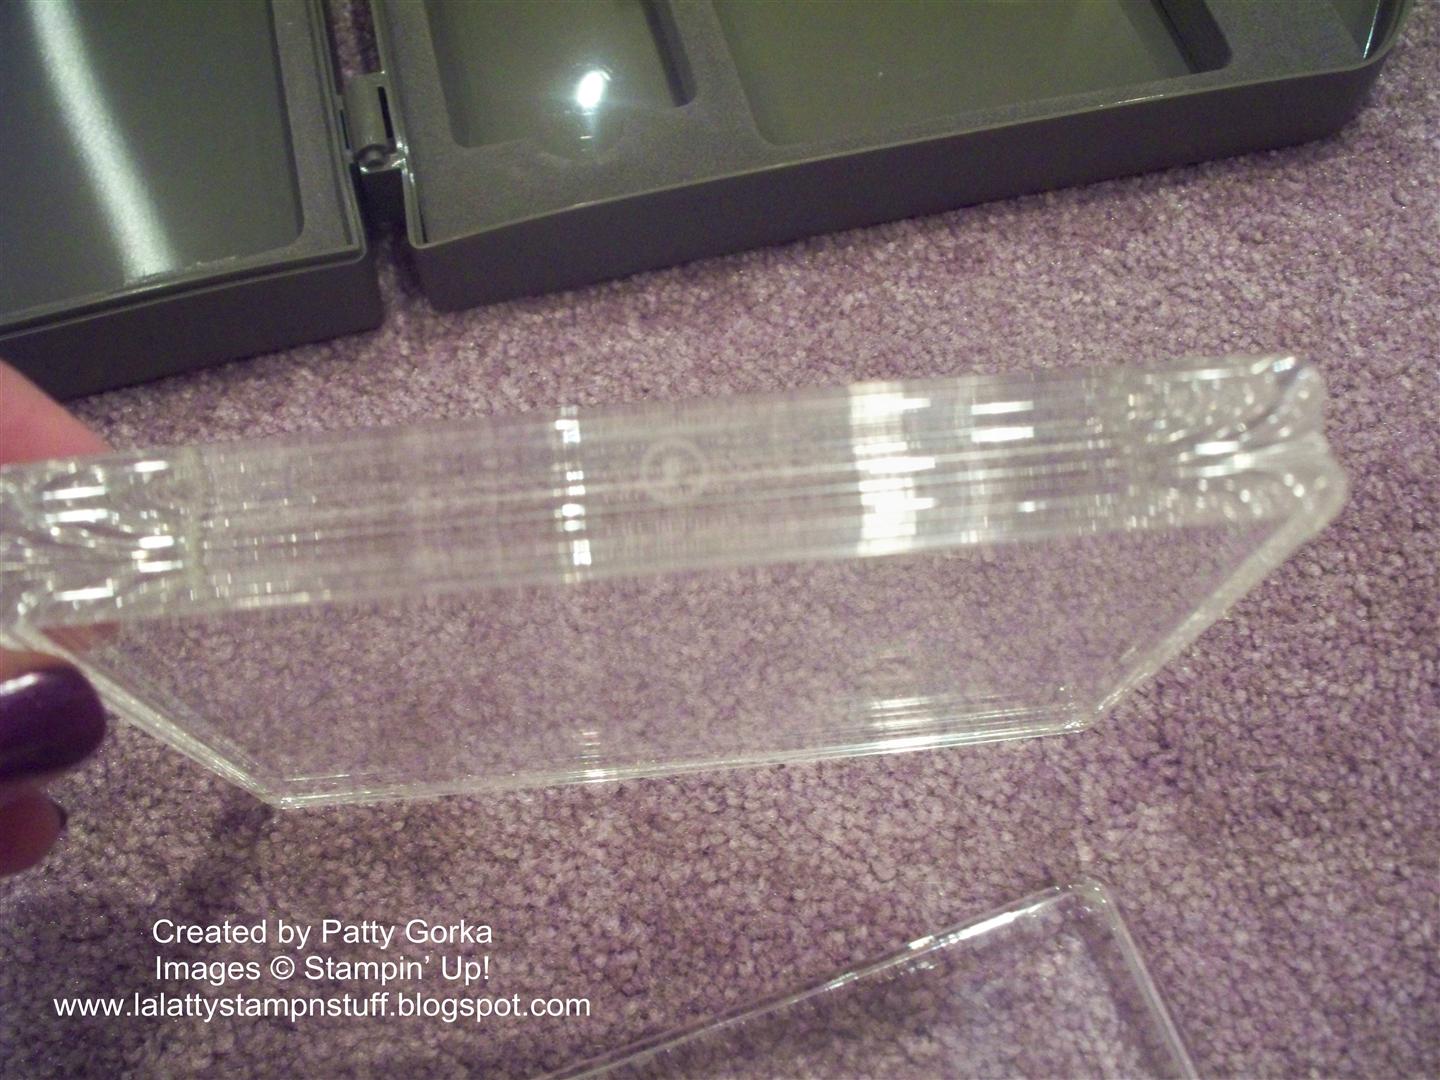
Before I move onto the next photo I wanted to take a minute to show you a close up of one of the Stampin' Up! clear mount blocks.  I was very surprised when I received my blocks because they are awesome.  I've had blocks from other companies and by far these are the best!  There are nicely curved grooves on all four sides and they are really, very sturdy!  Hmmm...I'm beginning to like the clear mount option already!
  

And below is a photo of the clear block caddy with all the foam inserts popped out and all my clear blocks in place.  You'll notice the additional foam insert at the top left side of my photo.

Here I've placed the foam insert inside the case and now it's ready to close up and put away.  You'll want to make sure to use this foam insert to protect your blocks when the case is closed.

Here's another photo of the clear block caddy closed and locked.  To lock the caddy all you need to do is to simply flip over the little clip.  As you can see there is a handle for easy carrying. 

There are 2 reasons I've decided to give the clear mount system a try.  One is that storage is starting to become an issue and as many of you know the clear mount stamps take up a lot less room, but the main reason I've decided to give the clear mount stamps a try is to save money!  If you were to purchase these stamp sets (in my photo below) with the wood mount option they would cost $116.80 and with the clear mount option they only cost $92.80 - that's a savings of $24 with just 4 stamp sets, can  you believe it?!!

These are the stamps that I recently purchased (they are all from the current occasions mini catalog- there is a link to the catty on the right hand side of my blog if you wanted to check it out).  And since I'm new to using clear mount stamps I've decided to go head and show you how to mount them. 

This is a photo of 1 stamp set, but it's a large set so it came in two separate cases.  This is the new Apothecary Art stamp set clear mount item #125527 $27.95 found in the new occasions mini catalog.  It's hard to see in this photo, but I wanted to point out that the rubber is die cut for you so that you do not need to cut/trim around the image.

Simply pop the image out of the rubber sheet and peel off the backing.  Now, some people are using these stamps just like this and some are placing the stickers over the foam.  Personally, I think I'll like being able to see the image so I'm going to go ahead and place the sticker over the foam.

Next, you will need to remove the sticker from the sticker index sheet.  Slowly peel the sticker from the sheet and then you will need to remove the sticker backing on the image- see my next photo below.

This is a photo of me removing the sticker backing.  You will see that the sticker backing is in two pieces- carefully remove each half.....(see next photo below)

...and then place the sticker on top of the foam/back side of the rubber stamp.  You'll want to first make sure that your sticker label and the stamp image will be applied in the correct direction.  In other words, your image label and stamp image should match.

Here is a photo of the stamp with the label in place. 

Here is a photo of the stamp on a clear mount block. I wanted to take a minute to explain that although I know it can be a bit confusing, but Stampin' Up! refers to their unmounted stamps as 'clear mount' and I just wanted to explain (for those of you who are not aware) that Stampin' Up's! clear mount stamps are not clear. The stamps are the same high quality red rubber as found in their wood mount stamps.

When  you are finished mounting your stamp set you can store your unmounted stamps in the DVD sized case that came with your set.  Or the way I've decided to store my stamps....(see my photo below)

...was too keep the rubber sheet that my stamps arrived in and then place my stamps back inside the die cut out opening.  The rubber sheet will help keep my stamps in place and I won't have to worry about losing any.

Well that's about it for today.  Once I get some stamping time I'll have to let you know how I like my new clear mount stamp sets.  There is a clear mount block template available on the Stampin' Up! website if you would like to download it.  The link for the template is here.  Once you are on that page look all the way towards the bottom and you will find where to download it from.

I hope you had a great weekend!  My kiddos are off from school tomorrow so it's going to be a busy one for me!  Thanks for stopping by!

Contact me today if you would like to place an order or to be added onto my mailing list!
To place your Stampin' Up! order- http://www.stampinup.com/ECWeb/default.aspx
My email address- pebbles4@ptd.net
Pin It

January 9, 2012

Hi everyone!  Today I decided to check out the CAS (or clean & simple) challenge on splitcoast stampers.  The challenge was to find ways to use die cuts and since I just recently received my new framelits (labels collection) from Stampin' Up! I knew I wanted to give them a try.

Everything I used to make my card is current, or will be current I should say, with the exception of the designer series paper that I purchased from the Stampin' Up! clearance rack, so if you are purchasing anything from Stampin' Up! be sure to check out those clearance rack items.

I began by first stamping my image and then cutting it out using my framelits and my big shot.  I cut out a larger pretty in pink layer and then I ran that through my big shot using my finial press embossing folder.  Then I colored my image using my SU markers and layered it using dimensionals.  The stamp I used on my card is from the Outlined Occasions stamp set and it is a new Sale-a-bration set that won't be available until Jan. 24th (so you're getting a sneak peek).
My pink designer series paper layer was punched along the bottom using my label punch.  Simply place your dsp only about 1/4" into the punch and punch away.  Move your punch over along the edge of your paper and punch again while trying to keep them lined up- it's really very easy. 

My red designer series paper was scored every 1/4" using my simply score tool and then I folded the paper back and forth.  I used my paper piercing tool to place mini glue dots where the folds of my dsp meets my card base. 

To adhere my sentiment layer onto my accordion folded dsp I used mini glue dots and placed them where the folds of the paper meet my pretty in pink layer.  Using a paper piercing tool comes in real handy for this because once you touch the glue dots they aren't as sticky.

The top part of my pretty in pink layer was adhered using stacked dimensionals.  I'll see if I can get a photo of this so that you know what I am talking about.  Here's a photo of my stacked dimensionals-  
To complete my card I added a mini clothespin with a small piece of twine tied around it- what a cute way to embellish a card.  Twine seems to be the new 'in' embellishment now.
 
Thanks so much for stopping by!  I'm off to get my house straightened up and start supper.  Have a great day!

Stamps: Outlined Occasions
Card Stock: Real Red, Pretty in Pink, White, Retired- SU Designer Series Paper
Ink: Black Stazon
Supplies: Twine, Mini Clothespin, Curly Label Punch, Simply Score Tool, Labels Collection Framelits, Big Shot, Finial Press Embossing Folder, SU Markers- real red & pretty in pink, Dimensionals, Glue Dots
Technique: Paper Folding, Dry Embossing

Contact me today if you would like to place an order or to be added onto my mailing list!
To place your Stampin' Up! order- http://www.stampinup.com/ECWeb/default.aspx
My email address- pebbles4@ptd.net
Pin It

January 8, 2011

Hi everyone!  I made this card for the monthly challenges in my blog group.  I wasn't able to post it earlier because I haven't been feeling well.  It seems that I always get that one bad sickness every winter.  Anyway, I used a new Stampin' Up! Sale-a-bration stamp set to make my card.  The set is called Fresh Vintage.

The challenge this month was 'newness' to create a card using something new, for a new occasion, and using a technique that is new to us.  I did a little more stamping on this card than I usually do and that is something fairly new to me, my stamp set is new and, I'm using this card towards my new year's resolution to send out more cards to my stamping friends.

I began by stamping my background using early espresso ink and the small flower stamp.  I stamped the rich razzleberry card stock using rich razzleberry ink- I like the tone on tone effect it gives.  Then I stamped my main image three times.  Once using early espresso ink, once using rich razzleberry ink and one more time using pretty in pink ink.  I did this because I wanted to cut out the pink and razzleberry flowers and place them over my main espresso image.

Next, I did a bit of faux stitching using my SU mat pack, paper piercing tool, and a white gel pen.  My flower image panel was placed on my card using dimensionals.  My ribbon is SU pretty in pink ribbon.
Be sure to stop by and check out the other cards from the members in our blog group.  I'll list their blogs below.  Again, my apologies for not posting my card sooner.  Have a great day, thanks for stopping by!


Stamps: Fresh Vintage
Card Stock:  White, Early Espresso, Rich Razzleberry
Ink: Early Espresso, Rich Razzleberry, Pretty in Pink
Supplies: Ribbon, SU Mat Pack, Paper Piercing Tool, White Gel Pen
Technique: Faux Stitching

Contact me today if you would like to place an order or to be added onto my mailing list!
To place your Stampin' Up! order- http://www.stampinup.com/ECWeb/default.aspx
My email address- pebbles4@ptd.net
Pin It

January 4, 2012

Happy New Year to you all!  And what a great way to begin the new year than with Stampin' Up's! new Occasions Mini catalog!  I love the mini catalog this time around! 
Click on the link below to view the mini catalog online-
http://204.228.150.61/catalogs/2012Occasions/20120104_Occasions_en-US.pdf

One more thing to mention, remember the clearance rack blitz ends tomorrow so be sure to take advantage of the items found in the clearance rack. We were told that some of the items may remain and some will not.
Here is the link to the clearance rack:
http://www.stampinup.com/ECWeb/ItemList.aspx?categoryid=493

You can email me with any questions and I'll be happy to help you. 

Contact me today if you would like to place an order or to be added onto my mailing list!
My Stampin' Up! Website- http://www.stampinup.net/esuite/home/lalatty/
To place your Stampin' Up! order- http://www.stampinup.com/ECWeb/default.aspx
My email address- pebbles4@ptd.net
Pin It