November 30, 2010


Since I'm currently hosting a CAS CASE card swap, I decided to case another card from the SU 2010/2011 catalog.  The card I cased can be found on page 121 of the catalog. 

I kept the same layout, but I changed the ink up a little bit, I used different decorative paper, I omitted the button embellishment, I used a different color ribbon, and I decided not to add a sentiment.  I almost forgot to mention that I used my ticket corner punch on the upper two corners, sometimes I forget about that little punch and it adds so much to a card.

There's no special technique to making this card.  All you need to do is to be sure to use your stamp-a-ma-jig to help you align the images.  I love using this stamp set because it's so versatile and so easy to use.

Until just the other day, I've never cased any cards out of the SU catalog and I'm finding that it's so fun to look through at the examples and see what I can make.  I have all of the SU catalogs all the way back to 1995 and I'll have to start looking through them more often. 

Have a great day and thanks for stopping by!

Stamps: Aviary
Card Stock: Certainly Celery, White, SU DP
Ink: Certainly Celery, Apricot Appeal, Bashful Blue, Pixie Pink
Supplies: Ribbon, Stamp-a-ma-jig, Ticket Corner Punch
Technique: 2 Step Stampin' Pin It

November 29, 2010


I've been busy making Christmas cards lately and this one was inspired by my Christmas tree.  Yep, I have a purple Christmas tree! 

I first stamped the ornaments using perfect plum, pale plum and silver encore ink and then I stamped the ornament hangers using my stamp-a-ma-jig.  Once the ink was dried I stamped over the ornaments again using VersaMark ink and then I quickly sprinkled SU's dazzling diamonds glitter over them.  My next step was to heat emboss the glitter.  It looks so pretty in person!

Just below my stamped/embossed ornaments I scored two lines using my score-pal and then I decided to add some silver cording over top of my dry embossed lines.  And finally, I sponged along the edges of my white card stock using perfect plum ink and then stamped my sentiment just below my score lines (and to the right).

Thanks for stopping by!  I hope you all had a great holiday weekend.  My weekend was great and I was able to get some shopping done.  See you tomorrow!

Stamps: Tree Trimmings, Christmas Greetings
Card Stock: Pale Plum, Perfect Plum, White
Ink: Pale Plum, Perfect Plum, Silver Encore, VersaMark
Supplies: Silver Cording, Stamp-a-ma-jig, Heat Gun, Dazzling Diamonds Glitter, Score-pal, Sponge
Technique: Heat Embossing, Dry Embossing, 2 Step Stampin', Sponging Pin It

November 26, 2010


Hi everyone and if you are brave enough to do some shopping today I hope you have a great time.  I just got home a few minutes ago from Walmart.  I wanted to purchase some of the 12 midnight deals and it was a mad house there.  People were so rude and cutting in line, but I was nice and polite and I got all of the items I wanted.

I wanted to mention that I am again hosting a CAS card swap.  This time it's a CASE, CAS swap.  Meaning that all you need to do is to find any CAS (clean & simple) card in the gallery on splitcoast stampers and CASE (copy and share everything) it.  Generally speaking to CASE a card means that you would find a card you like and change two things about it- it could be the layout, color of cardstock used, the stamps, etc.  You get the idea, right?  You will find more information about my card swap here, please feel free to join us and ask me if you have any questions.  I'm always happy to help.  The cards for this swap aren't due until Feb 1st, so there's lots of time to make your cards.  I figured it would be best for everyone if I wanted until after the holidays are over to swap the cards.

So that brings me to my card for today and although I didn't case it directly from the splitcoast gallery I did case this card.  I found this card on page 41 in the current 2010/2011 SU catalog.  I changed the layout just a tiny bit, I used a different Christmas tree image, I used different ribbon, and I used cardstock for my certainly celery scalloped border instead of chip board as show in the example. 

I stamped my image and colored it using my SU markers and my gold zig painty pen for the gold Christmas tree garland.  I didn't need to stamp a sentiment since it was already with my image and so the rest of my card was real easy to put together. 

My certainly celery layer was punched using my scallop border punch and I did some faux stitching along the upper part of my old olive layer.  I decided to go with a red and white checked ribbon which I purchased from Offray.

Well, that's about it for today.  My family and I will be decorating and putting up our Christmas tree today and I'll be busy in the kitchen making turkey soup.  Have a great day and I'll see you on Monday!

Stamps: Fun and Fast Notes
Card Stock: Real Red, Barely Banana, Certainly Celery, Old Olive, White
Ink: Black Stazon
Supplies: Ribbon, Corner Rounder Punch, SU Markers, Gold Zig Painty Pen, White Gel Pen, SU Mat Pack, Paper Piercing Tool, Scalloped Border Punch
Technique: Faux Stitching Pin It

November 25, 2010

Happy Thanksgiving to you all!  I spent some time at my mother in law's house and we had a really nice dinner.  Tonight my teenage daughter and I will be doing our midnight shopping like we do every year although this year there really isn't anything that we need, but it will be nice to just go out and spend some time together. 

I do not have a card to share with you today, but I do have a few pictures that I wanted to post a few weeks ago, but I just never got around to it.  The two pictures below are of my back yard when the leaves were at their peak fall color.  Of course the leaves are now all off the trees and we even have some snow on the ground.  I just had to take a picture of how pretty the leaves, my husband said it was a 'blog worthy' photo.


The next picture of my children on Halloween.  I took this picture right before they went trick or treating.  My older daughter stayed home and gave out candy to the children who came to our home and my husband and I took our smaller children around the neighborhood.  The baby was Dorothy from The Wizard of OZ and my son was a fire fighter again this year.  That is all my son wants to be for Halloween, he was a fire fighter last year too! 

This is one of the nicest photos I have of my three children together and of course did you notice the pumpkin I carved!?   I know it's hard to see in my photo, but it's a carving of a haunted house.


Well, that's all I have for today.  I'm off to get ready for some shopping.  I hope you all had a wonderful Thanksgiving and I'll try to post again tomorrow.  I'm not sure yet if I will have time because I will be spending the day putting up our Christmas tree and making turkey soup.  I do this every year on black Friday- it's sort of my tradition. Pin It

November 24, 2010


Hi everyone!  This is the card I made for this week's designed2delight's progressive challenge.  Isn't this skater penguin just the cutest!?  I also made my card for the double delight challenge in which we were to use this image along with some type of snowflakes.

The snowflakes I used on my card are my embossed cuttlebug background and a few punched snowflakes I made from the negative part of my EK Success snowflake border punch.

To create the image part of my card, I first printed it out, heat set it using my heat gun, and then I colored it using my SU markers.  Next, I decided to color in some of the area below the penguin using my bashful blue marker and then I put some crystal effects over top of that.  While the crystal effects product was still wet I sprinkled some dazzling diamonds glitter over top of it and then I let it dry. 

Once my image dried (it took a few hours) I began assembling my card.  I used my nesties to cut out my image and card stock layers and then I decided to use my white gel pen for a little bit of an accent along my red and bashful blue layers.

Thank you so much for stopping by and I hope you liked my card.  I wasn't quite sure about the color combination I used, but I think I made it work.  Have a great rest of the day!

Stamps: Skater Penguin- Designed2Delight digi image, SU's Snow Swirled- sentiment
Card Stock: White, Bashful Blue, Real Red, Certainly Celery
Ink: Black Stazon
Supplies: Ribbon, White Gel Pen, Square Nesties, Scallop Square Nesties, Stamp-a-ma-jig, SU Markers, Crystal Effects, Dazzling Diamonds Glitter
Technique:  Dry Embossing Pin It

November 23, 2010


Hi everyone!  Today I have a real easy Christmas card to share with you.  I've been in such a Christmas mood lately I can't seem to get enough Christmas cards lately, good thing too because Christmas is only 31 days away!

I love this layout and I know I use it a lot, but it's perfect for so many images.  I received this image through an image swap on splitcoast stampers.  This image is from Great Impressions and it's called Pepperment and Holly Border.

I simply colored in the image using my SU markers and then I decided to add some glitter on the berries of my image.  I also added a wavy border (using my SU marker) along the top and bottom edge of my image. 

My certainly celery layer was punched using my scallop trim border punch and then I added a ribbon at the top of my card.  I decided to use white ribbon and then I tied scraps of certainly celery and old olive ribbon which I colored using my SU markers- that's a great idea if you don't have exactly the ribbon color that you need.

Have a great rest of the day, I have some house work to get caught up on and my husband's grandmother is coming over to spend some time with the children. 

Stamps:  Pepperment and Holly Border- Great Impressions
Card Stock: White. Real Red, Certainly Celery
Ink: Black Stazon
Supplies: Ribbon, SU Markers, SU Dazzling Diamonds Glitter, 2 Way Glue Pen, Scallop Trim Border Punch Pin It

November 22, 2010


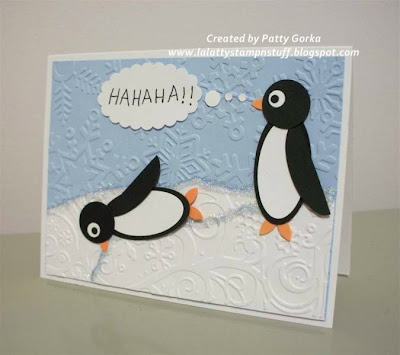
There's a cute little story behind the card I'm sharing with you today.  My teenage daughter has had a substitute English teacher for the first part of this year and her last day was this past Friday.  The students grew to love her and they didn't want to see her go.

Anyway, one day she was telling the kids a few jokes and one in particular they thought was really cute.  If I can remember correctly the joke went like this:  What is black and white, and black and white, and black and white?  Answer- a penguin rolling down a hill.  (next part of the joke)  What's black and white and laughing?  Answer- the penguin that pushed him.  So that's the story behind this card. 

On the teacher's last day my daughter wanted to give her teacher a card with a penguin on it and my daughter said she wanted it to be rolling down the hill.  This card was my daughter's idea; however as she was looking through the card gallery on splitcoast stampers and she spotted this card that she really liked and so we decided to make the penguins out of punches like blindstamper did.

We already knew that we were going to create a hill and emboss the background with snowflakes and the snow using a swirly folder.  Both of these folders are from my Cuttlebug Winter Wonderland set.

First, I embossed the blue background and then I tore a piece of white card stock and then I ran that through my cuttlebug.  I adhered them both to my card and then I added the glitter along the edges. 

My next step was to create the penguins.  My daughter helped making these and we started punching the body, then the head and lastly the feet and wings.  We used glue dots to place everything together (I love using my glue dots and they always seem to stick so well when I making projects like this).

These are the punches that we used to create the penguins:

Large Oval Punch- body
Small Oval Punch- white part of body and wing
1" Circle Punch- head
1/4" Circle Punch- white part of the eyes, bubbles for the caption
Small Circle Hole Punch- black part of the eyes, bubbles for the caption
Spring Bouquet Flower Punch- feet and nose (I cut off some of the petals)
Scallop Oval Punch- message bubble

My daughter decided to write in the caption using my SU black marker.  She wanted that penguin to be laughing and so that's why she decided to just write ha...ha...ha...!

The teacher absolutely loved this card and she knew right away that it was handmade.  She even asked if we had a cuttlebug, so she must have been into stamping/card making herself.  She told my daughter that she didn't have the folders we used and that she loved them.  It's nice giving a card when you know that the person who received it loves it!  Plus her classmates were really impressed and they asked her if she made the card, they almost didn't believe her.

Stamps: None
Card Stock: White. Bashful Blue, Black, Only Orange
Ink: None
Supplies: Cuttlebug, Cuttlebug Embossing Folder Winter Wonderland, SU Black Marker, SU Dazzling Diamonds Glitter, 2 Way Glue Pen, Glue Dots, Large Oval Punch, Small Oval Punch, 1" Circle Punch, 1/4" Circle Punch, Hole Punch, Scallop Oval Punch, Spring Bouquet Flower Punch
Technique: Dry Embossing, Paper Tearing, Punch Art Pin It

November 17, 2010


Hi everyone!  I can't believe it's Wednesday already!  Where does the time go?  Christmas will be here before you know it and in keeping with that theme I have another Christmas card to share with you. 

As many of you know I love making white cards with lots of white space and I saw a card in the gallery on splitcoast yesterday and in the card description I read that there was a challenge to create a card using lots of white space.  I'm not really familiar with what the challenge was or what was for, but anyway, I decided to make a card of my own using lots of white space.

I just recently got this image through the pay it forward images thread on splitcoast.  It's made by Stampavie and it's called Star Gazing, isn't it cute?

This image doesn't really need a whole lot of coloring.  I only needed to color in the trees, holly, and the star.  The road is water colored using my water color crayon and blender pen- I water colored this part of my image because I didn't want it to stand out and be too dark.

Just below my image I created two embossed lines using my score-pal and then below that I stamped my sentiment.

My background is embossed using the snowflake embossing folder from the Winter Wonderland Cuttlebug embossing folder set and then I added a piece of silver elastic cording instead of ribbon.

To finish off my card I decided to add some SU dazzling diamond glitter along the ground where the polar bears are sitting and on the snowy area of the tree.

Thanks for stopping by, have a great rest of the day!

Stamps: Stampavie Star Gazing, SU Christmas Greetings- for my sentiment
Card Stock: White
Ink: Black Stazon
Supplies: Silver Elastic Cording, Cuttlebug, Cuttlebug Embossing Folder Winter Wonderland, Score-pal, SU Markers, SU Dazzling Diamonds Glitter, 2 Way Glue Pen, Water Color Crayons, Blender Pen, Stamp-a-ma-jig
Technique: Dry Embossing, Water Coloring Pin It

November 16, 2010


This is my card for this week's Designed2Delight challenge and also for the Double Delight challenge found  this digi image along with adding some sparkle.

After I printed the digi image, I set the ink using my heat gun and then I colored it using my SU markers.  I added a few dots on her shirt using my white gel pen and her face was water colored using my SU crayons and blender pen.  I didn't use my marker on her face because SU markers tend to be a bit rich/deeper color for skin tone.

The wings are really glittery in person.  I colored them first with my SU markers and then I went over that with my VersaMarker and I lightly dusted SU's Iridescent Ice Embossing Powder, and set that using my heat gun.  I actually did this step twice and it's super glittery.  If you click on my photo it will enlarge my photo and you might be able to see it a little better.

My background is embossed using my cuttlebug embossing folder that I got from the Winter Wonderland package (it's a set of 6 embossing folders).  I actually embossed my background the first time and then I turned the folder around and embossed it again so that my entire background would become embossed.  I had to do this because this particular embossing folder only has a design on part of it.

For the lower portion of my card I used a small scrap of SU dp that I found in my scrap bin and on top of that I've added my white ribbon.  Just along the bottom of my card I decided to add three rows of paper piercing. 

I hope you like my card and thanks for taking the time to stop on by! See you tomorrow!

Stamps: Designed2Delight Kaela Digi Image
Card Stock: White, Bashful Blue, DP is SU
Ink: VersaMark
Supplies: Ribbon, Cuttlebug, Cuttlebug Embossing Folder Winter Wonderland, SU Mat Pack, Paper Piercing Tool, White Gel Pen, SU Markers, SU Iridescent Ice Embossing Powder, Heat Gun, Water Color Crayons, Blender Pen
Technique: Dry Embossing, Paper Piercing, Heat Embossing, Water Coloring Pin It

November 15, 2010


Hey everyone!  I hope you all had a great weekend!  It was beautiful here and we spent Saturday raking leaves and Sunday the family went out to do some early Christmas shopping.  The weather was beautiful and we all had a great time.  I wish we could have more weekends in November with 60 degree weather!

The card I made for today is another CAS Christmas card.  I was looking through my bin of images and I found this really cute Santa image and I thought it would be perfect for a previous sketch challenge I saw on the clean & simple stamping blog

I simply colored in the Santa images and then I decided to cut them and place them on my real red layer of card stock.  I arranged the Santa images in a different order than they were.  I didn't like that the ball of the middle Santa's hat would have been hanging off of the edge of my card.

Then I punched my certainly celery card stock layer using my EK Success wavy border punch, I added my ribbon, and lastly my sentiment.  And that's about it, real quick and easy!

Well, that's all for now, it's late and I'd better get some sleep.  Hope you had a great day and thanks for stopping by!

Stamps:  High Hopes Three Pane Santa, Sentiment is SU's Christmas Greetings 
Card Stock: White, Real Red, Certainly Celery
Ink: Black Stazon
Supplies: Ribbon, Markers, Stamp-a-ma-jig, EK Success Wavy Border Punch, Scissors for cutting out the Santa faces Pin It

November 11, 2010


Today I decided to step away from my Christmas cards for awhile and I decided to make a fall themed card using this basket harvest digi image from designed2delight.  I also made this card for the double delight and that challenge was to create a clean & simple card.

After printing the digi image I heat set it using my heat gun and then I began to color.  I wasn't quite sure which colors I wanted to go with, but in the end I think it turned out okay.  I really like that I ended up making the basket a ruby red color.

After coloring my image I cut it out using my circle nesties and then I layered it onto my scalloped ruby red card stock.  Next, I embossed the background of my card and then I began putting it all together.

My pumpkin pie card stock layer has faux stitching along the top and bottom portion and then I simply tied my certainly celery ribbon in the middle.

My sentiment is from SU's Give Thanks stamp set (I used my marker to color only the words I wanted tfomr that sentiment stamp) and then I punched it using my SU word window punch.

I used my scallop border punch on the tiny strip of pumpkin pie card stock at the bottom of my card.

And that's about it for today, thanks for stopping by and I hope you had a great day!

Stamps: Designed2Delight Harvest Pumkpin Digi Image, SU Give Thanks (for my sentiment)
Card Stock: White, Pumpkin Pie, Ruby Red, DP from Target's Dollar Spot
Ink: Black Marker to color part of the sentiment stamp
Supplies: Ribbon, Cuttlebug, Cuttlebug Embossing Folder Pumpkin Harvest, Scallop Circle and Circle Nesties, SU Scallop Border Punch, SU Mat Pack, Paper Piercing Tool, Glue Dots, White Gel Pen
Technique: Dry Embossing, Faux Stitching Pin It

November 10, 2010


Hi everyone!  Today I'm posting the last of the three CAS Christmas cards that I made for my CAS Christmas card swap. 

I started making my card by first running my card front through my cuttlebug machine.  Next, I wanted to focus on the main part of my card (the ornaments) and I ended up embossing glitter over them.  I colored over the ornaments using my VersaMarker and then I sprinkled SU's Iridescent Ice embossing powder over it.  Then all I needed to do was to heat emboss my glitter.  It's hard to see the glitter on my card, but if you click on my photo the picture will enlarge and you might be able to see it a little better.

My last step was to add my ribbon and stamp my Merry Christmas sentiment.  Although my card does include heat embossing, it's still clean and simple.  I had six of these cards made in about 1/2 hour!

One more thing before I go, I started a new CAS card swap and I would love to have you join me.  You can find my card swap thread here.

Thanks for taking the time to stop on by!  I'm back to my regular postings so be sure to come back tomorrow.   Make it a great day!

Stamps: Christmas Greetings
Card Stock: White
Ink: Black Stazon
Supplies: Ribbon, Cuttlebug, Cuttlebug Winter Wonder Embossing Folder Set, SU Iridescent Ice Embossing Powder, Heat Gun, VersaMark Marker, Stamp-a-ma-jig
Technique: Dry Embossing, Heat Embossing Pin It

November 9, 2010


I hope you are all having a wonderful Tuesday so far!  It's very windy here today so it's a great chance to catch up with my blogging.

The card I'm sharing with you today is another CAS Christmas card that I made for my card swap that just finished up.

I realize that I've made similar cards like this before, but this time I've decided to turn my card vertical and I've added a moon in the upper right hand corner.  And talk about easy, this card is about as easy as it gets and it just goes to prove that you don't need the newest, fanciest tools to create an amazing look.

The first thing I did to create my card was stamp my tree images and I did this by first inking my stamp using old olive ink and then using my garden green I sort of tapped the end of my ink pad right over top of it.  This is what gave me the two toned green look on my trees.  Next, I wiped the green ink off the bird part of the image and then I colored it using my real red marker and stamped it onto my white card stock.

My next step was to create a mask for the moon by punching out a 1" circle and applying it to the upper right hand corner.  I removed this mask once I was finished sponging my background.

To sponge my background I did not do any masking, I simply inked up my sponge and starting with barely banana I sponged behind the trees.  Next, I started sponging the blue part of my sky and I started with the lighter blue and then I worked outward going onto the darker blue.

And to finish off my card I simply stamped my Season's Greetings sentiment.  I decided not to add any ribbon or any other embellishments on my card because I felt that this way it would be good for mailing.

Thanks so much for stopping by and tomorrow I will be posting the last of three CAS Christmas cards that I made for my CAS Christmas card swap.  Have a great rest of the day!

Stamps: Scenic Season
Card Stock: White
Ink: Real Red, Barely Banana, Bashful Blue, Brilliant Blue, Old Olive, Garden Green
Supplies: Sponges, 1" Circle Punch, Real Red SU Marker, Stamp-a-ma-jig
Technique: Sponging, Masking Pin It

November 8, 2010

Hey everyone!  As many of you may know I have just finished up my Clean & Simple Christmas card swap.  I usually try to make it a point to make a few cards for the swaps that I host and today I will be sharing one of the cards I made.


I haven't used these tag punches in a long time and so I thought they would be perfect (along with the image I chose) to make a CAS Christmas card. 

First, I stamped my images and then I punched them out using my small tag punch.  The images are layered on coordinating card stock which I punched out using my large SU tag punch.  Along the bottom of my card I punched the real red border using my MS border punch called Cornice.  My son picked out this punch for me and so I had to use it.

I decided to go with some gold elastic cording for my embellishment.  I have no idea why, but I seem to think that gold goes nicely with red and green rather than silver.

Well that's about it for today.  I have two more CAS Christmas cards to share and I will be posting another one tomorrow.  Make it a great day!

Stamps: Tags So Much
Card Stock: White, Real Red, DP- from DCWV Paper Stack
Ink: Real Red, Glorious Green
Supplies: Gold Elastic Cording, Large & Small SU Tag Punches, Martha Stewart Punch Cornice Pin It

November 1, 2010

Hey everyone!  I'm still alive...LOL  I'm here, but so much as been going on lately and I'm hoping to get back into my regular posting this week.

I'm just finishing up my CAS Christmas card swap, which was a huge success.  If anyone would like to see the cards that I have received from this swap you can see them here.  Only the cards posted towards the top of this album and dated 2010 are from my latest swap.  The rest of the cards in the link I posted are from my CAS Christmas swap I hosted last year. 

I'm also hosting a round robin image swap on splitcoast stampers.  I still have a few openings left in the second group and you are all welcome to come check it out.  Once my second group is full I will be closing the swap.  You can find more information about that swap here.

Have a great day! Pin It