Stampin' Up! Spooktacular! Save 15% Today Only


Good morning!  Today is the day we've been waiting for.  Today is Spooktacular!  Today only you will get 15 percent off almost every stamp we sell!  It has already started and will continue through 11:50 PM (MT) this evening.  

This means all stamps in the current catalogs including: Background stamps, Personalized name stamps, Cookie press stamps, Single-image stamps, and wheels too. This DOES NOT include: Hostess sets, Bundled stamp sets, and Digital stamp brush sets.

If you would like to place an order through me you can do so online.  Here is the link:


http://www.stampinup.com/ECWeb/default.aspx?dbwsdemoid=2084036

Or you can send me your order and I will place your order for you. Remember this offer ends at 11:50 PM Mountain Time so be sure to send me your order early enough. 

Please note- I live in North East Pennsylvania and I am located in the path of this storm that is hitting the East Coast so if you would like me to place your order for you then please send it to me as soon as you can.  I'm worried that I may lose my power and I won't be able to answer any emails or place any orders.  I want to submit your order as early as I can.  For everyone close to this storm....stay safe!
Pin It

Dies & Punches Snowman


Good Morning!  This is the card I made for this week's 52 Christmas Card Throwdown blog challenge.  This week's challenge is to use die cuts and punched pieces on our projects.  I always wanted to make a snowman using the top note die and I figured this challenge was perfect for giving it a try.

I'll list what punches I used below.

Top Note Die- snowman body
3/4" Circle Punch- snowman eyes
Owl Punch- circles for the mouth
1 1/4" Square Punch- insert orange card stock in slightly for triangle for nose
Blossom Bouquet Flower Punch- the three red flowers on the hat
Little Leaves Sizzlit Die- leaves on the hat
Word Window Punch- for the sentiment

The snowman hat is dry embossed using my square lattice embossing folder.  The rim of the hat is not embossed.  I cut the black card stock first and then ran it through my big shot machine.  You'll want to always remember to cut/punch first and then emboss (it's usually much easier this way).

I'm not sure if you noticed, but I pulled out my SU chalks and I used the light pretty in pink chalk just to give the cheeks of the snowman some color.  The rest of my card was a matter of punching out the pieces and assembling them together.

Below are two more photos so that you can see my card close up.


Thanks so much for stopping by!  I hope you have a great weekend!

Stamps:  Teeny Tiny Wishes
Card Stock:  White, Black, Wild Wasabi, Real Red, Tangerine Tango, DSP- Subtles Paper Stack
Ink:  Black Stazon
Supplies:  Brands, SU Mat Pack & Paper Piercing Tool- for hole in flowers for brad, Big Shot, Square Lattice Embossing Folder, Top Note Die, Little Leaves Sizzlit Die, 3/4" Circle Punch, Owl Punch- for the circles of the mouth, 1 1/4" Square Punch- for the nose, SU chalks- for the pink cheeks, Glue Dots, Word Window Punch, Blossom Bouquet Flower Punch, White Gel Pen, Tombow Multi Glue
Technique:  Dry Embossing, Punch Art

Contact me today if you would like to place an order or to be added onto my mailing list!
My email address- pebbles4@ptd.net
Pin It

ABC New to you challenge

Good Evening!  I made this card for this week's ABC blog challenge and the challenge is to create a card using something 'New to You'.  I actually used two things that are new to me.  I used the window framelits and the stamp set.  I recently bought this retired stamp set and this is the first time I'm using it.

I stamped the flowers using baja breeze and soft suede ink and then they were cut out using the window framelits.  I also cut another window framelit layer and embossed that using the square lattice embossing folder. 

The designer series paper I used is also retired.  I used the same sheet of dsp, but the one piece is flipped over and sometimes doing this ensures that the papers will match nicely.

My very vanilla card base is dry embossed towards the top portion of my card using my simply score tool board and the bottom part of my very vanilla card has two rows of paper piercing.

My sentiment was stamped and punched using the large and scallop oval punches and for this card I decided to use use the crochet ribbon since it's the same vanilla color and I thougth it would match nicely.  I also added 3 pearls on my image panel in the upper right hand corner. 

I hope you liked my card and there's still time to play along in the ABC card challenges this week!  Thanks for stopping by!

Stamps:  Kind & Caring Thoughts
Card Stock:  Very Vanilla, Soft Suede, Baja Breeze, DSP- Elegant Soiree (Retired)
Ink:  Soft Suede, Baja Breeze
Supplies:  Big Shot, Crochet Trim, SU Mat Pack, Paper Piercing Tool, Large Oval Punch, Scallop Oval Punch, Square Lattice Embossing Folder, Basic Pearls. Simply Scoring Tool, Window Frame Collection Framelits
Technique:  Dry Embossing, Paper Piercing

Contact me today if you would like to place an order or to be added onto my mailing list!
My email address- pebbles4@ptd.net
Pin It

Exciting Stampin' Up News!

Good afternoon!  I have some exciting Stampin' Up! news to share with you!  I have the details listed below and if you have any questions please feel free to send me an email at pebbles4@ptd.net

Sell-A-Stamp Spooktacular

For one day only, you will get 15 percent off almost every stamp we sell! The goal is to sell more stamps in a single day than ever before.  Monday October 29th is the one-day Sell-A-Stamp Spooktacular!

Here are the details:  Starting at 12:00 AM (MT) and ending at 11:50 PM (MT), almost every stamp we sell will be 15 percent off.

This means all stamps in the current catalogs including:  Background stamps, Personalized name stamps, Cookie press stamps, Single-image stamps.  This DOES NOT include:  Hostess sets, Bundled stamp sets, Digital stamp brush sets.

You can place your order through me online on Monday October 29th by clicking the link below:

http://www.stampinup.com/ECWeb/default.aspx?email=PEBBLES4%40PTD.NET&phone=5704036144

Or you can send me your order and I will place your order for you. Remember this offer ends at 11:50 PM Mountain Time so be sure to send me your order early enough.

More Single Stamps

Stampin’ Up! has just added ten more individual stamps that are available for purchase -including three images that you have never seen before!  These stamps will be available for purchase through January 2, 2013 and yes, you can purchase them on Monday October 29th during the Spooktacular 15% off promotion. 
Here is a link if you would like to see the single stamps-

http://www.stampinup.com/ECWeb/ItemList.aspx?categoryID=1164

If  you're looking for a new Stampin' Up! demonstrator I'd love to help you!  I've been stamping and creating cards for nearly 9 years and I've been a Stampin' Up! demonstrator for almost 2 years.  I'm not one of the bigger demonstrators and so far I've been able to make my minimums (okay I had to place an order last quarter, but shhhhh don't tell my husband.....LOL).  So if you're looking for a new demonstraor I'd love to help you.  Feel free to send me an email!  Have a great day!

Contact me today if you would like to place an order or to be added onto my mailing list!
To place your Stampin' Up! order- http://www.stampinup.com/ECWeb/default.aspx
My email address- pebbles4@ptd.net
Pin It

Thanksgiving Leaves

Here's another quick fall/Thanksgiving card I made.  I used a retired stamp set called Lovely Leaves.  I love this leaf stamp set and I use it every year.

I simply inked up the stamps and stamped the leaves in the two corners.  You could use any color ink you wanted and this is a great card for mailing since it's flat and won't require extra postage.

My sentiment is from a current Stampin' Up! stamp set called Day of Gratitude.

Thanks for stopping by and have a great day!  I'm going to spend my day cleaning and getting my house back in order, it's been unorganized since I started my kitchen painting project last week.  See you tomorrow!

Stamps:  Lovely Leaves, Day of Gratitude
Card Stock:  White, More Mustard
Ink:  Chocolate Chip, Garden Green, More Mustard, Cajun Craze

Contact me today if you would like to place an order or to be added onto my mailing list!
To place your Stampin' Up! order- http://www.stampinup.com/ECWeb/default.aspx
My email address- pebbles4@ptd.net
Pin It

Halloween Pumpkin Smiles

Hi everyone!  I'm posting another Halloween card I made.  I used a retired Stampin' Up! stamp set called Pumpkin Patch.  This is a set from 2 years ago (I think).  It's so cute; I love the possibilities of this set.  You can stamp the pumpkins without the faces and then they could be fall/Thanksgiving images.

I love making cards that have lots of stamping on them and so I began making this card with all my stamping.  I stamped the pumpkins, stamped the stems and grass using green ink, and then I stamped the faces on the pumpkins.

Once all my stamping was complete I started putting my card together.  I was trying to keep this card more clean & simple so I didn't want to add too many layers.  I also wanted to keep this card flatter for easier mailing and that's why I only added a small piece of ribbon with a brad for my embellishment.

Well, that's about it for today.  I'm just on my way outside to clean up the yard.  It's such a lovely day here and I hate to stay indoors and waste the sunshine.

These are some of my very favorite challenges and I'm entering my card for them-
Come and Get it Challenge- make a Halloween card
Try it on Tuesday- Halloween theme challenge
Use it Tuesday- using orange & my hoarded item is my stamp set.  I've had this set since last year and this is the first I'm using it.

Have a great rest of the day and thanks for stopping by!

Stamps:  Pumpkin Patch
Card Stock:  White, Black, DSP- Paper Stack
Ink:  Black Stazon, Gumball Green, Pumpkin Pie
Supplies:  Ribbon, Brad, Hole Punch- for brad
Technique:  2 Step Stampin'

Contact me today if you would like to place an order or to be added onto my mailing list!
To place your Stampin' Up! order- http://www.stampinup.com/ECWeb/default.aspx
My email address- pebbles4@ptd.net
Pin It

Thanksgiving Squares

Good morning! This is another card I made for a clean & simple card swap that I just finished hosting.  I got the inspiration for these colors from all the pretty leaves that I have seen lately especially around where I live.  We're probably at the peak of our color right now and soon I'll be raking up the yard.

I used retired designer series paper, but this will work with any dsp and you can change this layout to make bigger squares, smaller ones, you can add a few more, or even make it your entire background.

I punched out 4 of the 1 1/4" squares and I placed them on my cajun craze layer.  I left enough room towards the bottom so that I could add my twine.  Then I stamped the leaf stamp and cut out 2 of the leaves and placed them right above where I knotted the twine. 

Lastly, I stamped one leave image in the bottom left hand corner and then I stamped my sentiment.  I love the CAS look of this card and how easy it was to make and I hope you do to.

Have a great day and thank so much for stopping by!  I hope you'll become a follower :)
Stamps: Day of Gratitude
Card Stock:  Very Vanilla, Cajun Craze, DSP- Autumn Spice (Retired)
Ink:  Old Olive, Chocolate Chip
Supplies:  1 1/4" Square Punch, Twine, Scissors, Stamp-a-ma-jig

Contact me today if you would like to place an order or to be added onto my mailing list!
To place your Stampin' Up! order- http://www.stampinup.com/ECWeb/default.aspx
My email address- pebbles4@ptd.net
Pin It

Curly Cute Season's Greetings


Hi everyone!  Today I'm posting a card I recently made for a clean & simple card swap that I just finished hosting.  This card is probably right on the edge of not being CAS, but it was it was simple to make.  It's really just a mixture of dry embossing and using die cuts.

I began making my card by dry embossing a piece of white card stock using the perfect polka dots embossing folder.  Next, I cut out the lattice card stock using the lattice die.  Then I took another piece of white card stock and using a label framelit I cut out the center/frame portion of my card and then I layered all three pieces together.

Once that part of my card was complete I made the flower which was punched out and then dry embossed using the petals-a-plenty embossing folder (you can dry emboss more that one flower at at time).  I used the little leaf sizzlit die to cut out the leaf and then I stamped my Season's Greetings sentiment.  I used glue dots to adhere the flower and leaf.

Before I sign off for the night, I'm excited to tell you that tomorrow is the big day!  My challenge blog starts tomorrow and the DT has some really wonderful cards made so make sure to stop on by and check out our first challenge.  I hope you'll play along with the challenges and follow us too.  The new challenge blog is called ABC Challenges.  Thanks for stopping by and have a wonderful night!

Stamps:  Curly Cute
Card Stock:  White, Cherry Cobbler, Wild Wasabi
Ink:  Cherry Cobbler
Supplies:  Big Shot, Petals-a-Plenty Embossing Folder, Perfect Polka Dots Embossing Folder, Labels Collection Framelits, Lattice Bigz Die, Little Leaf Sizzlits, 5 Petal Flower Punch, Glue Dots
Technique: Dry Embossing

Contact me today if you would like to place an order or to be added onto my mailing list!
To place your Stampin' Up! order- http://www.stampinup.com/ECWeb/default.aspx
My email address- pebbles4@ptd.net
Pin It

Christmas Lights

Hi everyone!  Today's 52 Christmas Card Throwdown blog challenge is a theme challenge and the theme is Christmas lights.  I had a few different ideas in mind for this challenge, but then I remembered an old Stampin' Up! stamp set that I have with the little elf and his lights.  This set is almost 20 years old!

I stamped the images and colored them with my Stampin' Up! markers.  Two of the elves were stamped, colored, and cut out.  My real red and gumball green card stock layers are dry embossed using my square lattice embossing folder.  Then I used the finishing edgelits for the real red border and my main image was cut using the apothecary accents framelits.

There are dimensionals under the main image layer as well as the two cut out elves.

Thanks everyone for stopping by.   As some of you may know I am in the process of starting my own challenge blog, ABC Challenges and my very first challenge will be this Monday so I hope you'll stop by and play along!

Stamps:  Santa's Elves, Teeny Tiny Wishes
Card Stock:  White, Real Red, Gumball Green, DSP- In Color Paper Stack
Ink:  Black Stazon
Supplies:  Ribbon, Brads, Hole Punch- for brads, Word Window Punch, Big Shot, Apothecary Accents Framelits, Finishing Touches Edgelits, Square Lattice Embossing Folder, Dimensionals
Technique:  Dry Embossing

Contact me today if you would like to place an order or to be added onto my mailing list!
To place your Stampin' Up! order- http://www.stampinup.com/ECWeb/default.aspx
My email address- pebbles4@ptd.net
Pin It

Twisted Sketch


Good Morning!   I made today's card for this week's Twisted Tuesday challenge and the twist this week is to use glimmer mist/spray/spritzers on your projects.  I know it's hard to see in my photo so I wanted to point it out that the glitter mist is on my white card stock behind the stockings as well as on my white background layer.

My card was really easy to make, I followed the sketch below and the only real time consuming part was making the stockings.  I first stamped the stocking images and punched them out using my stocking builder punch.  Then I punched out some more pieces for the top, toe, and heel part of each stocking.  The stockings have dimensionals under them and I added a small jingle bell to each stocking using a glue dot.

This is such a great layout so I hope you come on over to the Twisted Tuesday blog and play along.  Thanks for stopping by and have a great day!

Stamps:  Stitched Stocking, Teeny Tiny Wishes
Card Stock:  White, Baja Breeze, Raspberry Ripple, DSP- Snow Festival
Ink:  Baja Breeze, Raspberry Ripple
Supplies:  Stocking Builder Punch, Dimensionals, Basic Pearls, Jingle Bells, Glue Dots, Scallop Oval Punch, Large Oval Punch, Small Oval Punch, Tombow Multi Glue, Glitter Mist
Technique:  Punch Art

Contact me today if you would like to place an order or to be added onto my mailing list!
To place your Stampin' Up! order- http://www.stampinup.com/ECWeb/default.aspx
My email address- pebbles4@ptd.net
Pin It

ABC Challenges


Hi everyone!  I'm going to keep this post at the top of my blog for a few days. Today I wanted to let you all know that I have started a challenge blog!  It's something I've always wanted to do and my husband convinced me to give it a try!  Please stop on by my new challenge blog found here:

'ABC' stands for 'All Beautiful Cards' and my challenge blog will have a nice variety of challenges so that everyone will be able to play along.

It would be great if you would follow me at my challenge blog and please help me spread the word about my new challenge blog.  I'm also in the process of looking for a few design team members as well, so if this is something you might be interested in please stop by my new blog.  I have more information posted there about my DT call. 
Have a great day and thanks for stopping by!

Contact me today if you would like to place an order or to be added onto my mailing list!
To place your Stampin' Up! order- http://www.stampinup.com/ECWeb/default.aspx
My email address- pebbles4@ptd.net
Pin It

52 Christmas Card Throwdown Color Challenge


Good Morning!  This week's 52 Christmas Card Throwdown blog challenge is a color challenge.  The colors for this challenge are:  green, brown, gold, and vanilla/cream.  I didn't have any gold card stock so I decided to get out my gold embossing powder and create a gold ornament.

I stamped the ornaments and then they were die cut using the ornament framelits.  The gold and green ornaments have dimensionals beneath them.  My very vanilla card stock layer has some score lines in the background and I did that by using my score board and scoring every few lines.

The designer series paper along the top portion of my card was punched using my scallop border punch and placed onto my card.  Then I tied some of the brown ribbon across the dsp and I added a button with some linen thread tied through it. 

Lastly, I added some small bows on each ornament using linen thread and I placed three pearls in the center of the green ornament.  My sentiment was stamped in the lower left hand corner (inbetween the embossed lines).

I've been a bit behind with my blogging lately and I apologize.  I just finished my card swap and I've been busy getting things ready for my new challenge blog to begin.  I'll be back to blogging regularly again in a few days.  Thank you so much for stopping by and have a great day!

Stamps:  Ornament Keepsakes, Teeny Tiny Wishes
Card Stock:  Very Vanilla, Chocolate Chip, Retired DSP- Holly Berry Bouquet
Ink:  VersaMark, Chocolate Chip, Wild Wasabi
Supplies:   Big Shot, Holiday Ornaments Framelits, Simply Score Tool- for background score lines, Scallop Border Punch, Dimensionals, Ribbon, Linen Thread, Button, Gold Embossing Power, Heat Gun, Embossing Buddy, Stamp-a-ma-jig, Basic Pearls
Technique:  Heat Embossing, Dry Embossing

Contact me today if you would like to place an order or to be added onto my mailing list!
To place your Stampin' Up! order- http://www.stampinup.com/ECWeb/default.aspx
My email address- pebbles4@ptd.net
Pin It

52 Christmas Card Throwdown ~ Sketch


Good morning!  This week's 52 Christmas Throwdown blog challenge is a sketch Challenge.  See below for a picture of the sketch and be sure to visit the 52CCT blog (link posted above) for some special news this month.

I decided to make the bigger circles into ornaments and my images were stamped, colored, and then cut out and placed onto the punched out circles.

My blue background was embossed using the perfect polka dots embossing folder and all my circles were placed onto my card using dimensionals.  To help make the punched out circles look like ornaments I used my jewelry tag punch and I placed the punch out at the top of the circle and I tied on a nice bow using twine.

I sponged all around the edges of my circles using bashful blue ink and then I lightly went all around the circle edges using my 2 way glue pen and then I dipped the circle edges in glitter- it looks so neat in person!


And here is a photo of the sketch for this week's challenge.

Thanks so much for taking the time to stop by! If you have a moment be sure to visit the other DT member's blogs and see what they've created using this sketch!  Have a great day!  Don't forget to check out my new challenge blog found here, the first challenge begins on Oct 22nd.

Stamps:  Holiday Helpers, Teeny Tiny Wishes
Card Stock:  White, Bashful Blue, Retired Bashful Blue DSP
Ink:  Black Stazon, Bashful Blue
Supplies:  Twine, Jewelry Tag Punch, Word Window Punch- for sentiment, 1 3/4" Circle Punch, 1 1/4" Circle punch, 3/4" Circle Punch, 2 Way Glue Pen, Dazzling Diamonds Glitter, Big Shot, Perfect Polka Dots Embossing Folder, Hole Punch- for Jewelry tag, Dimensionals, SU Markers, Scissors- for cutting out images, Sponge, Mini Silver Brads
Technique:  Dry Embossing, Sponging

Contact me today if you would like to place an order or to be added onto my mailing list!
To place your Stampin' Up! order- http://www.stampinup.com/ECWeb/default.aspx
My email address- pebbles4@ptd.net
Pin It

Crafty Gal Blog Group Project

Hi everyone!  Today I made something different. The blog group I belong to has a monthly challenge and this month is was Athina's turn to host a challenge and her challenge was to  "Think Outside the Box".  We were to create a project with no squares or rectangles (not even the base of a card or scrapbook layout). Plus we were to try a new technique.

I ended up making a Christmas ornament.  This is the very first ornament I've ever made.  So what do you think, how did I do?  Below I have a few more close up photos for you.


I used the circle 3-D ornament die that is currently on the clearance rack on Stampin' Up! Here is the link in case you wanted to check it out and I also have a picture posted below for you.  I simply ran the die through my big shot using designer series paper.  It really helps if you use papers from the same pack of dsp becasue they will all match nicely. 

Once my circles were cut out I just folded along the scored lines and started adhering the circles together.  There are 20 total circles on my ornament. 

Before I closed up my ornament with the last few circles, I made a loop with some ribbon and tied a knot at the end.  Then I inserted the ribbon through the ornament so that the knot would be on the inside and I pulled the rest of the ribbon through and opening where the circles meet.  Next, I add the last few circles to finish my ornament and then I decided to add a bow towards the bottom of my ribbon.
If you have time be sure to visit the projects from the other memebers in my blog group-

Lela
Have a great day and thanks so much for stopping by!

Stamps:  None
Card Stock:  DSP- Be of Good Cheer
Ink: None
Supplies:  Big Shot, 3D Circle Die, Raspberry Ripple Ribbon


Contact me today if you would like to place an order or to be added onto my mailing list!
To place your Stampin' Up! order- http://www.stampinup.com/ECWeb/default.aspx
My email address- pebbles4@ptd.net
Pin It

Daisy Notebook

Good morning!  I know I just made and posted a notebook the other day, but my neighbor asked me to make her a book for a friend of hers and it turned out so pretty that I just has to share it with you.  My friend asked for a book using the color purple and she wanted the word miracles on the front. I didn't have stamp with the word miracle on it so I ended up printing it out on my computer.  I have a post of a tutorial, found here showing how I make these note books.
  
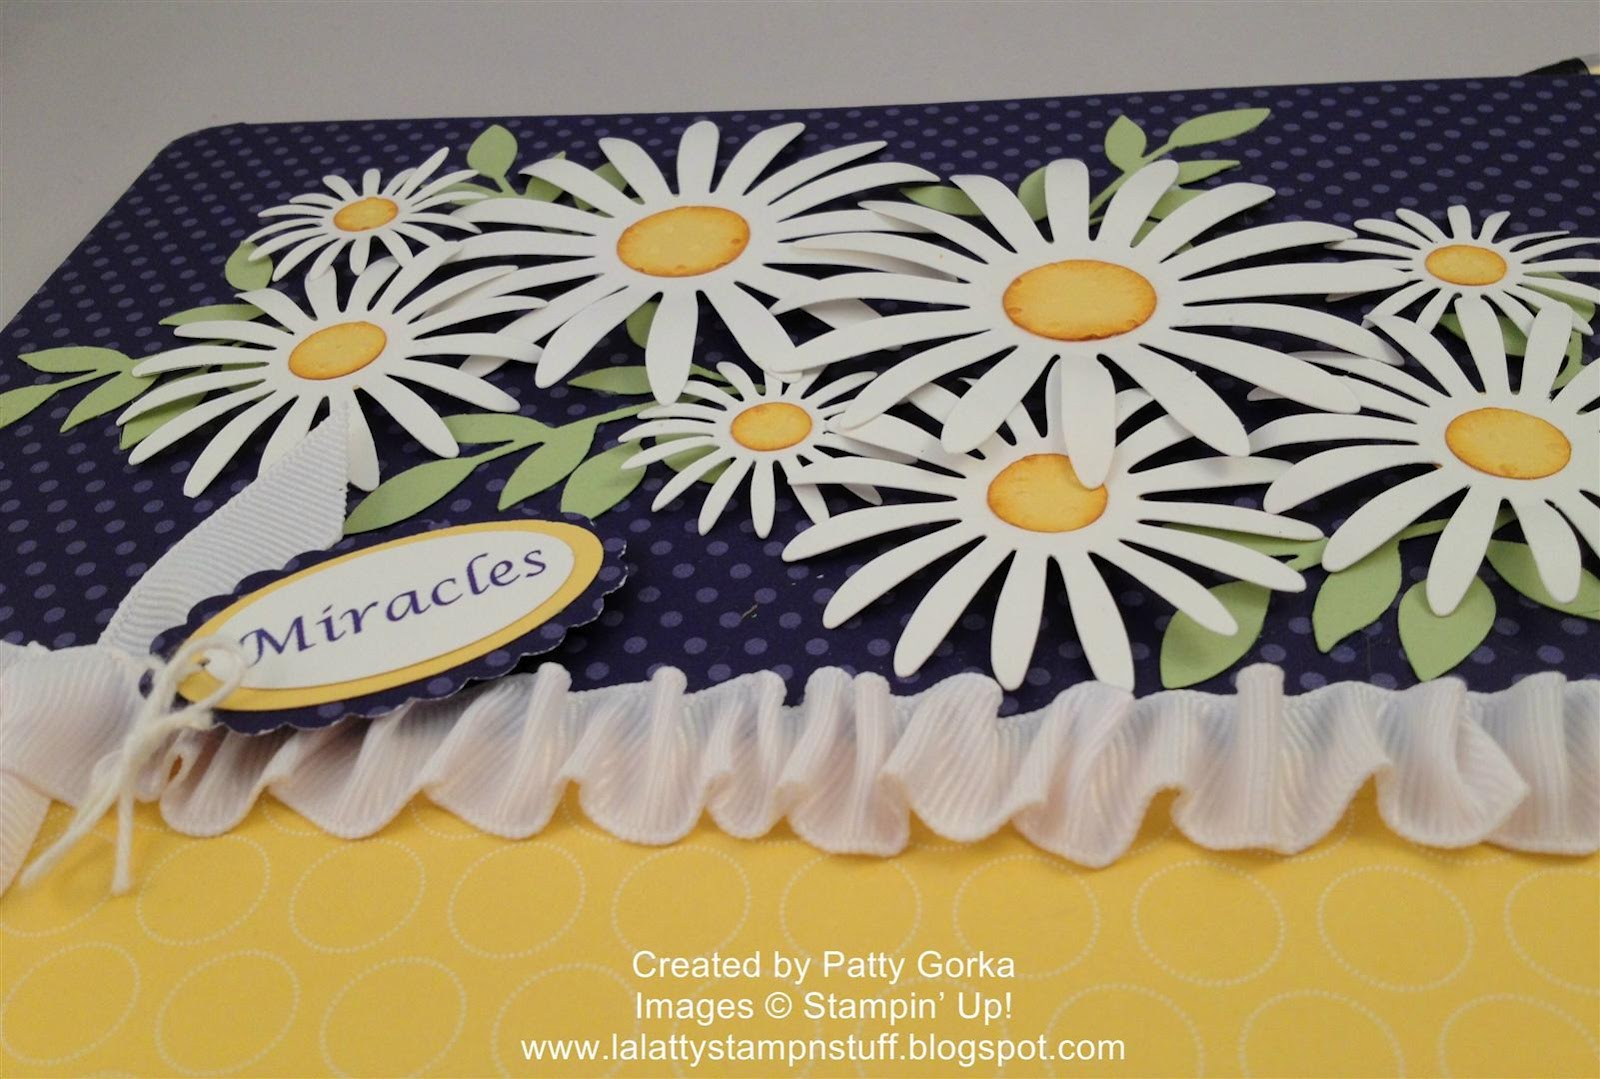
Here is a close up of the flowers I made using the daisy die.  I used a bone folder to help me slightly fold/bend the flower petals- this gives the flowers an awesome raised look.  The flower centers were punched out using circle punches, and then I put them into the perfect polka dots embossing folder and dry embossed them.  Before I glued the flower centers onto the daisies I sponged the edges using more mustard ink.

Here's another close up photo of the flowers.  I placed them onto the note book cover using dimensionals.  The leaves were cut using the little leaves sizzlit and they were adhered onto the note book using tombow multi glue.  In this photo you can see my ruffled ribbon and I do that by placing a long strip of sticky tape on the book and then I start working the ribbon side to side a bit while bunching up the ribbon and pushing it down which makes it stick to the tape.  I use a paper piercing tool to help me do this.  My sentiment is layered using oval punches and I do have one dimensionals under that to help hold it in place.

I thought I would show you a photo of how I finished off the inside of this book.  As you can see my ribbon is flat on the inside.  I only ruffle the ribbon on the front of the book.

I'm entering my notebook in the following challengess-

Creative Card Crew the challenge was to use the color purple.  Purple must be the predominate color.  I had to play along because purple is also my favorite color!

Totally Gorjuss Challenge- to use both a punch and a die.  I used my daisy die for the daisies (a sizzlit for the leaves) and I used circle punches for the flower centers and oval punches to layer my sentiment.

Tuesday Alchemy Challenge- which was to create anything, but a card or a tag.

Stamps:  None
Card Stock:  White, Daffodil Delight, Certainly Celery, Polka Dot Parade DSP, In Color Retired DSP Stack
Ink:  More Mustard
Supplies:  Big Shot, Daisy Die, Little Leaves Sizzlit, 3/4" Circle Punch, 1/2" Circle Punch, Circle Punch from Itty Bitty Shapes Punch Pack, Polka Dots Embossing Folder, Ribbon, Twine, Scallop Oval Punch, Large Oval Punch, Small Oval Punch, Dimensionals, Tombow Multi Glue, Sticky Strip Tape, Corner Rounder Punch, Composition Book, Refillable Pen, Sponge, Bone Folder, Hole Punch- for tying twine through sentiment
Technique:  Dry Embossing, Sponging, Altered Items

***Before I sign off for the day a friend of mine, Kathi is having a blog candy give-away on her blog and I wanted to share her link with you. Here is the link to her blog candy post so if you have a minute hop on over to Kathi's blog and see what she's offering.***

Thanks for stopping by and have a wonderful day!

Contact me today if you would like to place an order or to be added onto my mailing list!
To place your Stampin' Up! order- http://www.stampinup.com/ECWeb/default.aspx
My email address- pebbles4@ptd.net
Pin It

Stampin' Up! Special & Single Stamp News!


Good evening!  I have some Stampin' Up! news I wanted to pass along.  First, I wanted to let you know about the October special.  During the month of October you can get a FREE Festive Paper-Piercing Pack when you purchase the Ornament Keepsakes Set and Candlelight Christmas Specialty Designer Series Paper.  There are special numbers you need to use when ordering for this special.  Visit my Stampin' Up! website for more information, or better yet sign up for my newsletters and you will receive all the Stampin' Up! news as soon as I receive it.  Keep reading below because there's more.....


Stampin' Up! Single Stamps ~ Stamps Sets Gone Single!
Stampin' Up! is trying something new! They are offering you the chance to buy single pieces from these select stamp sets: Word Play, Perfectly Penned, and Seasonal Sayings. The offer will be available now through January 2, 2013. 

Please send me an email to pebbles4@ptd.net if you would like more information about the single stamps that are now available.  There are flyers that I will send you with the item numbers you must use to order the single stamps.

Also, Stampin’ Up! has lowered their print prices! Lower Print Prices ~ Save More on Photobooks, Cards, & More-Forever! Email me if you would like more details about the lowered print price changes.

Contact me today if you would like to place an order or to be added onto my mailing list!
To place your Stampin' Up! order- http://www.stampinup.com/ECWeb/default.aspx
My email address- pebbles4@ptd.net
Pin It

Twisted Tuesday ~ Rock, Paper, Scissors


It's good morning time....or at least that's how my 3 year old says it..LOL  Today I have some exciting news!  Melina has announced her new design team and I was asked to stay on!  I love her challenges so of course I had to say yes!  Thanks for having me, Melina!  She will be rotating her now so I will only be posting a Twisted Tuesday card every other week.  Now onto the challenge for this week. 

The Twisted Tuesday challenge this week is Rock, Paper, Scissors.  The challenge is to use patterned paper and hand cut with scissors on your creation.  The twist is the Rock" part of our challenge to use diamond glaze, diamond stickles, clear rhinestones, etc.

My rock/diamond is the jewel rhinestones in my background; the paper is the daffodil delight designer series paper behind my lattice die, and the scissors I used for my fussy cutting on my flowers and leaves.

I began making my card by first taking my dsp and placing it onto a piece of card stock.  Then I die cut the lattice and placed that on top of my daffodil delight dsp.  Next, I cut a piece of white card stock to size and using the labels collection framelits I cut out the center- this is the frame portion of my card.  After I had the frame cut out I ran it through my big shot using the square lattice embossing folder.  This entire panel was placed on my card using dimensionals.

To complete my card I stamped a few flowers and leaves and I cut them out and placed them onto my card.  I used glue dots and dimensionals to adhere the flowers and leaves on my card.  The birthday sentiment is from the stamp set teeny tiny wishes and I only stamped the word birthday and it's punched out using my jewelry tag punch.  To finish it off I added a small bow using twine on the tag and the tag also has dimensionals underneath it.  The rhinestones look really neat in my background on the lattice; it's so sparkly in person.

Thanks for stopping by and if you have time be sure to check out the new Twisted Tuesday design team.  Melina has a wonderful group of ladies!

I'm also entering my card in the following challenges-

Lollipop Craft challenge which was to use something old and something new.  My old item is my In Full Bloom stamp set (I've had that for years) and my new item is my lattice die (I just traded for that die and this is the first I'm using it).

and the Stamptacular Sunday Challenge which was to create a birthday day.  My stash of birthday cards is dwindling down so this was a great challenge for me!

and the Sentimental Sunday Challenge which was a 3-2-1 challenge.  This was a really neat challenge and fun too!  I used 3 flowers on my card, 2 Die cuts (the lattice on my background, and the labels collection die for the window frame), and I used 1 embossing folder (on my background- square lattice embossing folder).

Stamps:  In Full Bloom, Teeny Tiny Wishes
Card Stock:  White, Black, Daffodil Delight
Ink:  Black Stazon
Supplies:  Big Shot, Lattice Bigz Die, Square Lattice Embossing Folder, SU Markers, Twine, Jewelry Tag Punch, Labels Collection Framelits, Rhinestone Basic Jewels, Dimensionals, Tombow Multi Glue, Glue Dots, Scissors- for cutting out flowers and leaves
Technique:  Dry Embossing

Contact me today if you would like to place an order or to be added onto my mailing list!
To place your Stampin' Up! order- http://www.stampinup.com/ECWeb/default.aspx
My email address- pebbles4@ptd.net
Pin It