May 30, 2012


Good morning!  I decided to get out my bird punch last night and see what I could create since I haven't used it in quite some time.  This is the anniversary card I ended up making.  Hubby thought this was his anniversary card since our anniversary is coming up soon....nope sorry dear....LOL

The upper portion of my background was embossed using my simply scoring tool.  The lower portion of my background has an embossed top note die with the sentiment placed on top of it.  The Happy Anniversary sentiment is from the teeny tiny wishes stamp set and I punched it out using my word window punch.  I just have to say how much I love the teeny tiny wishes stamp set.  I find myself using it all the time- it's really a wonderful sentiment set.

The designer series paper I used on my card is one of the new papers in the upcoming catalog.  It's called Floral District and it's such a pretty paper pack, I'm sure you will like it too!  I used my simply scoring tool and I scored my dsp every 1/4" and then I folded it back 'n forth like an accordion fold and I placed that on my card using sticky strip tape.

Next, I punched out the leaves using the bird punch and I placed that on top of my dsp using glue dots.  If you plan on trying this it helps if you cut the glue dots in half.  Then I punched out the birds, the wings, I added a dot for the eyes, and I placed the birds on my card.  The bird on the right has stacked dimensionals underneath it to raise it up to the same height as my accordion folded designer series paper.  The bird on the left was simply placed onto my card base and I have that bird sitting up a little more.

In this photo below I wanted to try and show you a close up of the according designer series paper and the birds I made using the bird punch.  As you can see, I used a lot of dimensionals on this card.


The ribbon I used on my card is the new 3/8” stitched satin ribbon.  The new in color ribbon will be available in the new catalog which begins in just 2 days!  I've decided to hold my very first ribbon share and if you would like to read more about that please see my blog post found here.

Well, that's about it for today!  I hope you liked my anniversary card!  Thanks for stopping by!

Stamps:  Teeny Tiny Wishes
Card Stock:  Calypso Coral, Gumball Green, White, Floral District DSP
Ink:  Chocolate Chip
Supplies:  Gumball Green Ribbon, Big Shot, Top Note Die, Square Lattice Embossing Folder, 2 Step Bird Punch, Word Window Punch, Simply Scored Scoring Tool, Chocolate Chip SU Marker- for the eyes. Sticky Strip Tape, Glue Dots, Dimensionals
Technique:  Dry Embossing, Punch Art

Contact me today if you would like to place an order or to be added onto my mailing list!
To place your Stampin' Up! order- http://www.stampinup.com/ECWeb/default.aspx
My email address- pebbles4@ptd.net
Pin It

May 25, 2012

Hi there!  My mother in law graduated from college last night and I wanted to make her a congratulations card and this is what I came up with.  I knew I wanted to use my owl punch and so I started my card by making my owl and I had this spice cake dsp in my scrap bin so that's where I began.

I first punched out the owl and his belly matches the dsp.  From there I made the wings using my scallop oval punch and cutting that punch out in 1/2 gave me both wings.  The eyes are all from the owl punch and the graduation hat I just cut by hand and then I punched a hole in the center for the brad with the linen thread tassel.  To make the diploma I simply took a small scrap piece of very vanilla paper and I rolled it up and tied it with some linen thread.

My pool party card stock was embossed with lines by using my simply score tool and I also punched the upper part of my pool party card stock using my scallop dotted punch.  My very vanilla card stock was run through my big shot machine using the polka dot embossing folder.

My sentiment is from the 2012 SAB stamp set called sprinkled expressions.  I only used a portion of the stamp so I colored it with my chocolate chip marker and then I stamped it onto a scrap piece of card stock and punched it out using my word window punch.

Well, I guess that's about it.  If you have any questions about how I made my card (in case I missed explaining something) feel free to send me an eamil.  My email address is at the end of this post.  Below I wanted to post a photo so that you could see a close up of the owl I made.

Thanks so much for taking the time to stop on by!  I hope you have a wonderful holiday weekend!

Stamps:  Sprinkled Expressions
Card Stock:  Crumb Cake, Chocolate Chip, Very Vanilla, Pool Party, DSP Spice Cake
Ink:  Chocolate Chip- marker
Supplies:  Linen Thread, Owl Punch, 2 Step Bird Punch, Dotted Scallop Ribbon Border Punch, Big Shot, Perfect Polka Dots Embossing Folder, Simply Scoring Tool, Scallop Oval Punch, Modern Label Punch, Word Window Punch, Brad, Hole Punch- for brad, Glue dots, Tombow Glue
Technique:  Dry Embossing, Punch Art

Contact me today if you would like to place an order or to be added onto my mailing list!
To place your Stampin' Up! order- http://www.stampinup.com/ECWeb/default.aspx
My email address- pebbles4@ptd.net
Pin It

May 23, 2012

Hi everyone!  Today I wanted to show you a sneak peek and I also used this week's Mojo Monday sketch found here.  The stamp set I used is one of the new hostess sets called 'A Cherry on Top' which is a set of 9 stamps.  I also managed to use three of our new incolors- Raspberry Ripple, Gumball Green, Summer Starfruit.

I began making my card by first stamping my image.  I stamped the cake stand, then the sentiment, next the cherry (I stamped the cherry using my ink pads and I just sort of touched the cherry stem into the gumball green ink pad) and then the lid to the cake dish.  I stamped the cake stand and cherry twice and then I cut them out and placed them over top of my original image using dimensionals.

I used my big shot for several things on my card.  I used it for the stripes embossing folder and the polka dots embossing folder, but then I also used it for the clear oval die to cut out my main image.  I didn't use the entire Oval Accent Bigz Clear Die- the die is bigger.  I ended up cutting off part of the white card stock on the right and left side of my image.  I love the shape I ended up with and I can see myself using this die over and over again!

I used my Dotted Scallop Ribbon Border Punch for my white card stock behind the summer starfruit layer.  And for my ribbon treatment I tied and nice ribbon around my summer starfruit layer and then I added a white button with some twine tied through the center.  I used my raspberry ripple marker to color my twine- remember if you do this you have to let it dry a few minutes before working with it.  You may have noticed I added another small ribbon knot at the top of the cake dish.

I wanted to try and show you a close up photo so that you could see my stamped images and see the glitter I placed all around the lid to the cake dish.  I wanted to take a minute to let you all know about the new 'firm foam' ink pads Stampin' Up! will be coming out with on the 1st (once the new catalog is released).  I love these new ink pads!  They inked up my solid stamps so nicely and they give such a nice even coating of ink.  It was little effort for me to stamp my images!  Normally I'm tapping and twisting and tapping again and sometimes I have to stamp my images a few times to get one that I like, but not with these new ink pads.  I love them!  If you will be purchasing any of the new incolor ink pads they are the 'firm foam' so you'll be able to try them out and see how you like them.
Well, that's about it for today!  I have to log off and get supper started!  Have a great rest of the day!  Thanks for stopping by and I hope you liked my card today.

Stamps:  A Cherry on Top
Card Stock:  White, Raspberry Ripple, Gumball Green, Summer Starfruit
Ink:  Raspberry Ripple, Gumball Green, Summer Starfruit
Supplies:  Big Shot, Oval Accent Bigz Clear Die, Ribbon, Button, Twine, SU Raspberry Ripple Marker, Stripes Embossing Folder, Perfect Polka Dots Embossing Folder, Dotted Scallop Ribbon Border Punch, Dimensionals, 2 Way Glue Pen, Dazzling Diamonds Glitter, Glue Dots
Technique: Dry Embossing, 2 Step Stampin'

Contact me today if you would like to place an order or to be added onto my mailing list!
To place your Stampin' Up! order- http://www.stampinup.com/ECWeb/default.aspx
My email address- pebbles4@ptd.net
Pin It

May 22, 2012

Good morning!  This week's Twisted Tuesday challenge is to create a vacation themed card and the twist is that it needs to be a CAS (or clean & simple) card.  When I think about going on vacation I always think of the beach and boy, how I would love to be sitting on a beach in this beach chair right now....LOL

I stamped my image and then colored it using my SU markers- tempting turquoise, tangerine tango, sarah sand, and daffodil delight.  I decided to do some paper piecing with the umbrella part of the image using the same designer series paper that I used on the background of my card.

The tempting turquoise layer behind my image panel was crimped using my paper crimper and I have it placed on my card using dimensionals.  I used two of my new punches on my card- my decorative label punch which I used for my sentiment and my dotted scallop ribbon punch which I used on the bottom of my tangerine tango card stock.  For my embellishement I decided to use some twine with a button.

There won't be a new Twisted Tuesday challenge next week. Twisted Tuesdays will be on Vacation. Entrants will be able to be upload to the Vacation challenge until next Sunday, June 3rd.

If you have a moment be sure to visit the blogs and see the other design team member's cards.

Thanks so much for stopping by!  Have a great day!

Stamps:  Sparkling Summer, Cute Converse
Card Stock:  White, Tempting Turquoise, Tangerine Tango, DSP- Island Oasis
Ink:  Black Stazon
Supplies:  Twine, Button, 2 Way Glue Pen, Scissors- for paper piecing, Decorative Label Punch, Paper Crimper, Dimensionals, Dotted Scallop Ribbon Punch
Technique: Paper Piecing

Contact me today if you would like to place an order or to be added onto my mailing list!
To place your Stampin' Up! order- http://www.stampinup.com/ECWeb/default.aspx
My email address- pebbles4@ptd.net
Pin It

May 21, 2012

Good evening! Things here are crazy and with the beautiful weather we've had the past few days I've been trying to get most of the yard work finished.  Today it rained so I had some time to quickly put together a card. 

My card didn't turn out exactly how I had planned, but in the end I think it's okay- or at least that's what my teenage daughter said and so I thought I would post it anyway.

I began by making my lollie or medallion as they are sometimes called.  If you aren't sure how to make these I posted a tutorial awhile back and if you would like to see it click here.  Once my lollie was made all I needed to do was to put together my card.  My pink pirouette card stock is stamped using the longer (narrow) flower stamp from the Bordering on Romance stamp set.

I used the scallop trim border punch along the bottom of my white card stock and my birthday sentiment was punched out using my word window punch.

Well, that's about it for today.  Tomorrow I will be posting the card I made for the Twisted Tuesday challenge.  Have a great night!

Stamps:  Bordering on Romance, Teeny Tiny Wishes
Card Stock:  White, Pink Pirouette, Twitterpated DSP
Ink:  Black Stazon, Pink Pirouette
Supplies:  Scallop Trim Border Punch, Pleated Ribbon, Word Window Punch, 1" Circle Punch, 3/4" Circle Punch, Twitterpated Button, Twine, Simply Scoring Tool, Glue Gun- for gluing lollie together

Contact me today if you would like to place an order or to be added onto my mailing list!
To place your Stampin' Up! order- http://www.stampinup.com/ECWeb/default.aspx
My email address- pebbles4@ptd.net
Pin It

May 15, 2012


Good Morning!  Today's Twisted Tuesday challenge is to create a card with a 'chain'.  We could use a row of bling, a literal metal chain, a row of anything just make it like a chain.  The twist was that our cards must be tall or long. 

The 'chain' on my card is my row of stamped images and my card is longer.  I made my card so that it would fit into a letter size envelope.  My finished card size measures 8 1/2" x 3 1/2".

I began making my card by first stamping my row of circle flower images.  I decided to use the soon to be retired in colors on my card (I'm going to miss this group of colors).  I used my stamp-a-ma-jig to help me line up the circles.  Once my stamping was finished I started assembling my card. 

The bottom layer of concord crush card stock is punched using my scallop trim border punch and in-between each scallop I added a white dot using my white gel pen.  I used the labels framelits die for my sentiment and instead of ribbon I wanted to add some twine on my card.  The center of each flower on my images has a basic pearl and my pear pizzazz panel was dry embossed using my square lattice embossing folder. 

I wanted to take a few extra photos to show you how I embossed that panel since it isn't a standard card size and it's bigger than the embossing folder.  Below are some pictures of how I accomplished this-

Dry embossing a longer piece of card stock is possible, but you will need to choose an embossing folder in which you can match up the pattern.  This technique would work perfectly with the polka dots folder too.  Begin by inserting your card stock into the embossing folder and emboss as much of your card stock as you can.  In the photo below you can see that I was able to emboss about 3/4 across my card stock.

Next, you want to try and match up your embossed card stock with the portion of the folder in which it sits or fits nicely.  You are going to run your card stock through your big shot machine again so make sure that your first embossed area is sitting in the proper groves.

Close your folder and run it through your big shot again.  You do not need to crank your card stock all the way through.  I only ran it through enough to emboss the other half of my card stock.

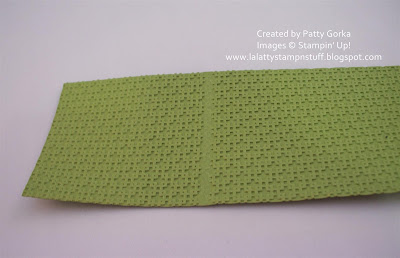
The photo below shows you what your card stock will look like now.  You will end up with a portion of your card stock that ended up being flattened from dry embossing the other side of your card stock.  I'm going to show you how to fix that!

Take your card stock and place it back inside your folder.  Make sure that it is lined up and that the embossed areas are sitting nicely where they belong.  You will see what I mean once you try this yourself.  Now, once your card stock it back inside the folder use your fingers and press down firmly on the folder to help re-emboss those flattened areas.  This will sort of do the trick, but sometimes (especially with this folder) you might need to work those embossed areas back out.

And this is how I make that happen.  I used my scoring tool from my simple scoring board and while you leave your card stock on the embossing folder, open up the folder and using the stylus gently push back down the areas that should be debossed.  If you need to you can flip your card stock over and place it on the other side of the embossing folder and working on the back side you can gently push down on the debossed areas.

And below is my finished embossed 8 1/2" long piece of dry embossed card stock.  I bet you can't even tell where my flattened strip was.

Here is another photo of my finished card.  I hope you liked my card today!  Believe it or not, this is the first 'long' card that I ever made!  I like this size card because it's pretty neat that it fits into a regular letter size envelope. Thanks so much for taking the time to stop by!  Have a great rest of the day!

Stamps:  Just Believe
Card Stock:  White, Concord Crush, Pear Pizzazz, Peach Parfait
Ink:  Concord Crush, Pear Pizzazz, Peach Parfait
Supplies:  Big Shot, Square Lattice Embossing Folder, Twine, Glue Dots, Labels Collections Framelits Die, Stamp-a-ma-jig, Scallop Trim Border Punch, White Gel Pen, Basic Pearls
Technique: Dry Embossing

Contact me today if you would like to place an order or to be added onto my mailing list!
To place your Stampin' Up! order- http://www.stampinup.com/ECWeb/default.aspx
My email address- pebbles4@ptd.net
Pin It

May 14, 2012

Hi everyone! Today I wanted to play along with the clean & simple challenge on Splitcoast stampers. Today's challenge we were to create cards using three panels. This technique is simply done by first stamping your image and then dividing it into three equal sections.

I chose to use my upsy daisy stamp set (I'm really going to miss this stamp set once it retires; this is one of my favorite flower stamps). My niece gave me a yellow daisy plant in a yellow and red basket yesterday for Mother's Day (I'm her God mother) and so that was the inspiration for my card today.

I began making my card by first stamping the daisies using daffodil delight ink and then again using early espresso ink. Then I simply cut my panels apart and I began to assemble my card. For my embellishment I decided to use a daffodil delight button with some twine tied in the center. I colored the twine using my early espresso marker.

I used my scallop border punch to punch along the bottom of my early espresso card stock. My sentiment was stamped and then punched using my word window punch. My daisy image panel was placed onto my card using dimensionals and that's about it!

Be sure to stop by tomorrow. I have a really neat card that I will be posting for the Twisted Tuesday challenge. Have a great rest of the day!

Stamps: Upsy Daisy, Teeny Tiny Wishes
Card Stock: White, Cherry Cobbler, Early Espresso, Daffodil Delight- dsp (retired)
Ink: Daffodil Delight, Early Espresso
Supplies: Twine, Button, Early Espresso Marker- to color twine, Dimensionals, Scallop Border Punch, Word Window Punch- for sentiment

Contact me today if you would like to place an order or to be added onto my mailing list!
To place your Stampin' Up! order- http://www.stampinup.com/ECWeb/default.aspx
My email address- pebbles4@ptd.net
Pin It

May 13, 2012


Hi everyone!  I just wanted to pop in for a moment and wish you all a Happy Mother's Day!  I'm sorry for not being around much last week.  It was a real hectic week for me.  I promise I'll be back to my regular postings this week.  Enjoy your day! Pin It

May 9, 2012

Good Morning!  Today's Twisted Tuesday challenge is to make a birthday card and the twist is that we had to use ribbon.  I decided to stamp and color this pretty flower image from the bordering on romance stamp set.

I just stamped it and colored it using my SU markers and then I cut it out and it's placed onto my card using dimensionals.  I then added a few basic pears in the center of my flowers.  The rest of my card was just a matter of assembling it.  There are a few layers placed together and I used the scalloped edge lit die for the white scallop border. 

My ribbon treatment is simply a piece of pleated ribbon placed onto my card and then I decided to tie some twine on top of it.  I finished it off by threading the twine through the center of my button and then tying a small bow. 

Have a great day and I hope you will play along with us this week!

Stamps: Bordering on Romance, Teeny Tiny Wishes
Card Stock:  White, Blushing Bride, Twitterpated DSP
Ink:  Black Stazon
Supplies:  Big Shot, Edgelit Die, Pleated Ribbon, Button, Glue Dots, Dimensionals, Basic Pearls, SU Markers, Scissors- for cutting out image

Contact me today if you would like to place an order or to be added onto my mailing list!
To place your Stampin' Up! order- http://www.stampinup.com/ECWeb/default.aspx
My email address- pebbles4@ptd.net
Pin It

May 5, 2012

Hi everyone!  My blog group has a monthly challenge and I'm posting this card for this month's challenge.  I must admit that I didn't make this card and I apologize.  I just didn't have time to make a card for today because I had my yard sale today and I'm exhausted.  My sale was so busy and I only had 2 hours of sleep last night so I hope my crafty gal blogger friends will forgive me, but this card does fit our challenge this month and I love this card so much that I just had to post it.  My upline sent me this card and I think it's so pretty!

Our challenge was to create a card for someone we care about and it had to include at least 3 layers, at least 2 embellishments, and at least one sentiment.  Here we have more than three layers, the embellishments are pearls, ribbon, and crochet trim, and the sentiment is thanks!

Inside the circle the background was scored using the simple scoring tool and the kraft paper was dry embossed on the left side.  Other than that the card is pretty much just a matter as assembling it with the butterflies ribbon and sentiment. 

I didn't want to list the supplies used because I didn't make this card I didn't want to give you the wrong details.  Thank you so much for stopping by!  I'll be back on Monday with another card for you!  Have a great rest of the weekend!

If you have time be sure to visit the blogs of the other crafty gals from my blog group.  You will find their blogs posted on the left side of the page.

Contact me today if you would like to place an order or to be added onto my mailing list!
To place your Stampin' Up! order- http://www.stampinup.com/ECWeb/default.aspx
My email address- pebbles4@ptd.net
Pin It

May 3, 2012


Good Morning!  Today I wanted to let you all know that I was featured as a guest designer on the Creative Belli Blog.  I love the Creative Belli blog, they have great challenges and the DT always has such great samples posted!  Here is the link to post where I'm featured as their guest designer, how exciting!  Thank you for having me!

Their current challenge was to make a card with an animal on it and this is what I came up with, as for the colors I chose to use...well the color wheel made me do it...LOL! 

I stamped the bird cages and then stamped a bird in each cage.  The cage on the left and on the top right were stamped and then cut out.  I thought it was neat that I ended up making the birds face each other and the 'friend to friend' sentiment just seemed to fit so nicely.

My background is embossed using the polka dots embossing folder and I used my scallop border punch to punch the little bit of rose red card stock that I used along the bottom of my main image panel. 

Thanks so much for stopping by!  I won't be posting again until Saturday morning because I'm busy getting ready for my yard sale.  Have a great day!

Stamps:  Aviary, Teeny Tiny Wishes
Card Stock:  White, Bashful Blue, Wild Wasabi, Rose Red, Wild Wasabi & Bashful Blue dsp from the designer series paper stack
Ink:  Bashful Blue, Wild Wasabi, Rose Red
Supplies:  Big Shot, Perfect Polka Dots Embossing Folder, Brads, Hole Punch- for brads, Scallop Border Punch, Dimensionals, Scallop Oval Punch, Large Oval Punch, Small Oval Punch,
Technique:  Dry Embossing, 2 Step Stampin'

Contact me today if you would like to place an order or to be added onto my mailing list!
To place your Stampin' Up! order- http://www.stampinup.com/ECWeb/default.aspx
My email address- pebbles4@ptd.net
Pin It

May 1, 2012


Good Morning!  Today over at Twisted Tuesday Challenges it's a sketch challenge and our twist is to use pearls on our card!  I hope you'll help pass the word about this week's challenge.  I love sketch challenges and as soon as I saw this sketch I knew exactly what I wanted to make. 

I used a retired Stampin' Up! stamp set called Garden Silhouettes!  This is one of my very favorite retired stamp sets!  I love to color this flower stamp using my SU markers and that's exactly how I made this card.  I inked up my stamps using my SU markers and then I stamped it onto my card stock.  I repeated this process three times, once in each corner and again on my main image panel.

I added a few basic pearls in the centers of the flowers and then I stamped my sentiment.  I decided to dry emboss the pretty in pink layer in the middle of my card.  I used my final press embossing folder- I sometimes do this just to give that little extra something to my cards and I'll left that border a little bigger around the edges. 

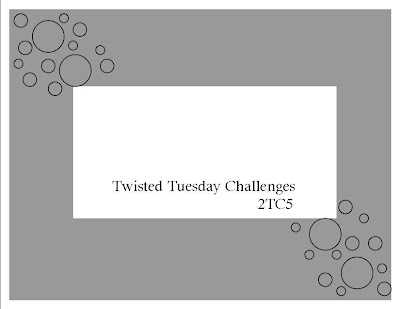
Below is a picture of the sketch for this week's challenge. 
Well, that's about it for today!  I wanted to take a moment to let you all know that I will be busy getting ready for my yard sale this weekend.  I'm not sure how much I'll be able to update this week, but for sure I'll be back as soon as I can.  I just wanted to let you all know what I'm up to in case I can't get some stamping time.  Have a great day and thanks for stopping by!

Here are the other Twisted Tuesday Challenge DT member's blogs in case you wanted to see their cards-
Melina- owner

Stamps:  Garden Silhouettes, Teeny Tiny Wishes
Card Stock: White, Pretty in Pink, Early Espresso
Ink:  Early Espresso
Supplies:  Basic Pearls, SU Markers- pretty in pink, early espresso, certainly celery, Big Shot, Final Press Embossing Folder
Technique: Dry Embossing

Contact me today if you would like to place an order or to be added onto my mailing list!
To place your Stampin' Up! order- http://www.stampinup.com/ECWeb/default.aspx
My email address- pebbles4@ptd.net
Pin It