Double Embossed


Good Morning!  I hope you had a wonderful weekend!  The card I made today is for this week's ABC blog challenge which is to create a card that is double embossed.   You can use heat and dry embossing or you can use 2 different dry embossed patterns.  I decided to use heat embossing on my background and a dry embossed layer behind my flower.  My striped green layer has some paper tearing across the top.

I used the large open flower stamp from the SU Field Flowers stamp set for my heat embossing on my background.  It turned out great!  For my main flower image I wanted to cut it out so that I could layer it onto a dry embossed panel, I stamped it and cut it out using scissors and then an x-acto knife for the tricky smaller areas. The flower is placed onto my dry embossed layer using dimensionals.  I had to cut some of the dimensionals in half so that they would fit behind the flower stem.

To finish my card, I added some crochet trim ribbon and my sentiment that I decided to place sideways along the flower image panel.  I hope you can come play along with us this week.  The DT over at ABC Challenges would love to see your cards too!  Have a great day!

Stamps:  Field Flowers, Teeny Tiny Wishes
Card Stock:  Very Vanilla, Rose Red, Wild Wasabi, Subtles DSP Stack
Ink:  Rose Red, Regal Rose, Wild Wasabi, Black Stazon, VersaMark
Supplies:  Crochet Trim Ribbon, Big Shot, Fancy Fan Embossing Folder, Decorative Label Punch, Clear Embossing Powder, Heat Gun, X-acto Knife, Dimensionals, Glue Dots, Scissors
Technique:  Dry Embossing, Heat Embossing, Paper Tearing

Contact me today if you would like to place an order or to be added onto my mailing list!
My email address- pebbles4@ptd.net
Pin It

Pet Sympathy


Good Morning!  I needed to make a pet sympathy card and I pulled out a retired Stampin' Up! set called 'D is for Dog'.  I haven't used this set much, but I'm so glad I kept it. 

The upper part of my background is dry embossed using my cloudy day embossing folder and the lower half of my background is actually designer series paper that I stamped the paw print on using black ink.  This is a great way to use of some of the paper from the paper stack packs.

I have a black strip of card stock across my card and I made that by punching it using my scallop border punch and I added a row of white dots using my white gel pen all along the scallops.

My main puppy image was created by stamping the dog and then I added some green grass along the puppy's feet using my certainly celery marker.  Then I used my spritzer tool and a black marker and I spritzed all around the puppy image.  Next, I added some rhinestone gems for the collar and I stamped and cut out the dog bone.  My puppy image layer is placed on my card using dimensionals.

To finish the front of my card I added some white ribbon and my sentiment.  My sentiment also has dimensionals underneath it.  I rarely ever stamp on the inside of my card, but this time I decided to give it a try.  Below is a photo of the inside.


I took the dog paw stamp and I stamped a few paw prints.  Then I used a scrap piece of paper and I used it as a mask to spritz some black ink along the left side and over paw prints.

Thanks so much for stopping by!  I hope you liked my card!  It's going to be a hot one here in PA so it looks like the kids and I will be swimming a lot this week.  Have a great day & stay cool!

Stamps:  D is for Dog
Card Stock:  Black, White, Marina Mist, DSP Subtles Paper Stack
Ink:  Black Stazon, River Rock- for the bone
Supplies:  Ribbon, 7/8" Scallop Circle Punch, 1" Circle Punch, 1 1/8" Circle Punch, Designer label Punch, White Gel Pen, Scallop Border Punch, SU Markers, Big Shot, Cloudy Day Embossing Folder, Rhinestone Gems, Spritzer Tool, Dimensionals
Technique:  Dry Embossing, Spritzing

Contact me today if you would like to place an order or to be added onto my mailing list!
My email address- pebbles4@ptd.net
Pin It

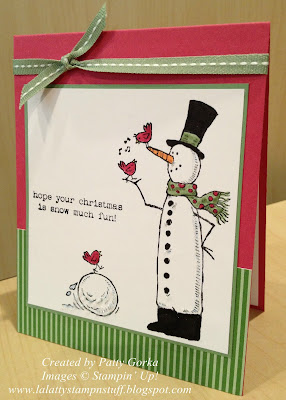
Christmas in July Challenge


Hi everyone!  I know I've been missing for some time now, but I'm still here.  I've been so busy lately and trying to catch up with my stamping.  My daughter just graduated from high school and then I had a party for her.  Now she's busy working and she'll start college in January.  We're also busy training a new puppy- that's always fun..LOL

I'm still very active with my challenge blog and the card I made today is for our Christmas in July challenge.  There's still time to play along since the linky doesn't close until tomorrow (at noon EST) so I hope you'll come play along with us.  You can make any Christmas/Holiday card you'd like.

I kept my card easy and I just stamped the images and colored them using my SU markers.  Then I added some glitter for the snow and I finished off my card using some ribbon and that's it, super quick and easy!

Thanks for stopping by!  Have a great day!

Stamps:  Snow Much Fun
Card Stock:  White, Rose Red, Wild Wasabi, DSP Stack- Wild Wasabi
Ink:  Black Stazon
Supplies: Ribbon, DD Glitter, 2 Way Glue Pen, SU Markers

Contact me today if you would like to place an order or to be added onto my mailing list!
My email address- pebbles4@ptd.net
Pin It