Hi everyone! I've been busy this week so I must apologize for not posting sooner. I wanted to take a moment to thank all of my new followers. If anyone would like to sign up for my monthly newsletter please send me an email at
pebbles4@ptd.net I will be having special offers that I will be giving to my newsletter subscribers only. For those of you who already receive my newsletters be sure to watch for my special email next week!
Also, we only need 16 more followers and I will be giving away a new Simply Score Tool from Stampin' Up! If you would like to enter you need to leave a comment for me on this blog post found here----->
Simple Score Tool Giveaway. If you sign up to receive my newsletters I will enter your name twice. If you already receive my newsletters I will be entering your name twice as well.
I also wanted to let you all know (and I forgot to mention this in my newsletter) I do have Stampin' Up! gift certificates available for anyone who would like to purchase one for a holiday or other gift. I will include a lovely holiday hand stamped card with every gift certificate purchase.
Now on to today's projects. I wanted to make some Christmas cards using the Lovely as a Tree stamp set just to show you how versatile this set it. Lovely as a Tree is one of my favorite sets and it's perfect for so many occasions. I've used it for sympathy, masculine, fall, and Christmas cards too! The two cards I am sharing with you today would be perfect for your holiday cards since these wouldn't require extra postage.
The first card I'm sharing with you is a case of myself. I made a card similar to this one awhile back when I was on the Clean & Simple design team on splitcoast stampers. This time when I made this card I made it even easier.
I simply stamped the tree image using chocolate chip ink and then I stamped some smaller snowflakes using night of navy ink, but I stamped off onto a scrap piece of paper first so that they would appear lighter. Then I did some sponging for my background and next, I punched out my 4 squares. When you are punching the squares to make it appear like a window you will want to try and punch as close to each square as you can.
To complete my card I layered my squares onto my night of navy card stock and and then using a scrap piece of designer series paper I punched the bottom using my scallop border punch and that completed the window look I was going for. My dsp was placed on my card using dimensionsals.
Stamps: Lovely as a Tree, Curly Cute, Merry & Bright- for the small snowflakes
Card Stock: White, Night of Navy, SU DSP
Ink: Night of Navy, Chocolate Chip- for the tree image
Supplies: Stamp-a-ma-jig, Scallop Border Punch, Dimensionals, 1 3/8" Square Punch
Technique: Sponging
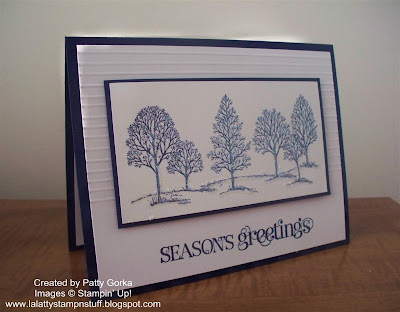
The second card I made uses the same stamp sets and card stock colors, but my card is a little different.
I used night of navy in to stamp the tree image and then I applied a nice amount of dazzling diamonds glitter over the trees using my 2 way glue pen. It's very glittery in person. My tree panel was placed onto my card using dimensionals.
My background is embossed and I created the horizontal lines by using my simply score tool and scoring my lines every 1/4" (another great use for the simply score tool). I only placed the scor lines on the upper half of my background so that the bottom half would be unembossed and I would be able to stamp my sentiment below my main tree image.
Stamps: Lovely as a Tree, Curly Cute
Card Stock: White, Night of Navy
Ink: Night of Navy
Supplies: Simply Score Tool, Stamp-a-ma-jig, 2 Way Glue Pen, Dazzling Diamonds Glitter, Dimensionals
Technique: Dry Embossing
Well, that's about it for today. I'm off to work on a piece of framed art that I started a few days ago. Have a wonderful day!
Contact me today if you would like to place an order or to be added onto my mailing list!


