The 'chain' on my card is my row of stamped images and my card is longer. I made my card so that it would fit into a letter size envelope. My finished card size measures 8 1/2" x 3 1/2".
I began making my card by first stamping my row of circle flower images. I decided to use the soon to be retired in colors on my card (I'm going to miss this group of colors). I used my stamp-a-ma-jig to help me line up the circles. Once my stamping was finished I started assembling my card.
The bottom layer of concord crush card stock is punched using my scallop trim border punch and in-between each scallop I added a white dot using my white gel pen. I used the labels framelits die for my sentiment and instead of ribbon I wanted to add some twine on my card. The center of each flower on my images has a basic pearl and my pear pizzazz panel was dry embossed using my square lattice embossing folder.
I wanted to take a few extra photos to show you how I embossed that panel since it isn't a standard card size and it's bigger than the embossing folder. Below are some pictures of how I accomplished this-
Close your folder and run it through your big shot again. You do not need to crank your card stock all the way through. I only ran it through enough to emboss the other half of my card stock.
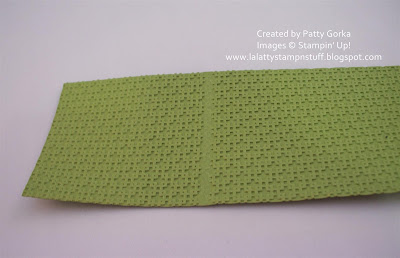
The photo below shows you what your card stock will look like now. You will end up with a portion of your card stock that ended up being flattened from dry embossing the other side of your card stock. I'm going to show you how to fix that!
Take your card stock and place it back inside your folder. Make sure that it is lined up and that the embossed areas are sitting nicely where they belong. You will see what I mean once you try this yourself. Now, once your card stock it back inside the folder use your fingers and press down firmly on the folder to help re-emboss those flattened areas. This will sort of do the trick, but sometimes (especially with this folder) you might need to work those embossed areas back out.
And this is how I make that happen. I used my scoring tool from my simple scoring board and while you leave your card stock on the embossing folder, open up the folder and using the stylus gently push back down the areas that should be debossed. If you need to you can flip your card stock over and place it on the other side of the embossing folder and working on the back side you can gently push down on the debossed areas.
And below is my finished embossed 8 1/2" long piece of dry embossed card stock. I bet you can't even tell where my flattened strip was.
Here is another photo of my finished card. I hope you liked my card today! Believe it or not, this is the first 'long' card that I ever made! I like this size card because it's pretty neat that it fits into a regular letter size envelope. Thanks so much for taking the time to stop by! Have a great rest of the day!
Stamps: Just Believe
Card Stock: White, Concord Crush, Pear Pizzazz, Peach Parfait
Ink: Concord Crush, Pear Pizzazz, Peach Parfait
Supplies: Big Shot, Square Lattice Embossing Folder, Twine, Glue Dots, Labels Collections Framelits Die, Stamp-a-ma-jig, Scallop Trim Border Punch, White Gel Pen, Basic Pearls
Technique: Dry Embossing
Contact me today if you would like to place an order or to be added onto my mailing list!
My Stampin' Up! Website- http://www.stampinup.net/esuite/home/lalatty/
To place your Stampin' Up! order- http://www.stampinup.com/ECWeb/default.aspx
My email address- pebbles4@ptd.net


9 comments:
What beautiful colors and love the design. Thanks for the tutorial, what a great idea!
Wow! Great card and awesome tutorial! I just love visiting your blog! :)
This is a WOW card Patty! I love the circle images and the border punch. Thank you for showing how you did the dry embossing. I would have never thought of this! Great idea :)
Patty--what a graet card! Thank you for sharing how to emboss a long card with a single folder--gret tip!
I love the long chain of flowers and I too will miss these colors!
Well, aren't you clever with that embossing folder I love?!?! I 'need' to get that one!
Super cute card. I love those colors together. Stamped with a ma jig too!
Oh and that little bow.....great job!
Patty, your card is amazing! So beautiful!!!
And THANK YOU for the information on how to emboss a longer piece. That's very helpful!
Beau-ti-ful!!!. Love that colour combo and every detail you put on this lovely card!!!.
Thanks for the neat tip for embossing.
hugs,
Debbie
Thanks for the tip!
Post a Comment