I made this card for this week's splitcoast clean & simple challenge in which we were to create a card using the 'rule of 3' meaning that we needed to have 3 of something on our cards. I'm also submitting this card for the Stampin' Up! only challenge blog found here. For this challenge we were to create Mother's day cards.
I began by punching my card stock for my border. Here I needed 5 punch outs and I used the 3rd position of my Doily Triple Layer Punch. I used a scrap piece of card stock so that's why my top part is cut off- not to worry you won't see that part anyway.
Here I simply placed the punch outs together. I didn't even worry about trying to glue them together. The adhesive in the next step will be enough. I used my grid paper to help me line up the punch outs.
I placed my adhesive along the bottom portion of my white card stock and then all I needed to do was to neatly lay it on top of my punch out pieces.
Next, all you need to do is to trim off the excess card stock along the ends. I used my paper snips for this and that's all there is to creating a border using your triple layer punch!
Now for my flower images. I used the smallest flower image on my Inspired by Nature flower stamp. I simply colored that part of the stamp using my SU markers and then I stamped it onto my card stock.
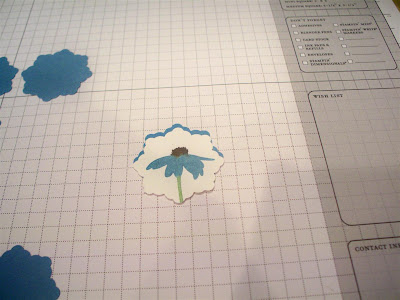
Next, I punched out the flower using my Doily Triple Layer Punch (in the first position). I did this for a total of three times. Then to create my background layer I needed to punch out 6 peices of Marina Mist card stock.
Once I had all my pieces punched out it was time to start putting them together. I positioned my flower image layer on my Marina Mist background so that just a little bit of the border was showing along the top portion.
Then I took another Marina Mist punch out and I placed that piece just along the bottom part of my stamped image so that just a bit of the border would be showing. Both pieces of Marina Mist card stock will overlap each other on the back side, but you won't see that part once your card is completed.
And here is my finished card. My three flowers are raised up using SU dimensionals. The upper portion of my background was embossed using my Big Shot and my Polka Dots embossing folder. My Mother's Day sentiment is from the hostess stamp set called Something to Celebrate.
Thank you so much for stopping by. I hope you liked my card! Have a great rest of the day. It's getting warm here today and I'm just about to turn on the air conditioner.
Stamps: Inspired By Nature, Something to Celebrate
Card Stock: White, Marina Mist, Wild Wasabi
Ink: Early Espresso
Supplies: Ribbon, SU Markers, Doily Triple Layer Punch, Big Shot, Polka Dots Embossing Folder, Dimensionals, Stamp-a-ma-jig
Technique: Dry Embossing
Contact me today if you would like to place an order or to be added onto my mailing list!
My Stampin' Up! Website- http://www.stampinup.net/esuite/home/lalatty/
To place your Stampin' Up! order- http://www.stampinup.com/ECWeb/default.aspx
My email address- pebbles4@ptd.net


7 comments:
Ooooh, I love the fun stuff you did with the new punch! Thanks for playing SUO Challenges.
Adore your card ... beautifully done! Great tutorial on creating this gem!
I did not know you were a SU demo- I love this great card- Love the border punch you created. Beautiful!
Gorgeous card! You should enter it into the Hand Stamped Sentiments challenge for this week. They're doing a Mother's Day theme too.
Beautiful card, love how you did the border.
Creative use of that new SU punch! Thanks for joining us at SUO Challenges.
Great use of the new punch! Thanks for giving us the "how-to". Beautiful colors and stamp choice too. So glad you joined us at SUO Challenges!
Post a Comment